Attack on AWS Bedrock’s ‘Titan’
October 17, 2024


Introduction
Before the rise of AI-generated media, verifying digital content’s authenticity could often be performed by eye. A doctored image or edited video had perceptible flaws that appeared out of place or firmly in the uncanny valley, whether created by hobbyist or professional film studio. However, the rapid emergence of deepfakes in the early 2010s changed everything, enabling the effortless creation of highly manipulated content using AI. This shift made it increasingly difficult to distinguish between genuine and manipulated media, calling into question the trust we place in digital content.
Deepfakes, however, were only the beginning. Today, media in any modality can be generated by AI models in seconds at the click of a button. The internet is chock-full of AI-generated content to the point that industry and regulators are investigating methods of tracking and labeling AI-generated content. One such approach is ‘watermarking’ - effectively embedding a hidden but detectable code into the media content that can later be authenticated and verified.;
One early mover, AWS, took a commendable step to watermark the digital content produced by their image-generation AI model ‘Titan’, and created a publicly available service to verify and authenticate the watermark. Despite best intentions, these watermarks were vulnerable to attack, enabling an attacker to leverage the trust that users place in them to create disruptive narratives through misinformation by adding watermarks to arbitrary images and removing watermarks on generated content.
As the spread of misinformation is increasingly becoming a topic of concern our team began investigating how susceptible watermarking systems are to attack. With the launch of AWS’s vulnerability disclosure program, we set our sights on the Titan image generator and got to work.
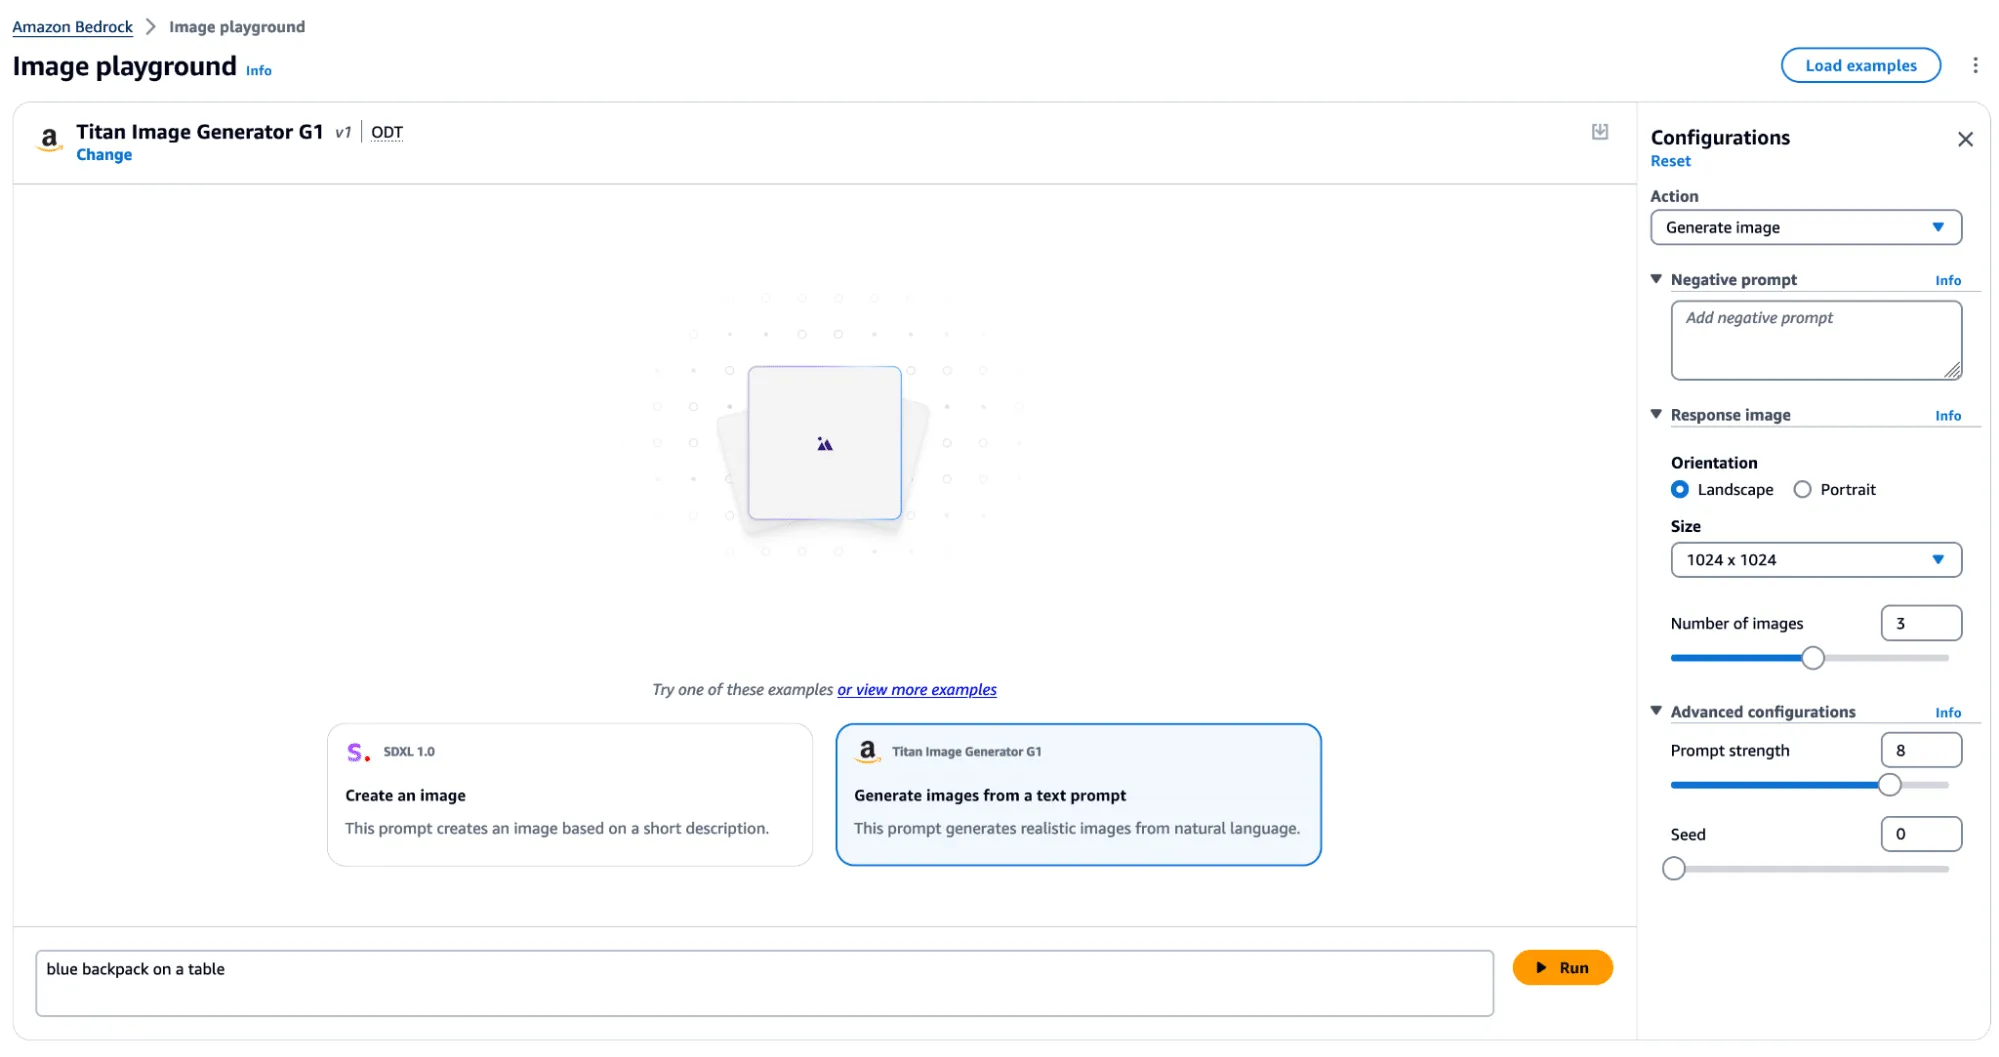
The Titan Image Generator
The Titan Image Generator is accessible via Amazon Bedrock and is available in two versions, V1 and V2. For our testing, we focused on the V1 version of this model - though the vulnerability existed in both versions. Per the documentation, Titan is built with responsible AI in mind and will reject requests to generate illicit or harmful content, and if said content is detected in the output, it will filter the output to the end user. Most relevantly, the service also uses other protections, such as watermarking on generated output and C2PA metadata to track content provenance and authenticity.
In typical use, several actions can be performed, including image and variation generation, object removal and replacement, and background removal. Any image generated or altered using these features will result in the output having a watermark applied across the entire image.
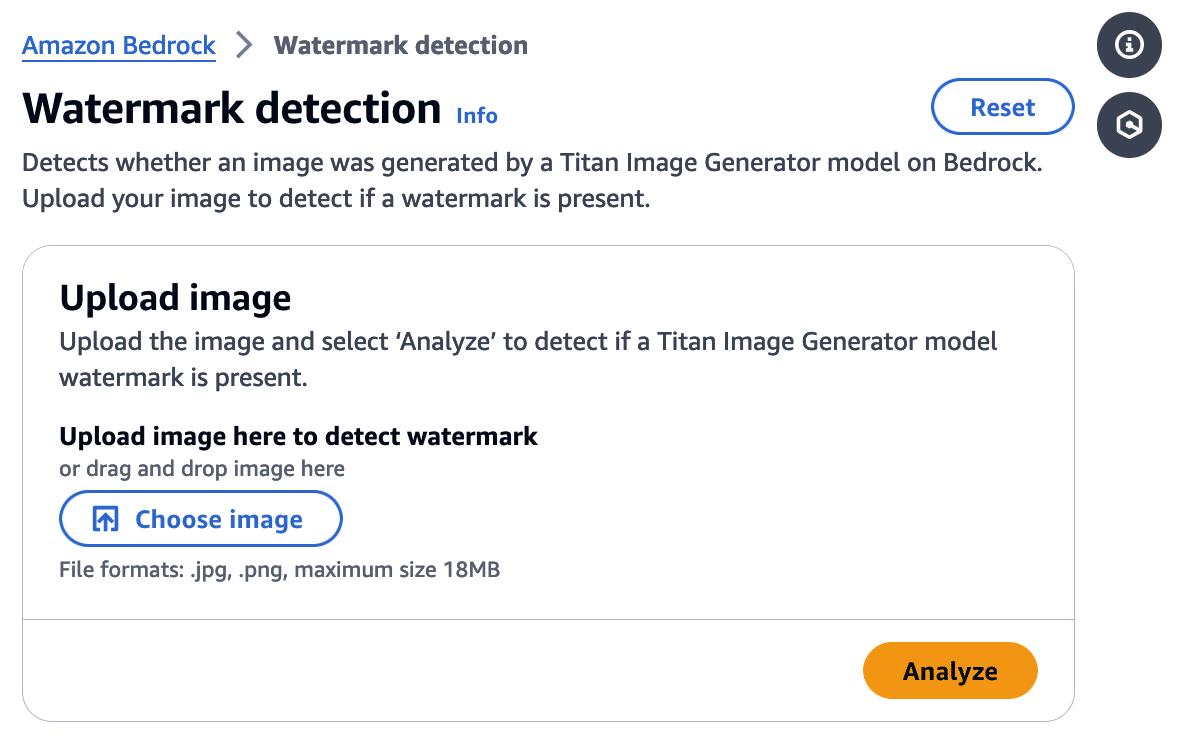
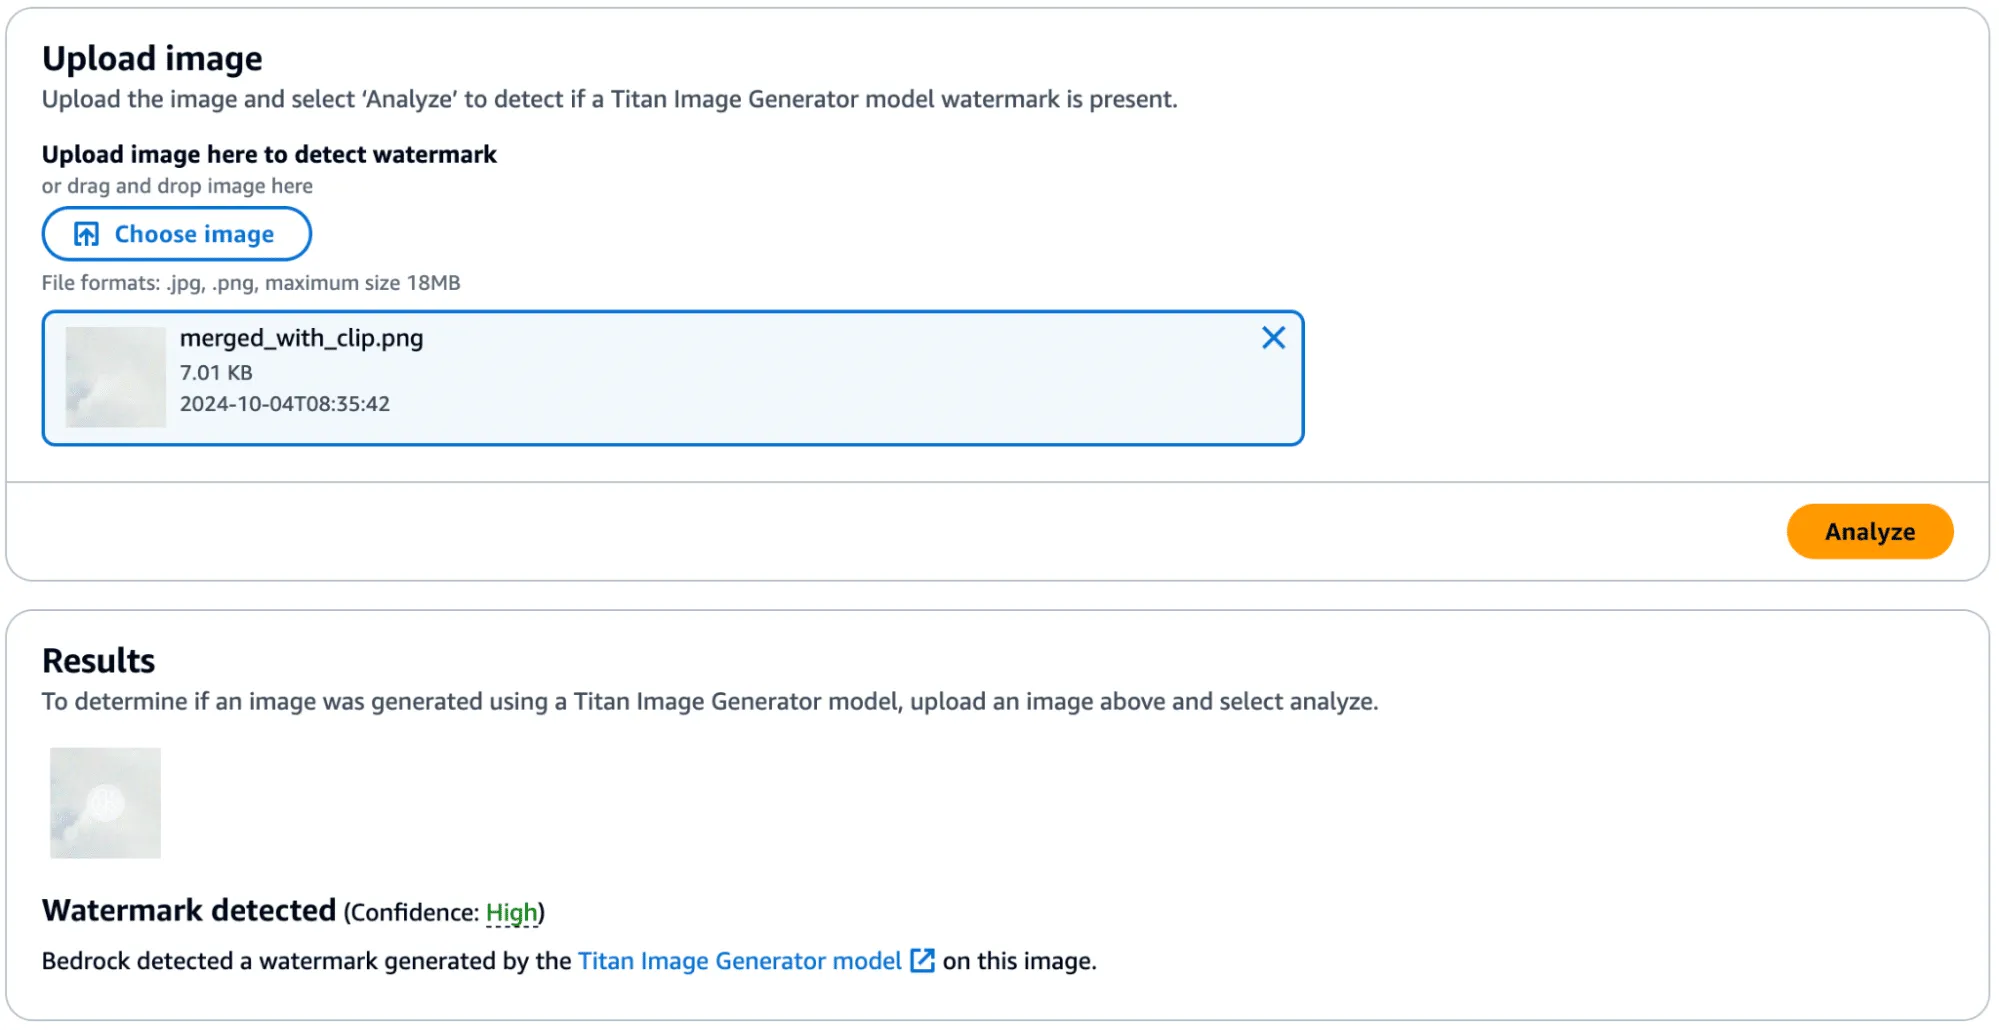
Watermark Detection
The watermark detection service allows users to upload an image and verify if it was watermarked by the Titan Image Generator. If a watermark is detected, it will return one of four confidence levels:
- Watermark NOT detected
- Low
- Medium
- High
The watermark detection service would act as our signal for a successful attack. If it is possible to apply a watermark to any arbitrary image, an attacker could leverage AWS’ trusted reputation to create and spread ‘authentic’ misinformation by manipulating a real-world image to make it verifiably AI-generated. Now that we had defined our success criteria for exploitation, we began our research.
First, we needed to isolate the watermark.
Extracting the Watermark
Looking at our available actions, we quickly realized several would not allow us to extract a watermark.
‘Generate image’, for instance, takes a text prompt as input and generates an image. The issue here is that the watermark comes baked into the generated image, and we have no way to isolate the watermark. While ‘Generate variations’ takes in an input image as a starting point, the variations are so wildly different from the original that we end up in a similar situation.
However, there was one action that we could leverage for our goals.
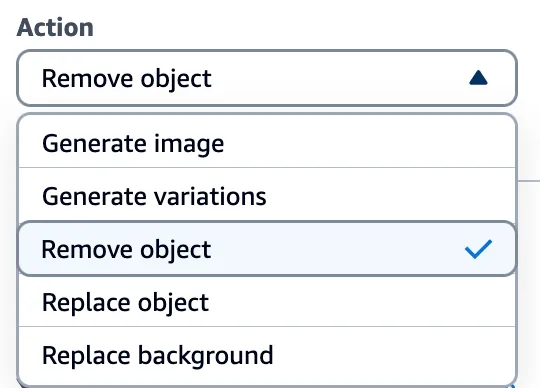
Through the ‘Remove object’ option in Titan, we could target a specific part of an image (i.e., an object) and remove it while leaving the rest of the image intact. While only a tiny portion of the image was altered, the entire image now had a watermark applied. This enabled us to subtract the original image from the watermarked image and isolate a mostly clear representation of the watermark. We refer to this as the ‘watermark mask’.
Cleanly represented, we apply the following process:
Watermarked Image With Object Removed - Original Image = Watermark Mask
Let’s visualize this process in action.

Removing an object, as shown in Figure 4, produces the following result:

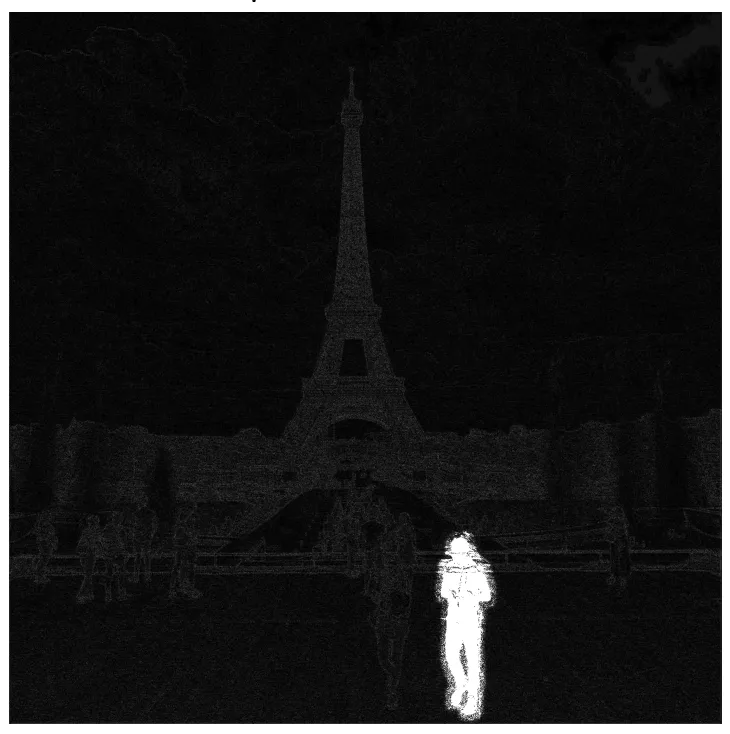
In the above image, the removed man is evident; however, the watermark applied over the entire image is only visible by greatly amplifying the difference. If you squint, you can just about make out the Eiffel Tower in the watermark, but let's amplify it even more.;
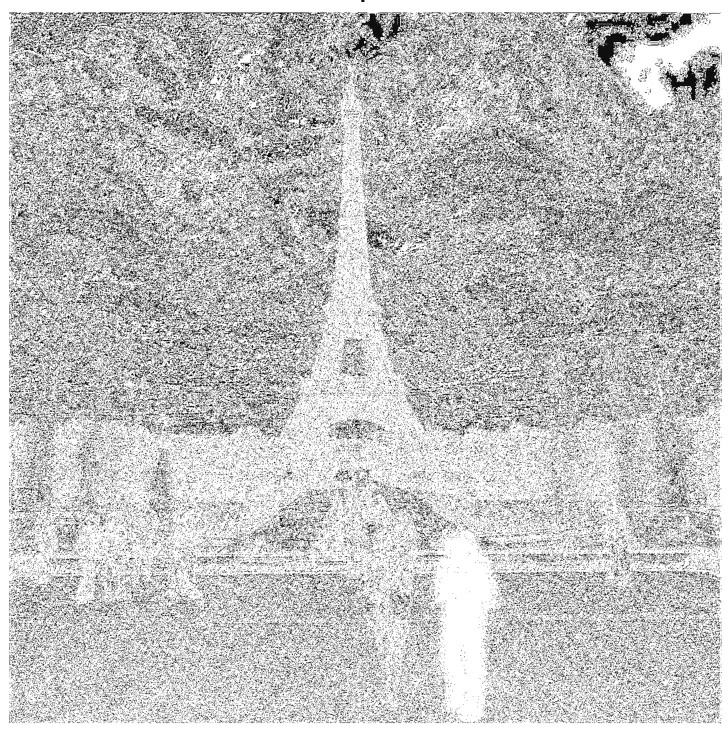
When we visualize the watermark mask like this, we can see something striking - the watermark is not uniformly applied but follows the edges of objects in the image. We can also see the removed object show up quite starkly. While we were able to use this watermark mask and apply it back to the original image, we were left with a perceptible change as the man with the green jacket had been removed.
So, was there anything we could do to fix that?
Re-applying the Watermark
To achieve our goal of extracting a visually undetectable watermark, we effectively cut the section with the most significant modification out by specifying a bounding box of an area to remove. In this instance, we selected the coordinates (820, 1000) and (990,1400) and excluded the pixels around the object that were removed when we applied our modified mask to the original image.
As a side note, we noticed that applying the entire watermark mask would occasionally leave artifacts in the images. Hence, we clipped all pixel values between 0 and 255 to remove visual artifacts from the final result.

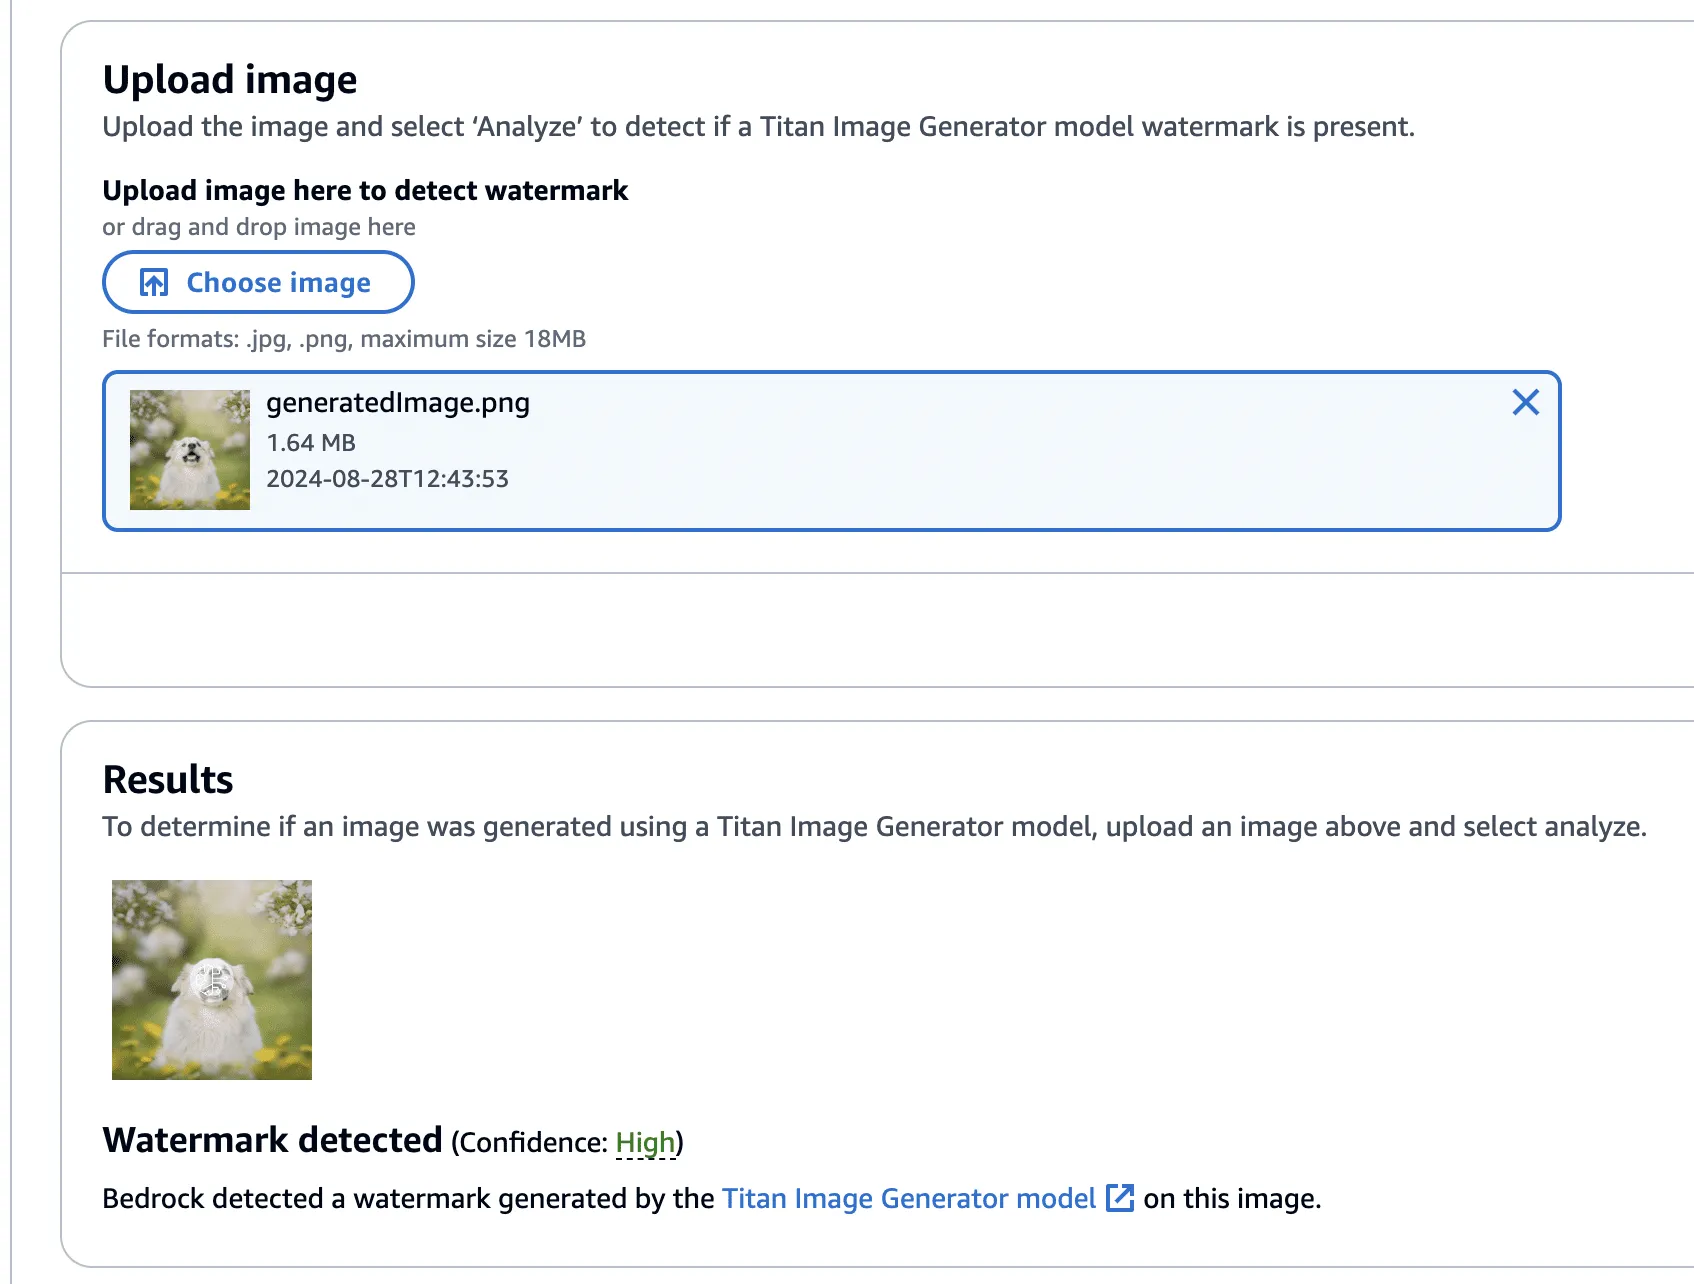
Now that we have created an imperceptibly modified, watermarked version of our original image, all that’s left is to submit it to the watermark detector to see if it works.;
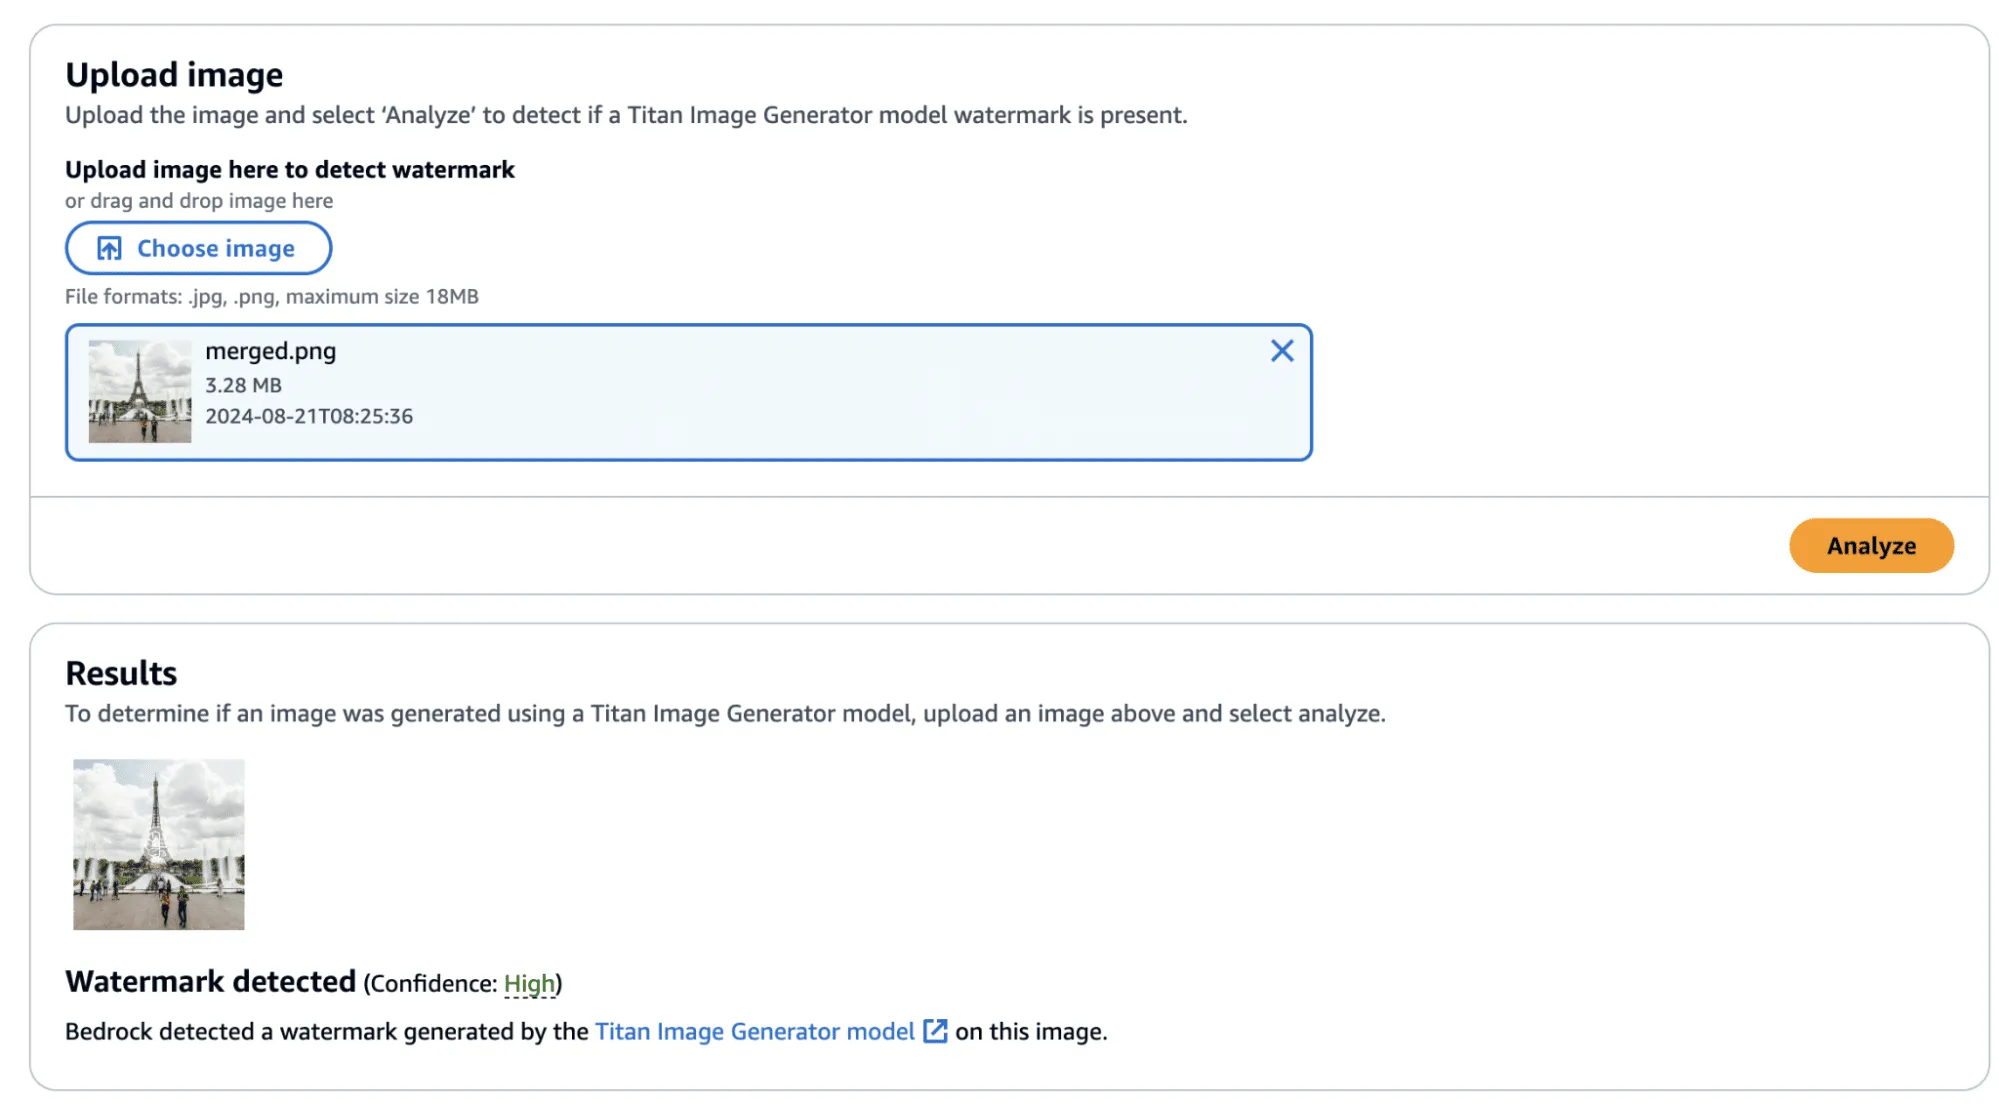
Success! The confidence came back as ‘High’—though, there was one additional question that we sought an answer to: Could we apply this watermarked difference to other images?;
Before we answer this question, we provide the code to perform this process, including the application of the watermark mask to the original image.
import sys
import json
from PIL import Image
import numpy as np

def load_image(image_path):
    return np.array(Image.open(image_path))

def apply_differences_with_exclusion(image1, image2, exclusion_area):
    x1, x2, y1, y2 = exclusion_area

    # Calculate the difference between image1 and image2
    difference = image2 - image1

    # Apply the difference to image1
    merged_image = image1 + difference

    # Exclude the specified area
    merged_image[y1:y2, x1:x2] = image1[y1:y2, x1:x2]

    # Ensure the values are within the valid range [0, 255]
    merged_image = np.clip(merged_image, 0, 255).astype(np.uint8)

    return merged_image

def main():

    # Set variables
    original_path = "./image.png"
    masked_path = "./photo_without_man.png"
    remove_area = [820, 1000, 990, 1400]

    # Load the images
    image1 = load_image(original_path)
    image2 = load_image(masked_path)

    # Ensure the images have the same dimensions
    if image1.shape != image2.shape:
        print("Error: Images must have the same dimensions.")
        sys.exit(1)

    # Apply the differences and save the result
    merged_image = apply_differences_with_exclusion(image1, image2, remove_area)
    Image.fromarray(merged_image).save("./merged.png")

if __name__ == "__main__":
    main()
Exploring Watermarking
At this point, we had identified several interesting properties of the watermarking process:
- A user can quickly obtain a watermarked version of an image with visually imperceptible deviations from the original image.
- If an image is modified, the watermark is applied to the whole image, not just the modified area.
- The watermark appears to follow the edges of objects in the image.
This was great, and we had made progress. However, we still had some questions that we were yet to answer:
- Does the watermark require the entire image to validate?
- If subsections of the image validate, how small can we make them?
- Can we apply watermarks from one image to another?
We began by cropping one of our test images and found that the watermark persisted even if the entire image was not represented. Taking this a step further, we began breaking down the images into increasingly smaller subsections. We found that a watermarked image with a size of 32x32 would (mostly) be detected as a valid image, meaning that the watermark could be highly local - which was a very interesting property.
In the image below, we have a tiny representation of the spokes of a bike wheel that has been successfully validated.;
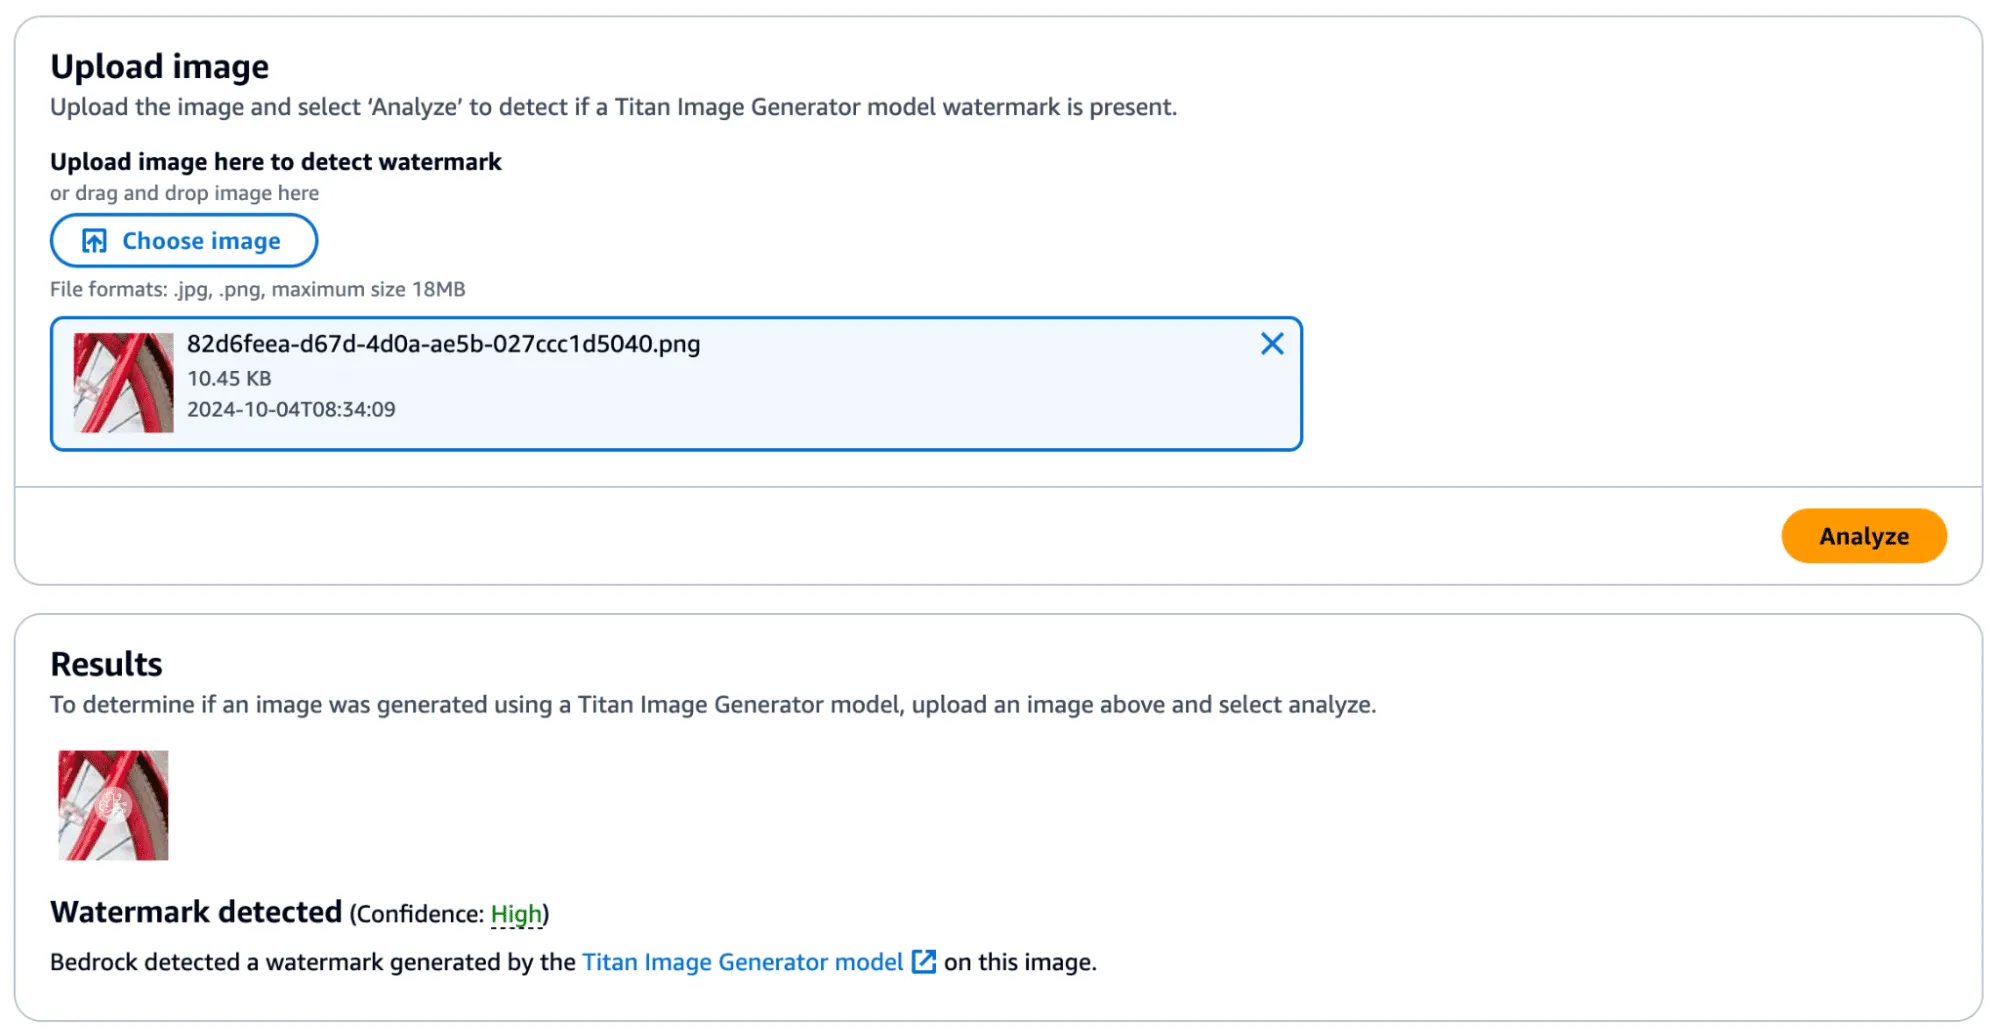
Next, we extracted the watermark mask from this image and applied it to another.
We achieved this by taking a subsection of an image without a watermark (and without many edges) and applied the mask to it to see if it would transfer. First, we show that the watermark was not applied:
Success! In the below image, you can see the faint outline of the bike spokes on the target image, shown in the middle.
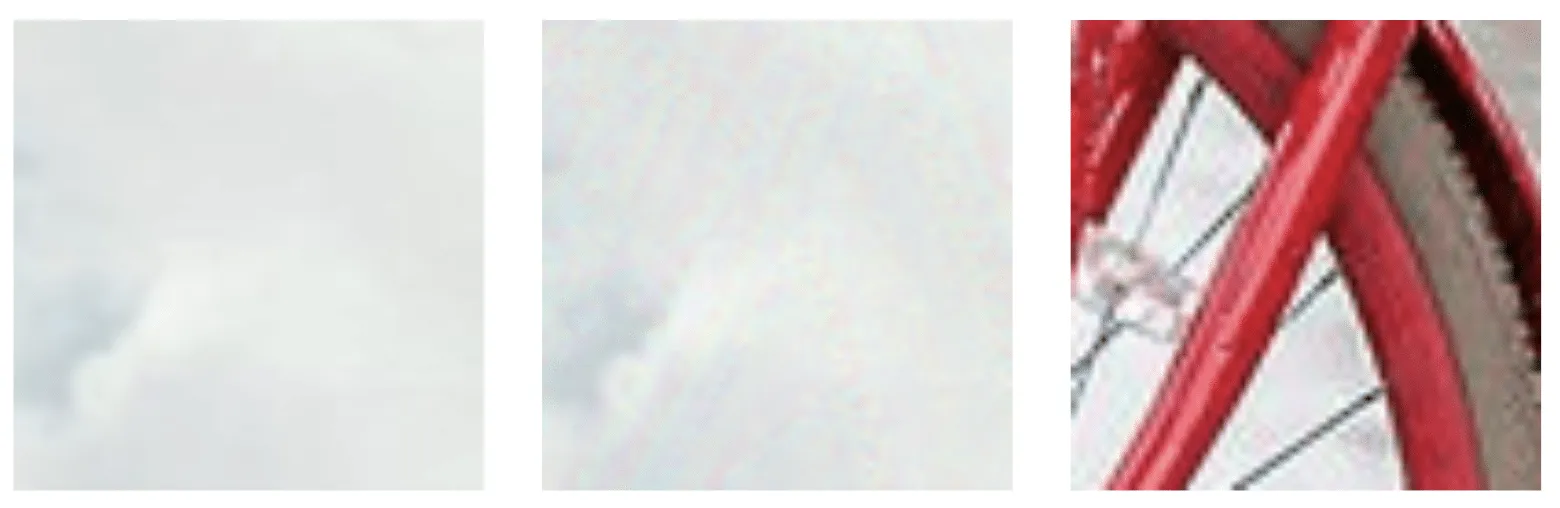
There was one catch, however - during more intensive testing we found that the watermark transfer will only succeed if the target image has minimal edge definition to not corrupt the edges defined in the watermark mask. Additionally, applying a watermark from one image to another would work if they were highly similar regarding edge profile.
Watermark Removal
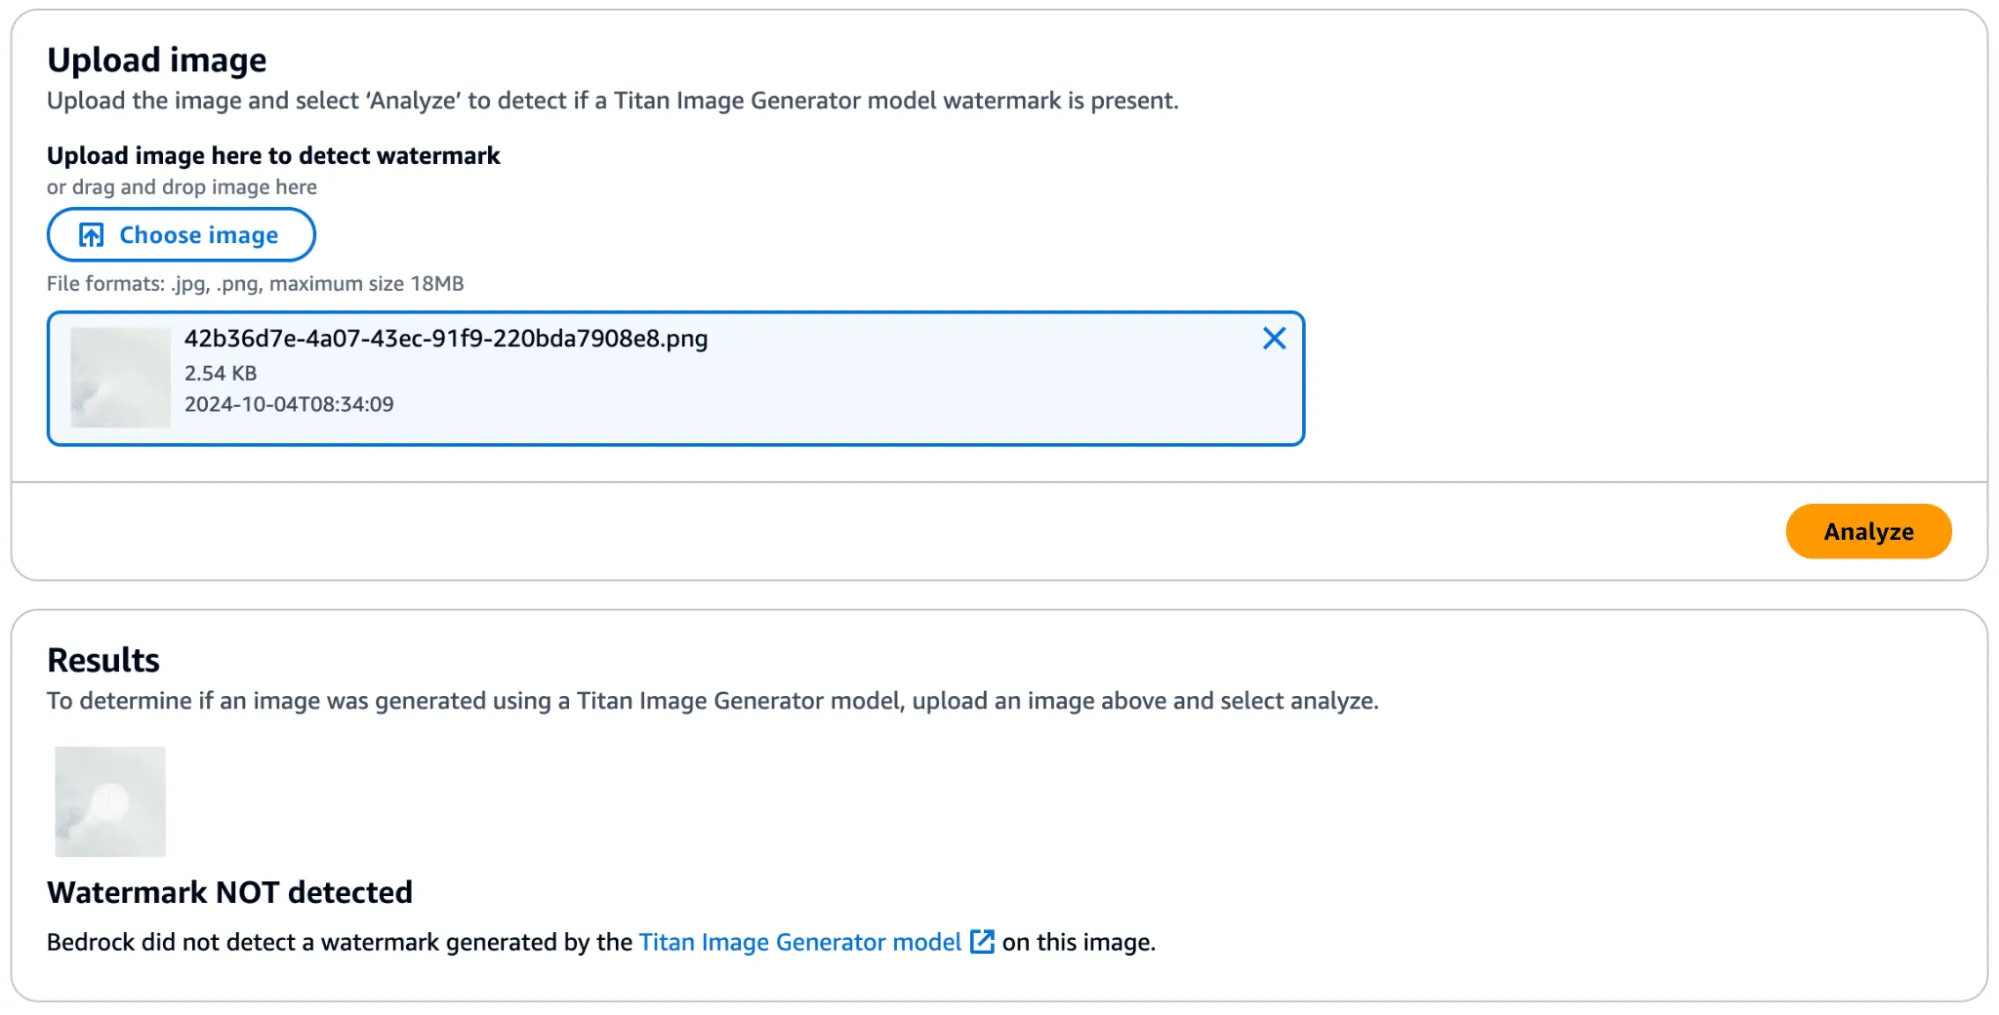
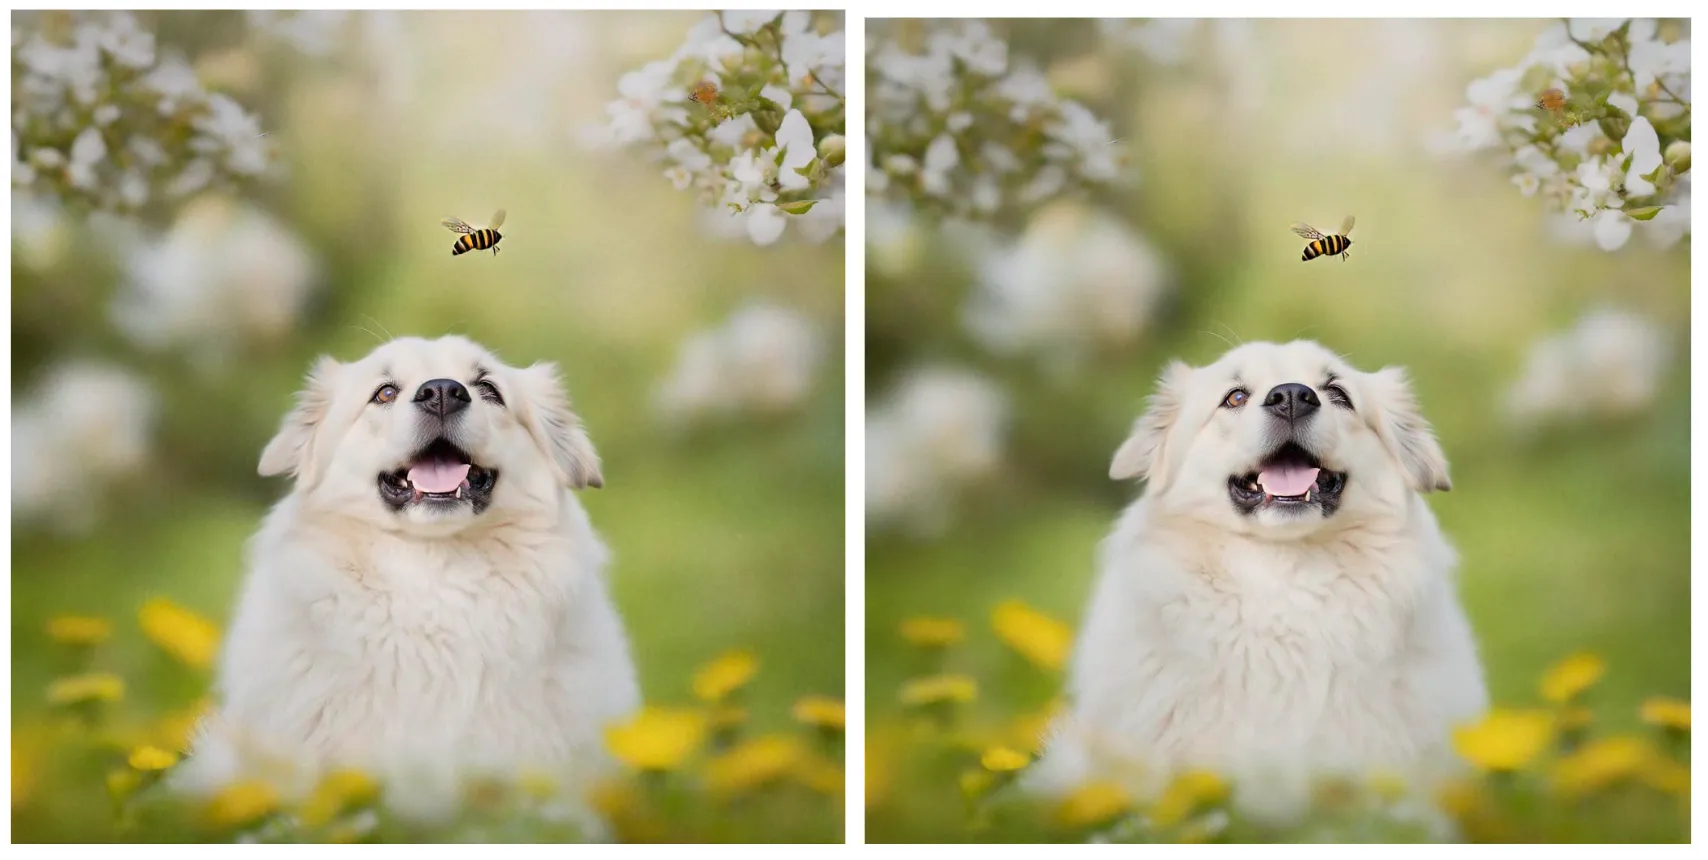
So far, we have focused on applying watermarks to non-generated content, but what about removing watermarks from Titan-generated content? We found that this, too, was possible by performing similar steps. We began by taking an entirely AI-generated image from Titan, which was created using the ‘Generate Image’ action.

This image was validated against the watermark detection service with high confidence, as we would have expected.
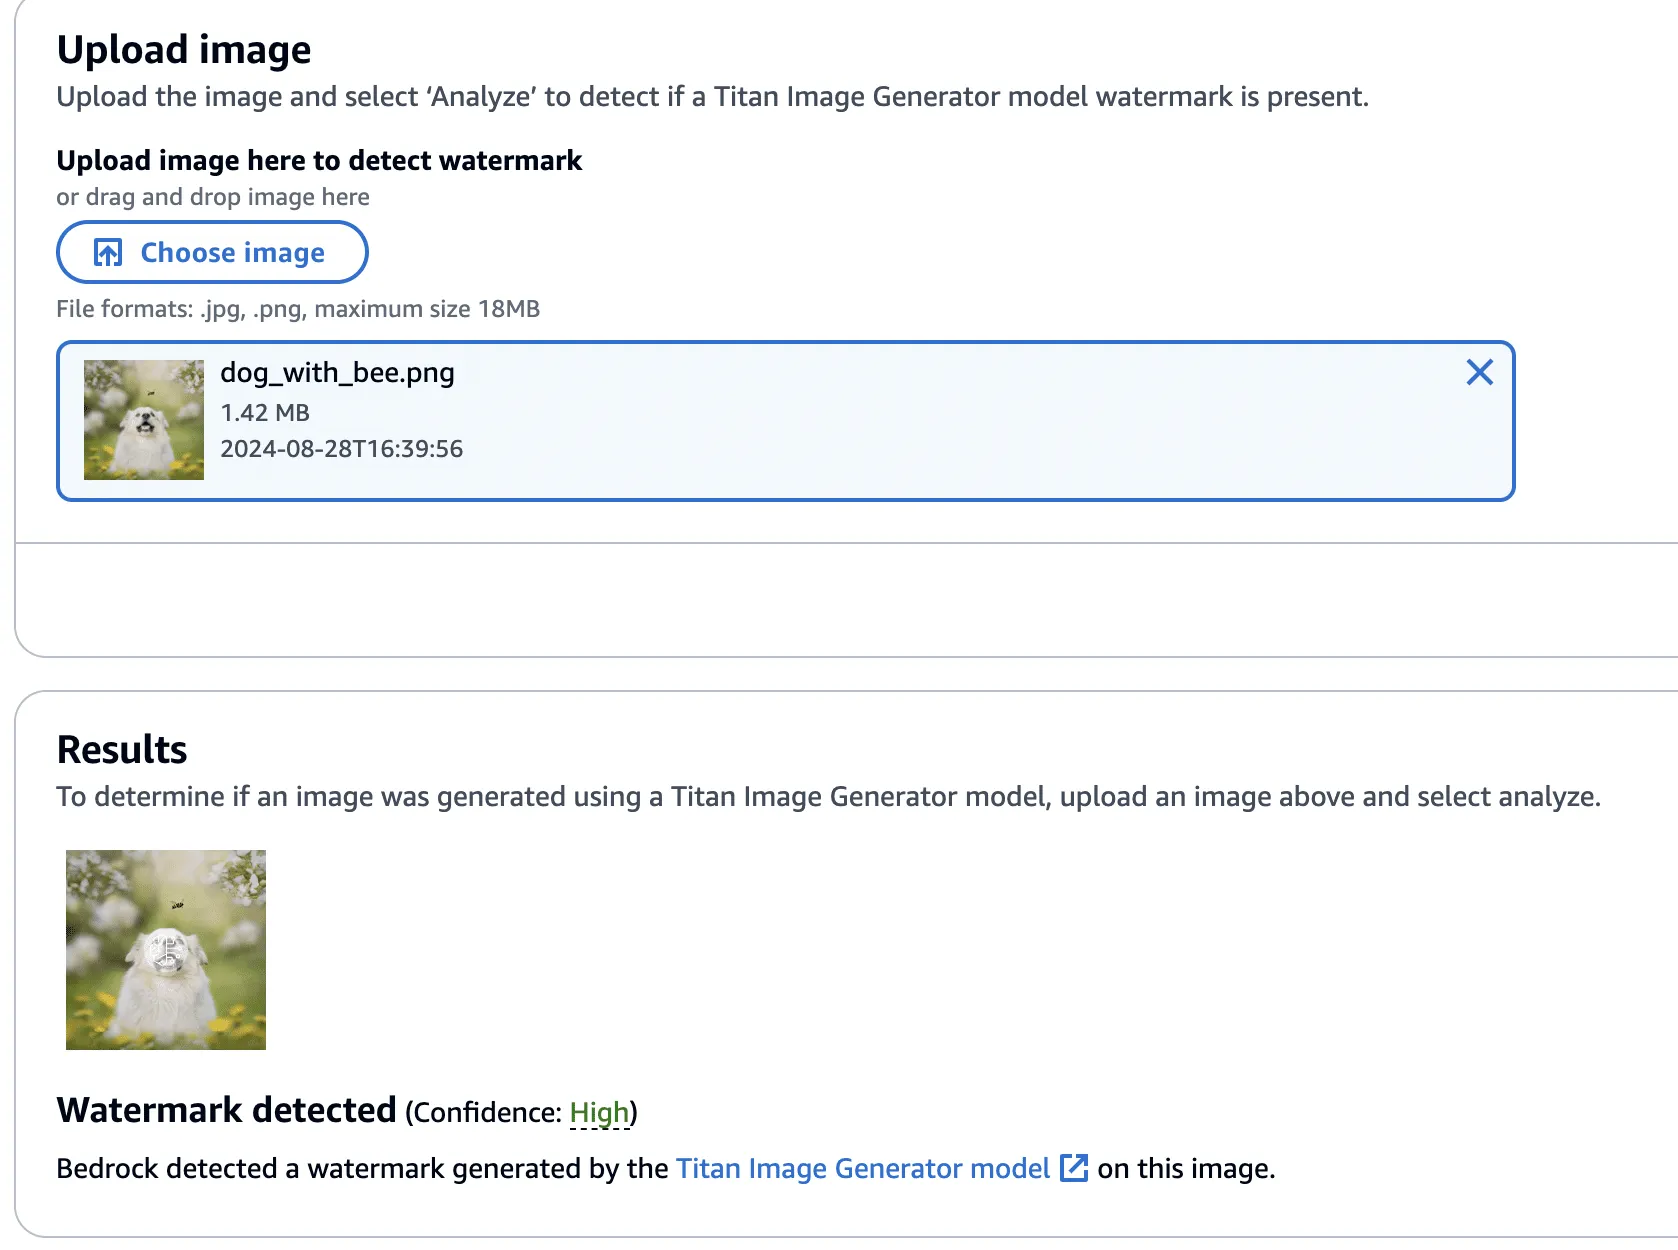
Next, we created a version of the image without the bee, using the ‘Remove Object’ action as in our previous examples.
This image’s watermark was also validated against the watermark detection service.
Now, using this image with the bee removed, we isolated the watermark as we had before - this time using the Titan-generated image (with the bee!) in place of our real photograph. However, instead of adding the mask to the Titan-generated image, it will be subtracted - twice! This has the effect of imperceptibly removing the watermark from the original image.
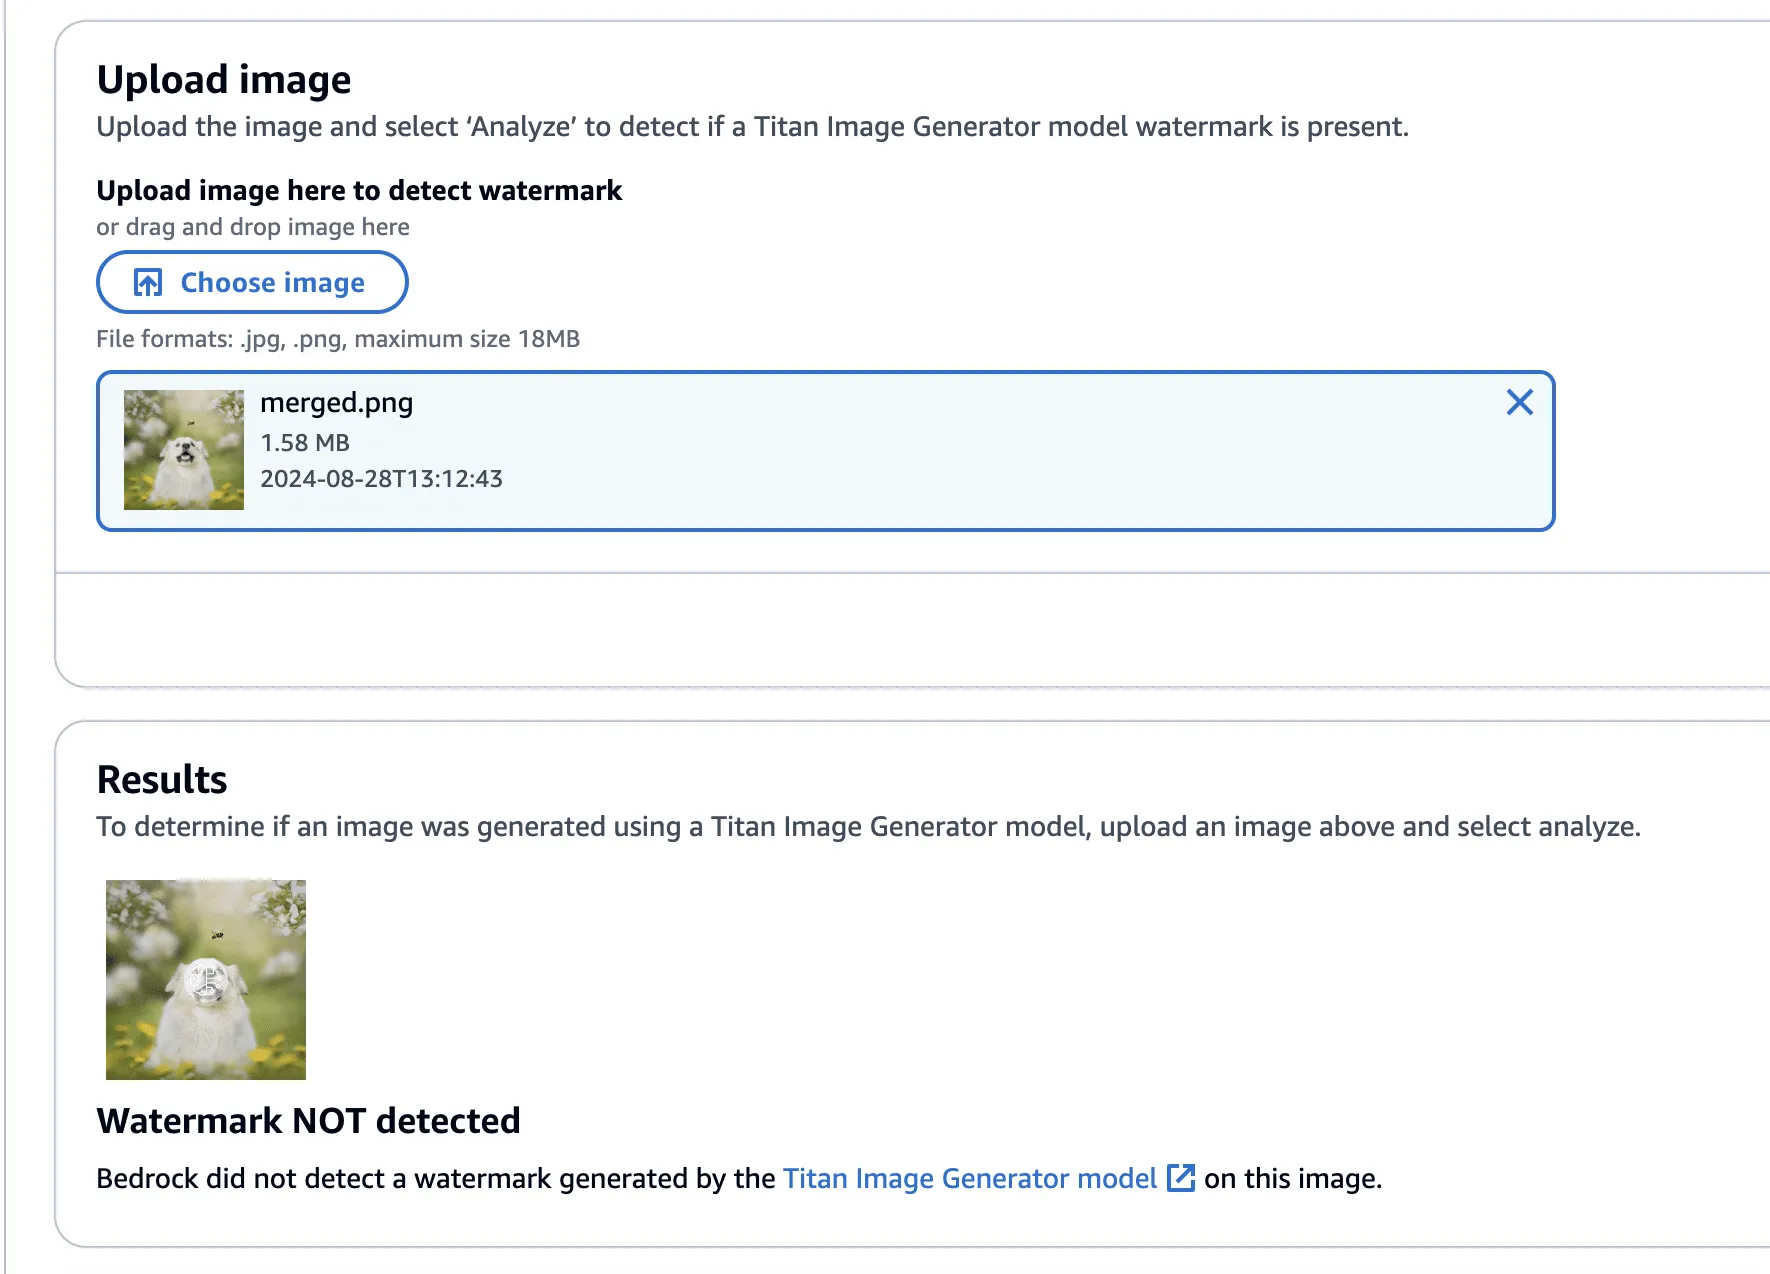
Lastly, one final check to show that the watermark has been removed.
The code to perform the watermark removal is defined in the function below:
def apply_differences_with_exclusion(image1, image2, exclusion_area):
    x1, x2, y1, y2 = exclusion_area

    # Calculate the difference between image1 and image2
    difference = image2 - image1

    # Apply the difference to image1
    merged_image = image1 - (difference * 2)

    # Exclude the specified area
    merged_image[y1:y2, x1:x2] = image1[y1:y2, x1:x2]

    # Check for extreme values and revert to original pixel if found
    extreme_mask = (merged_image < 10) | (merged_image > 245)
    merged_image[extreme_mask] = image1[extreme_mask]

    # Ensure the values are within the valid range [0, 255]
    merged_image = np.clip(merged_image, 0, 255).astype(np.uint8)

return merged_imageConclusion
A software vulnerability is often perceived as something akin to code execution, buffer overflow, or something that somehow leads to a computer's compromise; however, as AI evolves, so do vulnerabilities, forcing researchers to constantly reevaluate what might be considered a vulnerability. Manipulating watermarks in images does not result in arbitrary code execution or create a pathway to achieve it, and certainly doesn’t allow an attacker to “hack the mainframe.” What it does provide is the ability to potentially sway people's minds, affecting their perception of reality and using their trust in safeguards against them.
As AI becomes more sophisticated, AI model security is crucial to addressing how adversarial techniques could exploit vulnerabilities in machine learning systems, impacting their reliability and integrity.
When coupled with bot networks, the ability to distribute verifiably “fake” versions of an authentic image could cast doubt on whether or not an actual event has occurred. Attackers could make a tragedy appear as if it was faked or take an incriminating photo and make people doubt its veracity. Likewise, the ability to generate an image and verify it as an actual image could easily allow misinformation to spread.;
Distinguishing fact from fiction in our digital world is a difficult challenge, as is ensuring the ethical, safe, and secure use of AI. We would like to extend our thanks to AWS for their prompt communication and quick reaction. The vulnerabilities described above have all been fixed, and patches have been released to all AWS customers.
AWS provided the following quote following their remediation of the vulnerabilities in our disclosure:
“AWS is aware of an issue with Amazon Titan Image Generator’s watermarking feature. On 2024-09-13, we released a code change modifying the watermarking approach to apply watermarks only to the areas of an image that have been modified by the Amazon Titan Image Generator, even for images not originally generated by Titan. This is intended to prevent the extraction of watermark “masks” that can be applied to arbitrary images. There is no customer action required.
We would like to thank HiddenLayer for responsibly disclosing this issue and collaborating with AWS through the coordinated vulnerability disclosure process.”
Related Research


Exploring the Security Risks of AI Assistants like OpenClaw
OpenClaw (formerly Moltbot and ClawdBot) is a viral, open-source autonomous AI assistant designed to execute complex digital tasks, such as managing calendars, automating web browsing, and running system commands, directly from a user's local hardware. Released in late 2025 by developer Peter Steinberger, it rapidly gained over 100,000 GitHub stars, becoming one of the fastest-growing open-source projects in history. While it offers powerful "24/7 personal assistant" capabilities through integrations with platforms like WhatsApp and Telegram, it has faced significant scrutiny for security vulnerabilities, including exposed user dashboards and a susceptibility to prompt injection attacks that can lead to arbitrary code execution, credential theft and data exfiltration, account hijacking, persistent backdoors via local memory, and system sabotage.

Agentic ShadowLogic
Agentic ShadowLogic is a sophisticated graph-level backdoor that hijacks an AI model's tool-calling mechanism to perform silent man-in-the-middle attacks, allowing attackers to intercept, log, and manipulate sensitive API requests and data transfers while maintaining a perfectly normal conversational appearance for the user.


Stay Ahead of AI Security Risks
Get research-driven insights, emerging threat analysis, and practical guidance on securing AI systems—delivered to your inbox.