AI’ll Be Watching You
August 9, 2024
min read


Summary
HiddenLayer researchers have recently conducted security research on edge AI devices, largely from an exploratory perspective, to map out libraries, model formats, neural network accelerators, and system and inference processes. This blog focuses on one of the most readily accessible series of cameras developed by Wyze, the Wyze Cam. In the first part of this blog series, our researchers will take you on a journey exploring the firmware, binaries, vulnerabilities, and tools they leveraged to start conducting inference attacks against the on-device person detection model referred to as “Edge AI.”
Introduction
The line between our physical and digital worlds is becoming increasingly blurred, with more of our lives being lived and influenced through an assortment of devices, screens, and sensors than ever before. Advancements in AI have exacerbated this, automating many arduous tasks that would have typically required explicit human oversight – such as the humble security camera.
As part of our mission to secure AI systems, the team set out to identify technologies at the ‘Edge’ and investigate how attacks on AI may transcend the digital domain – into the physical. AI-enabled cameras, which detect human movement through on-device AI models, stood out as an archetypal example. The Wyze Cam, an affordable smart security camera, boasts on-device Edge AI for person detection, which helps monitor your home and keep a watchful eye for shady characters like porch pirates.
Throughout this multi-part blog, we will take you on a journey as we physically realize AI attacks through the most recent versions of the AI-enabled Wyze camera – finding vulnerabilities to root the device, uploading malicious packages through QR codes, and attacking the underlying model that runs on the device.
This research was presented at the DEFCON AIVillage 2024.
Wyze
Wyze was founded in 2017 and offers a wide range of smart products, from cameras to access control solutions and much more. Although Wyze produces several different types of cameras, we will focus on three versions of the Wyze Cam, listed in the table below.

Rooting the V3 Camera
To begin our investigation, we first looked for available firmware binaries or public source code to understand how others have previously targeted and/or exploited the cameras. Luckily, Wyze made this task trivial as they publicly post firmware versions of their devices on their website.
Thanks to the easily accessible firmware, there were several open-source projects dedicated to reverse engineering and gaining a shell on Wyze devices, most notably WyzeHacks, and wz_mini_hacks. Wyze was also a device targeted in the 2023 Toronto Pwn2Own competition, which led to working exploits for older versions of the Wyze firmware being posted on GitHub.
We were able to use wz_mini_hacks to get a root shell on an older firmware version of the V3 camera so that we would be better able to explore the device.
Overview of the Wyze filesystem
Now that we had root-level access to the V3 camera and access to multiple versions of the firmware, we set out to map it to identify its most important components and find any inconsistencies between the firmware and the actual device. During this exploratory process, we came across several interesting binaries, with the binary iCamera becoming a primary focus:
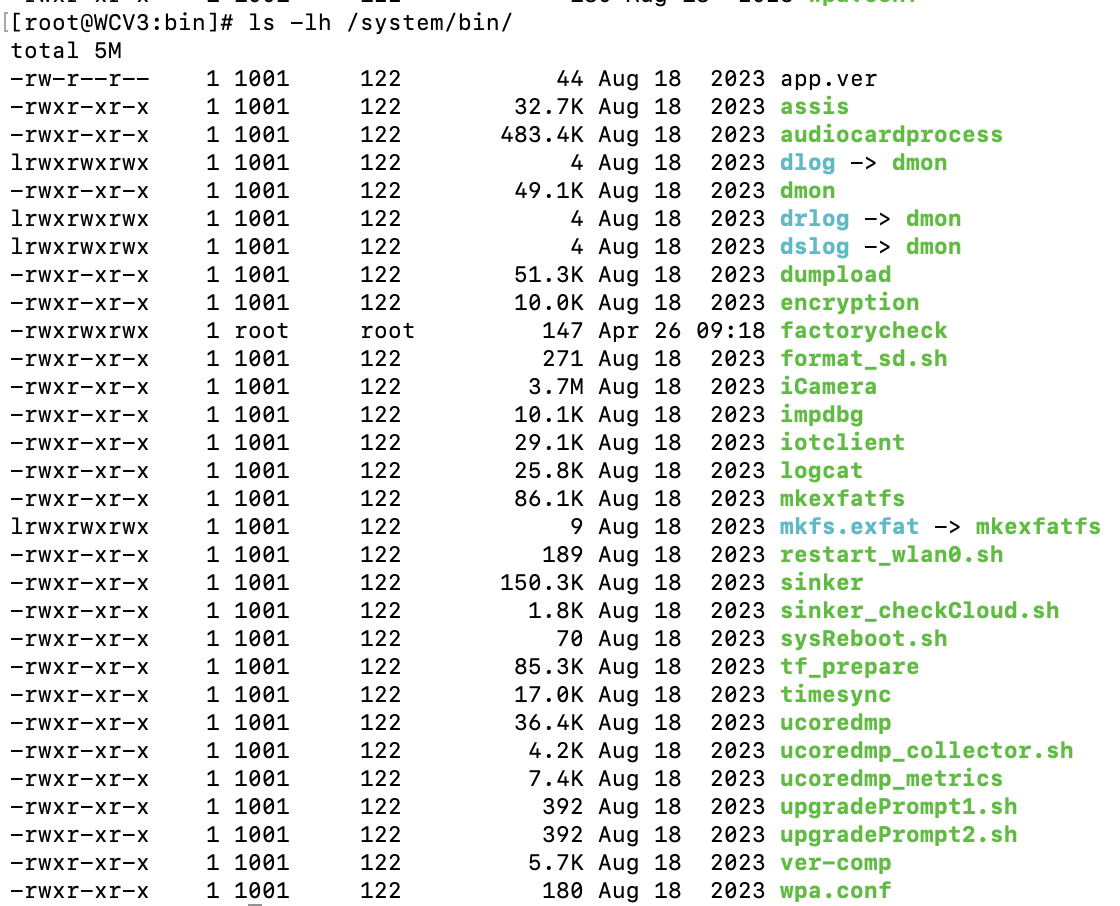
We found that iCamera plays a pivotal role in the camera’s operation, acting as the main binary that controls all processes for the camera. It handles the device’s core functionality by interacting with several Wyze libraries, making it a key element in understanding the camera’s inner workings and identifying potential vulnerabilities.
Interestingly, while investigating the filesystem for inconsistencies between the firmware downloaded from the Wyze website and the device, we encountered a directory called /tmp/edgeai, which caught our attention as the on-device person detection model was marketed as ‘Edge AI.’
Edge AI
What’s in the EdgeAI Directory?
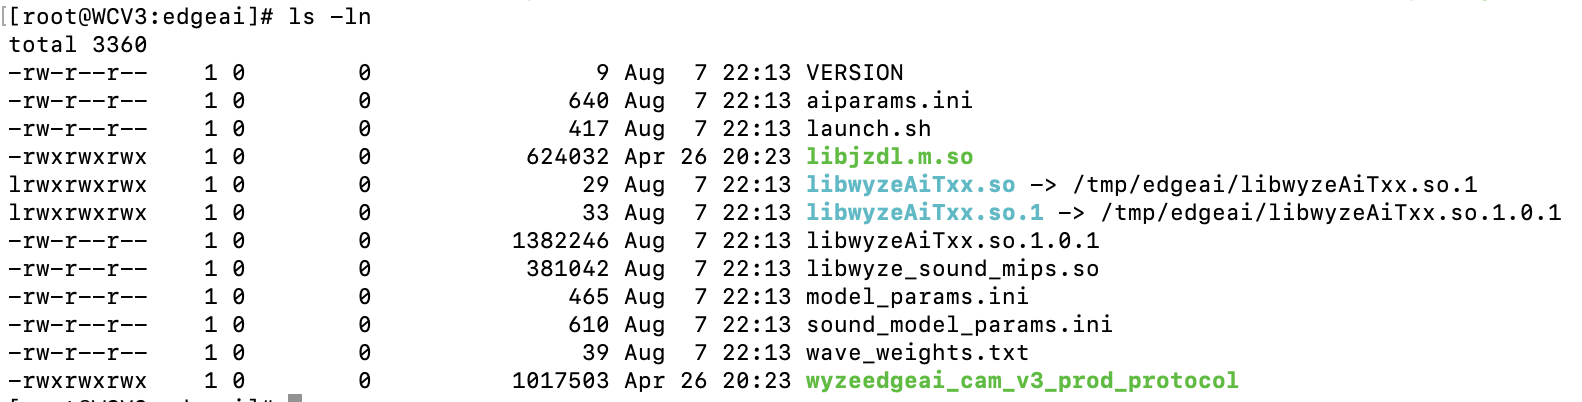
Ten unique files were contained within the edgeai directory, which we extracted and began to analyze.
The first file we inspected – launch.sh – could be viewed in plain text:

launch.sh performs a few key commands:
- Creates a symlink between the expected shared object name and the name of the binary in the edgeai folder.
- Adds the /tmp/edgai folder to PATH.
- Changes the permissions on wyzeedgeai_cam_v3_prod_protocol to be able to execute.
- Runs wyzeedgeai_cam_v3_prod_protocol with the paths to aiparams.ini and model_params.ini passed as the arguments.
Based on these commands, we could tell that wyzeedgeai_cam_v3_prod_protocol was the main binary used for inference, that it relied on libwyzeAiTxx.so.1.0.1 for part of its logic, and that the two .ini files were most likely related to configuration in some way.
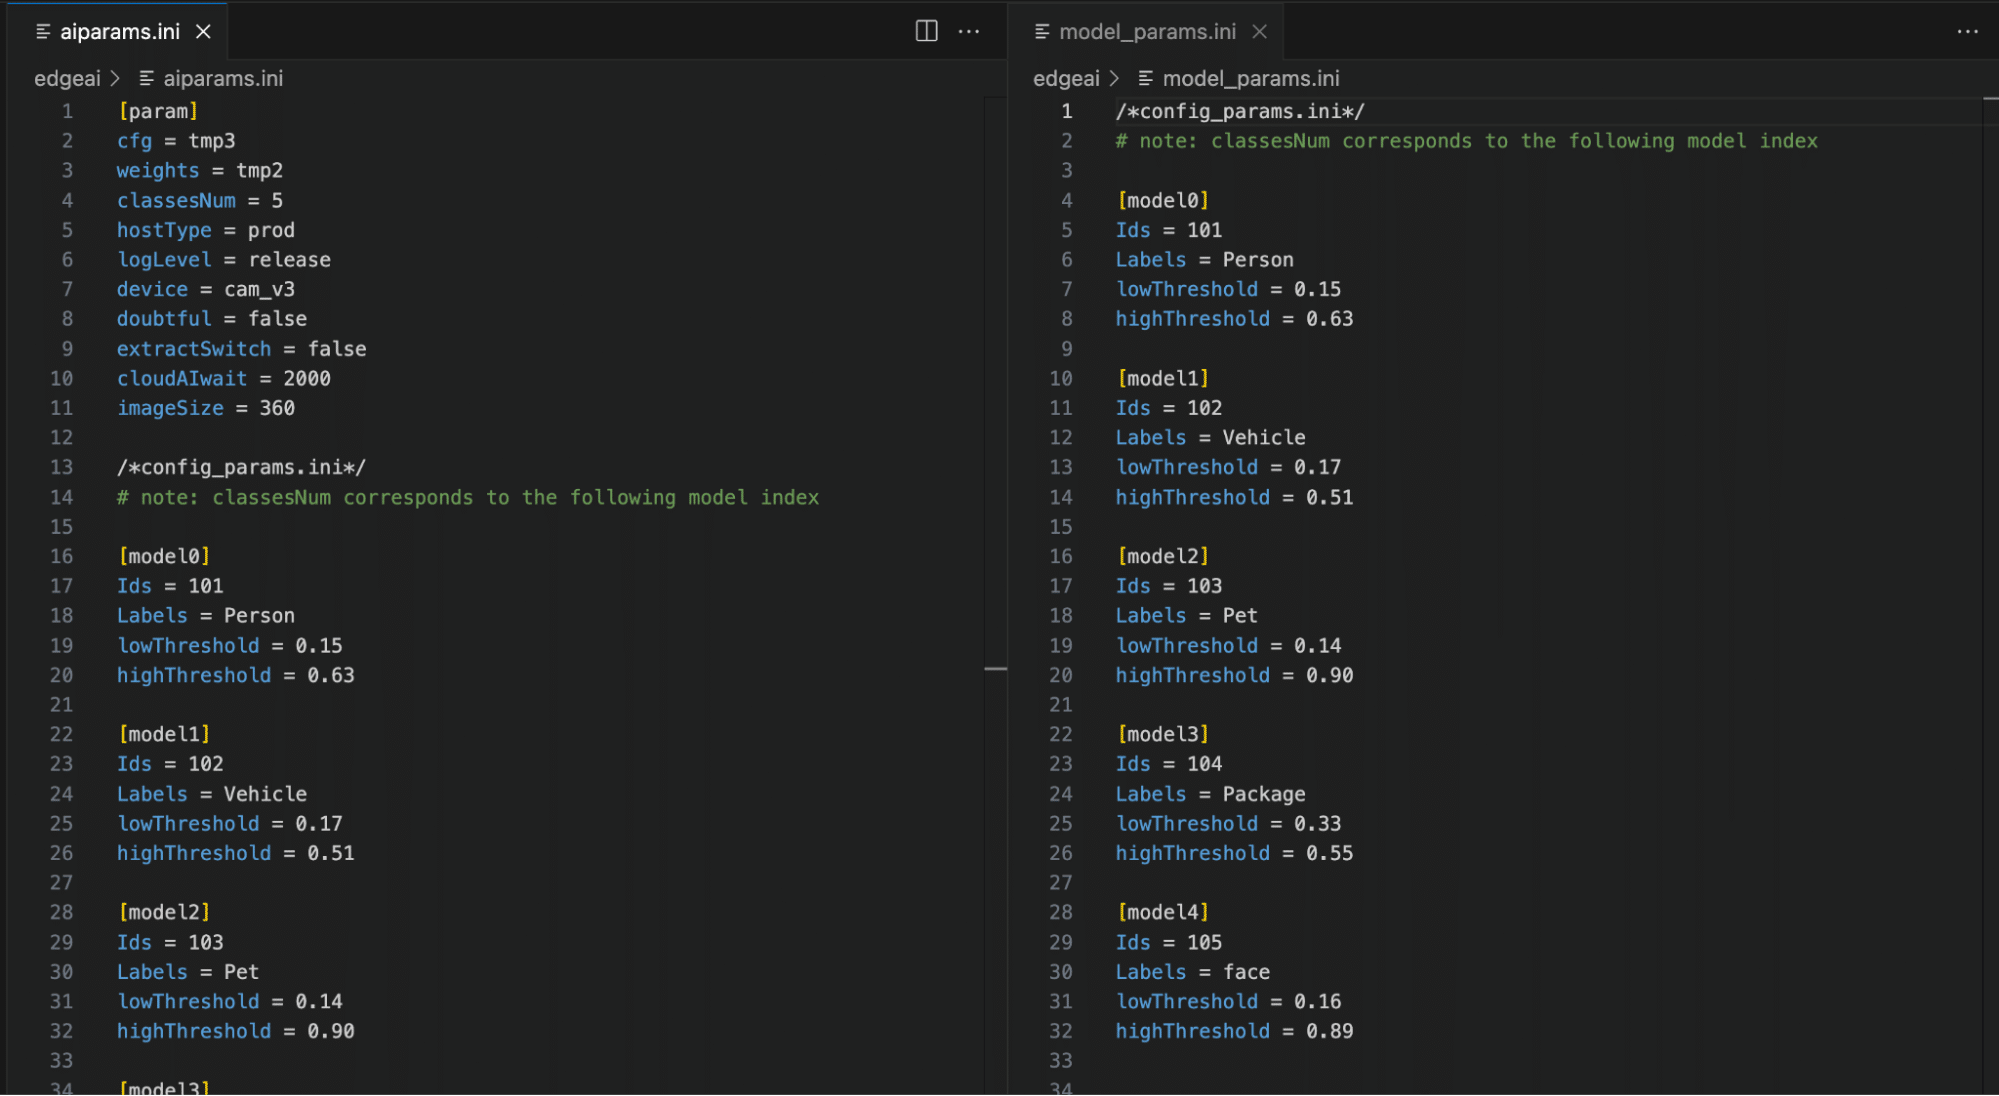
As shown in Figure 4, by inspecting the two .ini files, we can now see relevant model configuration information, the number of classes in the model, and their labels, as well as the upper and lower thresholds for determining a classification. While the information in the .ini files was not yet useful for our current task of rooting the device, we saved it for later, as knowing the detection thresholds would help us in creating adversarial patches further down the line.
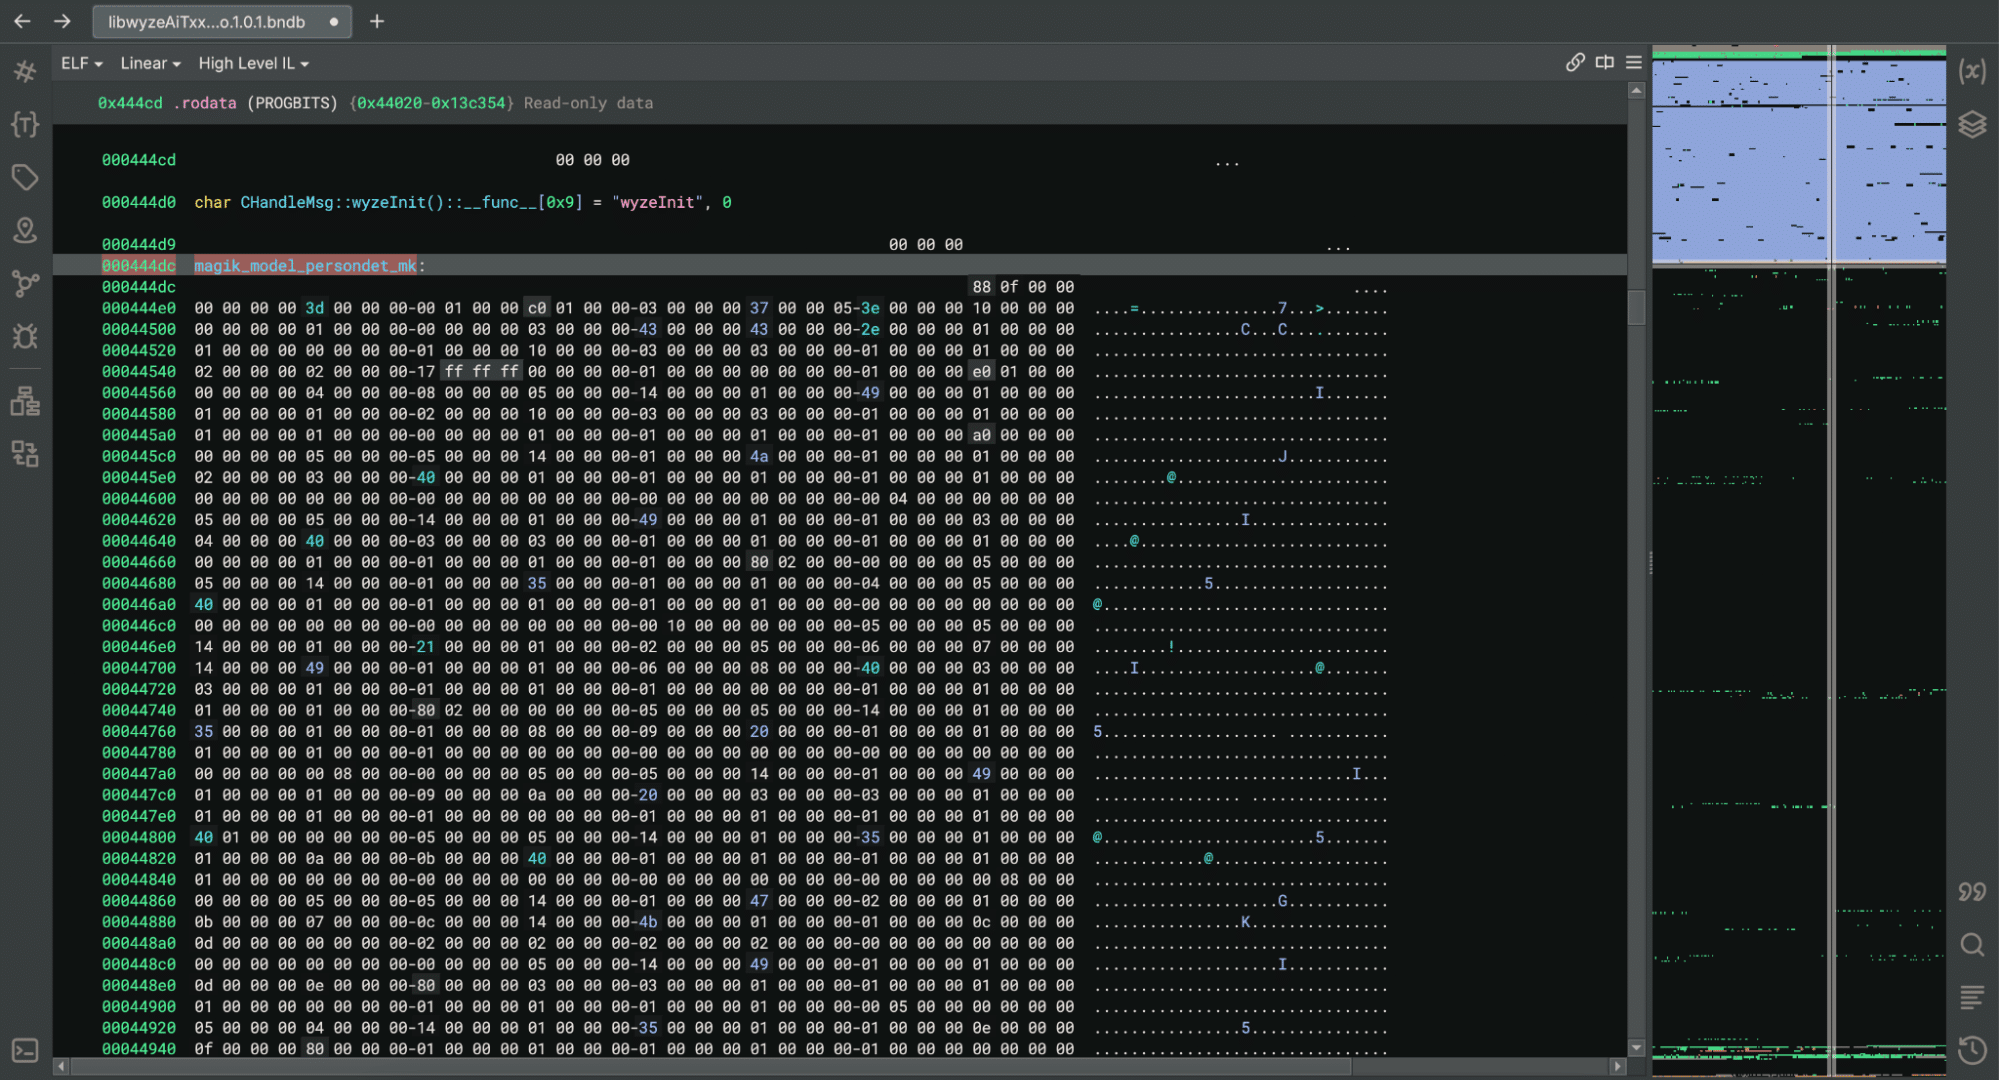
We then started looking through the binaries, and while looking through libwyzeAiTxx.so.1.0.1, we found a large chunk of data that we suspected was the AI model given the name ‘magik_model_persondet_mk’ and the size of the blob – though we had yet to confirm this:
Within the binary, we found references to a library named JZDL, also present in the /tmp/edgeai directory. After a quick search, we found a reference to JZDL in a different device specification which also referenced Edge AI: ‘JZDL is a module in MAGIK, and it is the AI inference firmware package for X2000 with the following features’. Interesting indeed!
At this point, we had two objectives to progress our research: Identify how the /tmp/edgeai directory contents were being downloaded to the device in order to inspect the differences between the V3 Pro and V3 software; and reverse engineering the JZDL module to verify the data named ‘magik_model_persondet_mk’ was indeed an AI model.
Reversing the Cloud Communication
While we now had shell access to the V3 camera, we wanted to ensure that event detection would function in the same way on the V3 Pro camera as the V3 model was not specified as having Edge AI capabilities.
We found that a binary named sinker was responsible for downloading the files within the /tmp/edgeai directory. We also found that we could trigger the download process by deleting the directory’s contents and running the sinker binary.
Armed with this knowledge, we set up tcpdump to sniff network traffic and set the SSLKEYLOGFILE variable to save the client secrets to a local file so that we could decrypt the generated PCAP file.
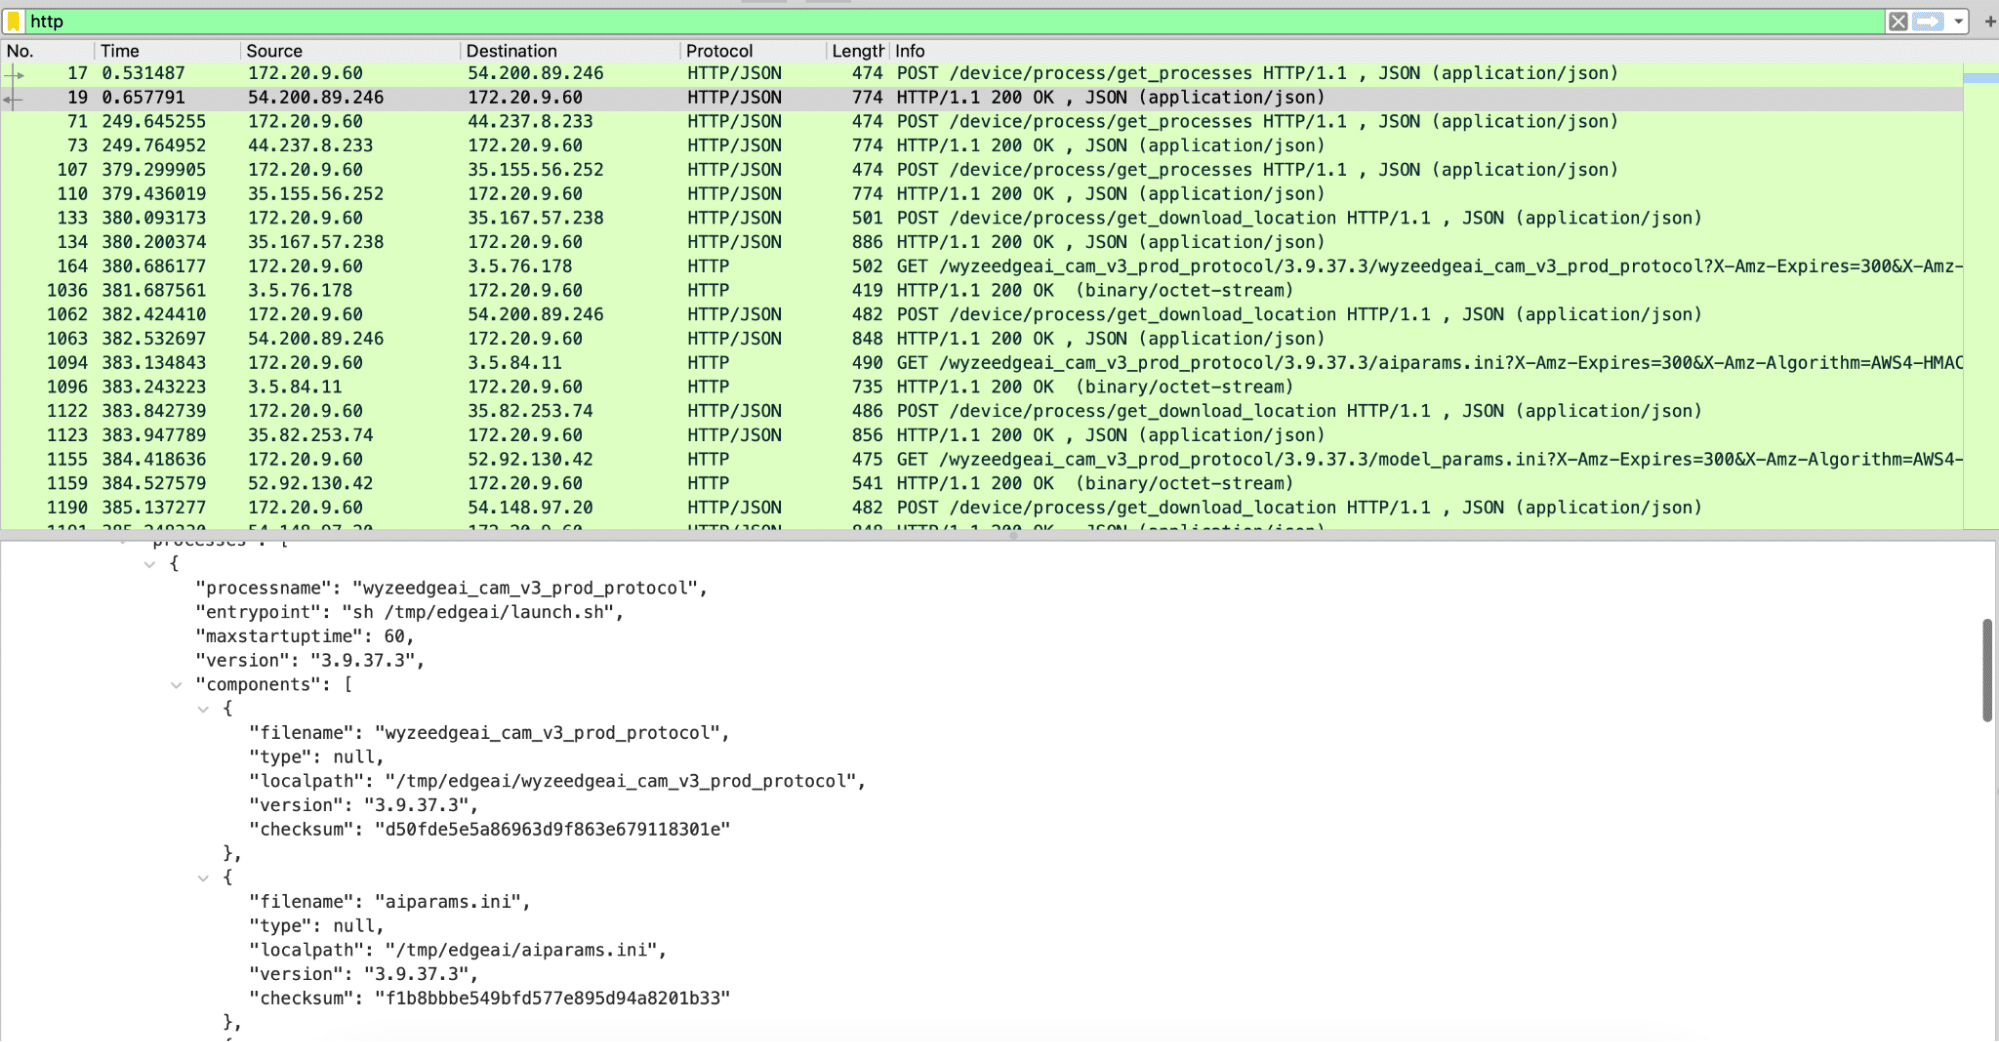
Using Wireshark to analyze the PCAP file, we discovered three different HTTPS requests that were responsible for downloading all the firmware binaries. The first was to /get_processes, which, as seen in Figure 6, returned JSON data with wyzeedgeai_cam_v3_prod_protocol listed as a process, as well as all of the files we had seen inside of /tmp/edgeai. The second request was to /get_download_location, which took both the process name and the filename and returned an automatically generated URL for the third request needed to download a file.
The first request – to /get_processes – took multiple parameters, including the firmware version and the product model, which can be publicly obtained for all Wyze devices. Using this information, we were able to download all of the edgeai files for both the V3 Pro and V3 devices from the manufacturer. While most of the files appeared to be similar to those discovered on the V3 camera, libwyzeAiTxx.so.1.0.1 now referenced a binary named libvenus.so, as opposed to libjzdl.so.
Battle of the inference libraries
We now had two different shared object libraries to dive into. We started with libjzdl.so as we had already done some reverse engineering work on the other binaries in that folder and hoped this would provide insight into libvenus.so. After some VTable reconstruction, we found that the model loading function had an optional parameter that would specify whether to load a model from memory or the filesystem:
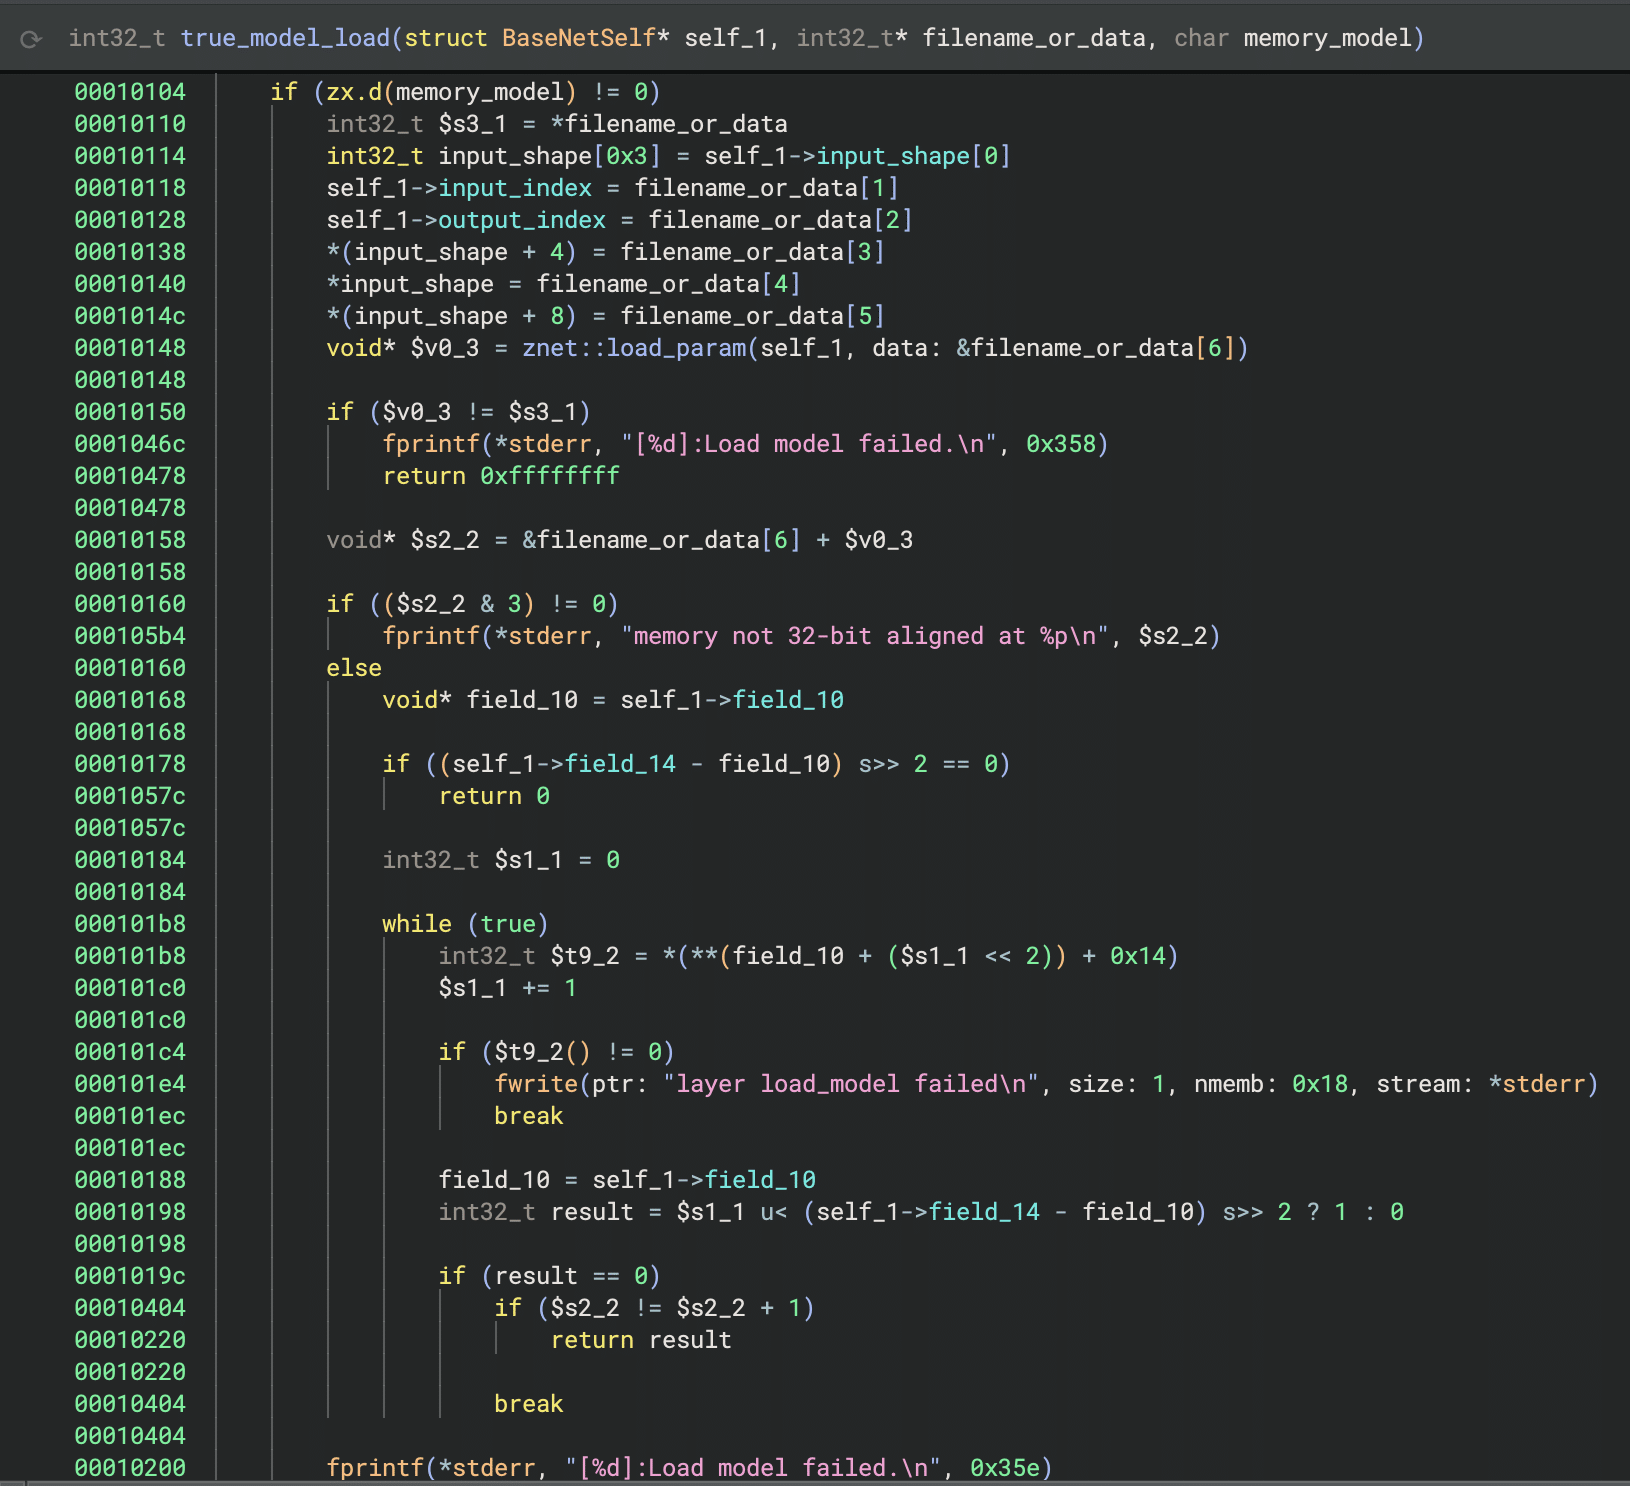
This was different from many models our team had seen in the past, as we had typically seen models being loaded from disk rather than from within an executable binary. However, it confirmed that the large block of data in the binary from Figure 5 was indeed the machine-learning model.
We then started reverse engineering the JDZL library more thoroughly so we could build a parser for the model. We found that the model started with a header that included the magic number and metadata, such as the input index, output index, and the shape of the input. After the header, the model contained all of the layers. We were then able to write a small script to parse this information and begin to understand the model’s architecture:
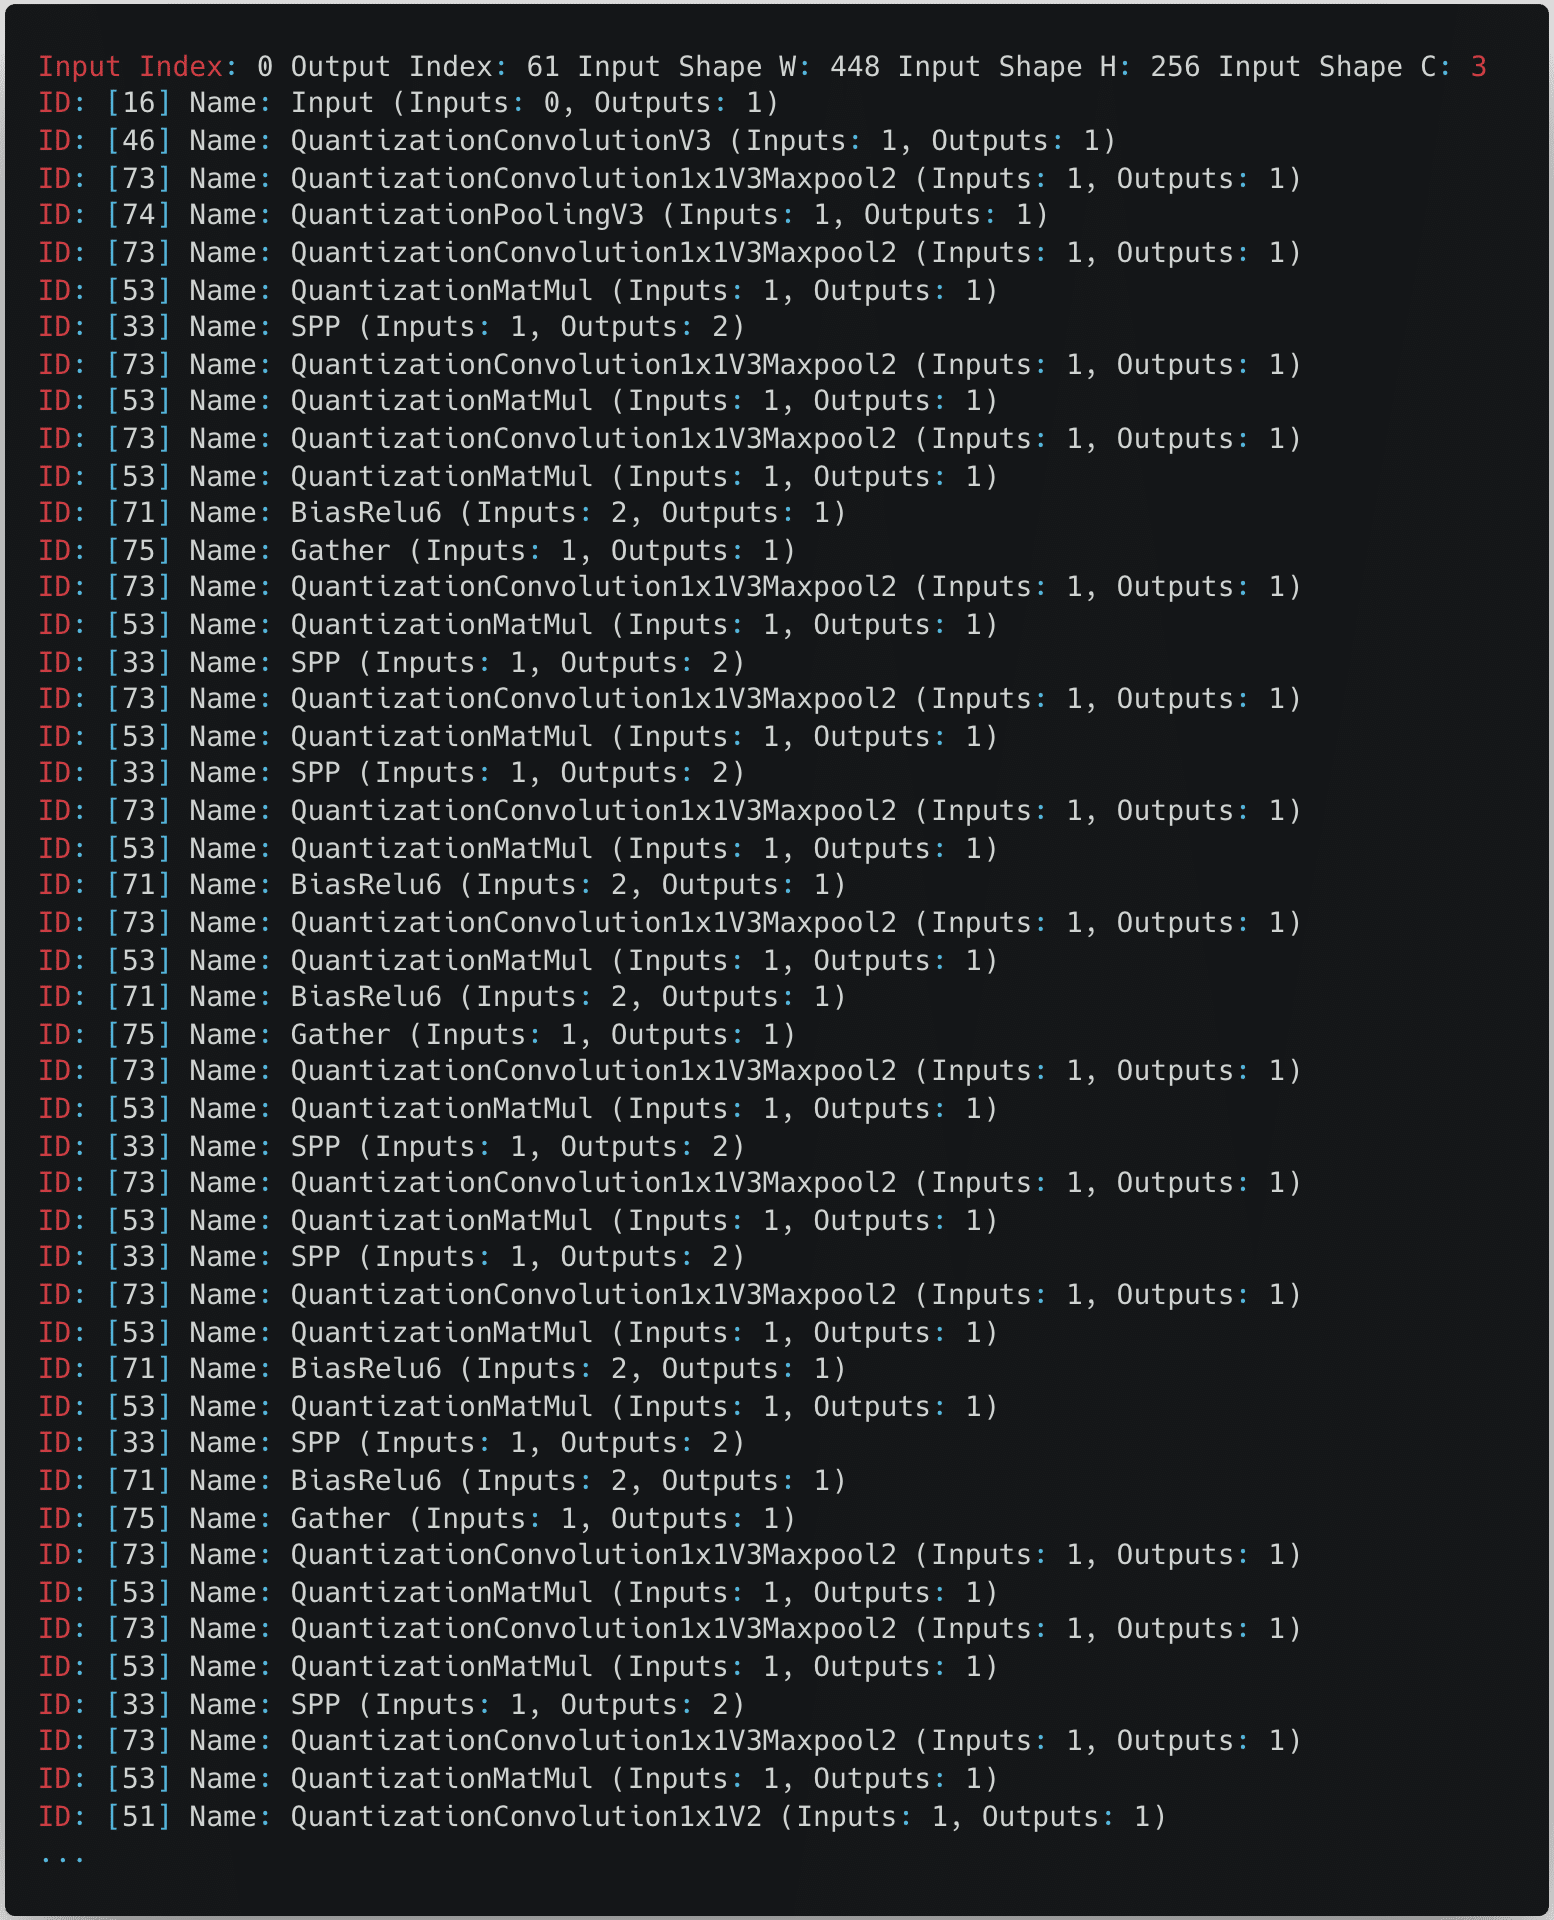
From the snippet in the above figure, we can see that the model expects an input image with a size of 448 by 256 pixels with three color channels.
After some online sleuthing, we found references to both files on GitHub and realized that they were proprietary formats used by the Magik inference kit developed by Ingenic.
namespace jzdl {

class BaseNet {
  public:
    BaseNet();
    virtual ~BaseNet() = 0;
    virtual int load_model(const char *model_file, bool memory_model = false);
    virtual vector<uint32_t> get_input_shape(void) const; /*return input shape: w, h, c*/
    virtual int get_model_input_index(void) const;   /*just for model debug*/
    virtual int get_model_output_index(void) const;  /*just for model debug*/

    virtual int input(const Mat<float> &in, int blob_index = -999);
    virtual int input(const Mat<int8_t> &in, int blob_index = -999);
    virtual int input(const Mat<int32_t> &in, int blob_index = -999);

    virtual int run(Mat<float> &feat, int blob_index = -999);
};

BaseNet *net_create();
void net_destory(BaseNet *net);

} // namespace jzdl
At this point, having realized that JZDL had been superseded by another inference library called Venus, we decided to look into libvenus.so to determine how it differs. Despite having a relatively similar interface for inference, Venus was designed to use Ingenic’s neural network accelerator chip, which greatly boosts runtime performance, and it would appear that libvenus.so implements a new model serialization format with a vastly different set of layers, as we can see below.
namespace magik {
namespace venus {
class VENUS_API BaseNet {
public:
    BaseNet();
    virtual ~BaseNet() = 0;
    virtual int load_model(const char *model_path, bool memory_model = false, int start_off = 0);
    virtual int get_forward_memory_size(size_t &memory_size);
    /*memory must be alloced by nmem_memalign, and should be aligned with 64 bytes*/
    virtual int set_forward_memory(void *memory);
    /*free all memory except for input tensors*/
    virtual int free_forward_memory();
    /*free memory of input tensors*/
    virtual int free_inputs_memory();
    virtual void set_profiler_per_frame(bool status = false);
    virtual std::unique_ptr<Tensor> get_input(int index);
    virtual std::unique_ptr<Tensor> get_input_by_name(std::string &name);
    virtual std::vector<std::string> get_input_names();
    virtual std::unique_ptr<const Tensor> get_output(int index);
    virtual std::unique_ptr<const Tensor> get_output_by_name(std::string &name);
    virtual std::vector<std::string> get_output_names();
    virtual ChannelLayout get_input_layout_by_name(std::string &name);
    virtual int run();
};
}
}
Gaining shell access to the V3 Pro and V4 cameras
Reviewing the logs
After uncovering the differences between the contents of the /tmp/edgeai folder in V3 and V3 Pro, we shifted focus back to the original target of our research, the V3 Pro camera. One of the first things to investigate with our V3 Pro was the camera’s log files. While the logs are intended to assist Wyze’s customer support in troubleshooting issues with a device, they can also provide a wealth of information from a research perspective.
By following the process outlined by Wyze Support, we forced the camera to write encrypted and compressed logs to its SD card, but we didn’t know the encryption type to decrypt them. However, looking deeper into the system binaries, we came across a binary named encrypt, which we suspected may be helpful in figuring out how the logs were encrypted.

We then reversed the ‘encrypt’ binary and found that Wyze uses a hardcoded encryption key, “34t4fsdgdtt54dg2“, with a 0’d out 16 byte IV and AES in CBC mode to encrypt its logs.
Cross-validating with firmware binaries from other cameras, we saw that the key was consistent across the devices we looked at, making them trivial to decrypt. The following script can be used to decrypt and decompress logs into a readable format:
from Crypto.Cipher import AES
import sys, tarfile, gzip, io

# Constants
KEY = b'34t4fsdgdtt54dg2'  # AES key (must be 16, 24, or 32 bytes long)
IV = b'\x00' * 16           # Initialization vector for CBC mode

# Set up the AES cipher object
cipher = AES.new(KEY, AES.MODE_CBC, IV)

# Read the encrypted input file
with open(sys.argv[1], 'rb') as infile:
    encrypted_data = infile.read()

# Decrypt the data
decrypted_data = cipher.decrypt(encrypted_data)

# Remove padding (PKCS7 padding assumed)
padding_len = decrypted_data[-1]
decrypted_data = decrypted_data[:-padding_len]

# Decompress the tar data in memory
tar_stream = io.BytesIO(decrypted_data)
with tarfile.open(fileobj=tar_stream, mode='r') as tar:
    # Extract the first gzip file found in the tar archive
    for member in tar.getmembers():
        if member.isfile() and member.name.endswith('.gz'):
            gz_file = tar.extractfile(member)
            gz_data = gz_file.read()
            break

# Decompress the gzip data in memory
gz_stream = io.BytesIO(gz_data)
with gzip.open(gz_stream, 'rb') as gzfile:
    extracted_data = gzfile.read()

# Write the extracted data to a log file
with open('log', 'wb') as f:
    f.write(extracted_data)
Command injection vulnerability in V3 Pro
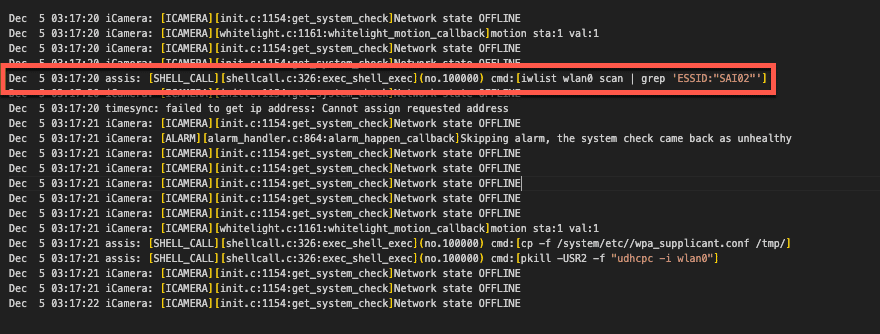
Our initial review of the decrypted logs identified several interesting “SHELL_CALL” entries that detailed commands spawned by the camera. One, in particular, caught our attention, as the command spawned contained a user-specified SSID:
We traced this command back to the /system/lib/libwyzeUtilsPlatform.so library, where the net_service_thread function calls it. The net_service_thread function is ultimately invoked by /system/bin/iCamera during the camera setup process, where its purpose is to initialize the camera’s wireless networking.
Further review of this function revealed that the command spawned through SHELL_CALL was crafted through a format string that used the camera’s SSID without sanitization.
00004604 snprintf(&str, 0x3fb, "iwlist wlan0 scan | grep \'ESSID:\"%s\"\'", 0x18054, var_938, var_934, var_930, err_21, var_928);
00004618 int32_t $v0_6 = exec_shell_sync(&str, &var_918);
We had a strong suspicion that we could gain code execution by passing the camera a specially crafted SSID with a properly escaped command. All that was left now was to test our theory.
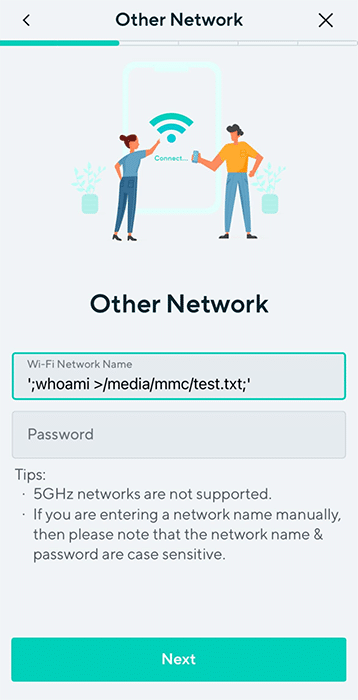
Placing the camera in setup mode, we used the mobile Wyze app to configure an SSID containing a command we wanted to execute, “whoami > /media/mmc/test.txt”, and scanned the QR code with our camera. We then checked the camera’s SD card and found a newly created test.txt file confirming we had command execution as root. Success!
However, Wyze patched this vulnerability in January 2024 before we could report it. Still, since we didn’t update our camera firmware, we could use the vulnerability to root and continue exploring the device.
Getting shell access on the Wyze Cam V3 Pro
Command execution meant progress, but we couldn’t stop there. We ideally needed a remote shell to continue our research effectively, although we had the following limitations:
- The Wyze app only allows you to use SSIDs that are 32 characters or less. You can get around this by manually generating a QR code. However, the camera still has limitations on the length of the SSID.
- The command injection prevents the camera from connecting to a WiFi network.
We circumvented these obstacles by creating a script on the camera’s SD card, which allowed us to spawn additional commands without size constraints. The wpa_supplicant binary, already on the camera’s filesystem, could then be used to set up networking manually and spawn a Dropbear SSH server that we had compiled and placed on the SD card for shell access (more on this later).
#!/bin/sh

#clear old logs
rm /media/mmc/*.txt

#Setup networking
/sbin/ifconfig wlan0 up
/system/bin/wpa_supplicant -D nl80211 -iwlan0 -c /media/mmc/wpa.conf -B
/sbin/udhcpc -i wlan0

#Spawn Droopbear SSH server
chmod +x /media/mmc/dropbear
chmod 600 /media/mmc/dropbear_key
nohup /media/mmc/dropbear -E -F -p 22 -r /media/mmc/dropbear_key 1>/media/mmc/stdout.txt 2>/media/mmc/stderr.txt &
We could now SSH into the device, giving us shell access as root.
Wyze Cam V4: A new challenge
While we were investigating the V3 Pro, Wyze released a new camera (Wyze Cam V4) (in March 2024), and in the spirit of completeness, we decided to give it a poke as well. However, there was a problem: the device was so new that the Wyze support site had no firmware available for download.
This meant we had to look towards other options for obtaining the firmware and opted for the more tactile method of chip-off extraction.
Extracting firmware from the Flash
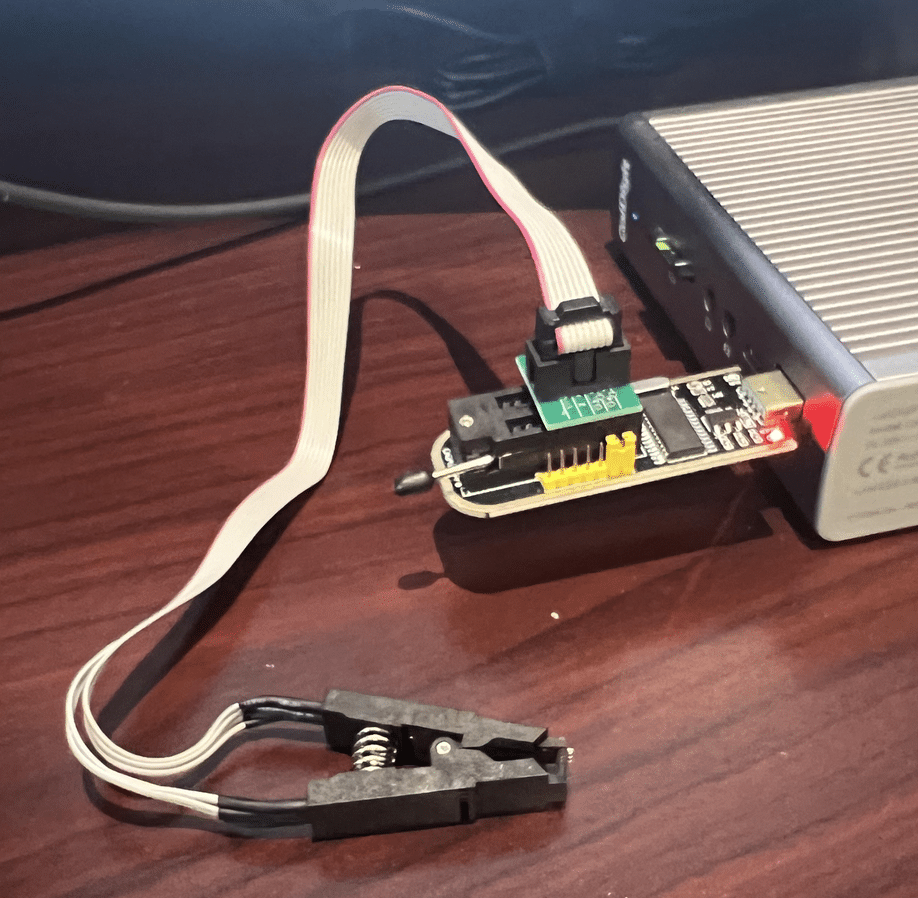
While chip-off extraction can sometimes be complicated, it is relatively straightforward if you have the appropriate clips or test sockets and a compatible chip reader that supports the flash memory you are targeting.
Since we had several V3 Pros and only one Cam V4, we first attempted this process with our more well-stocked companion – the V3 Pro. We carefully disassembled the camera and desoldered the flash memory, which was SPI NAND flash from GIGADEVICE.
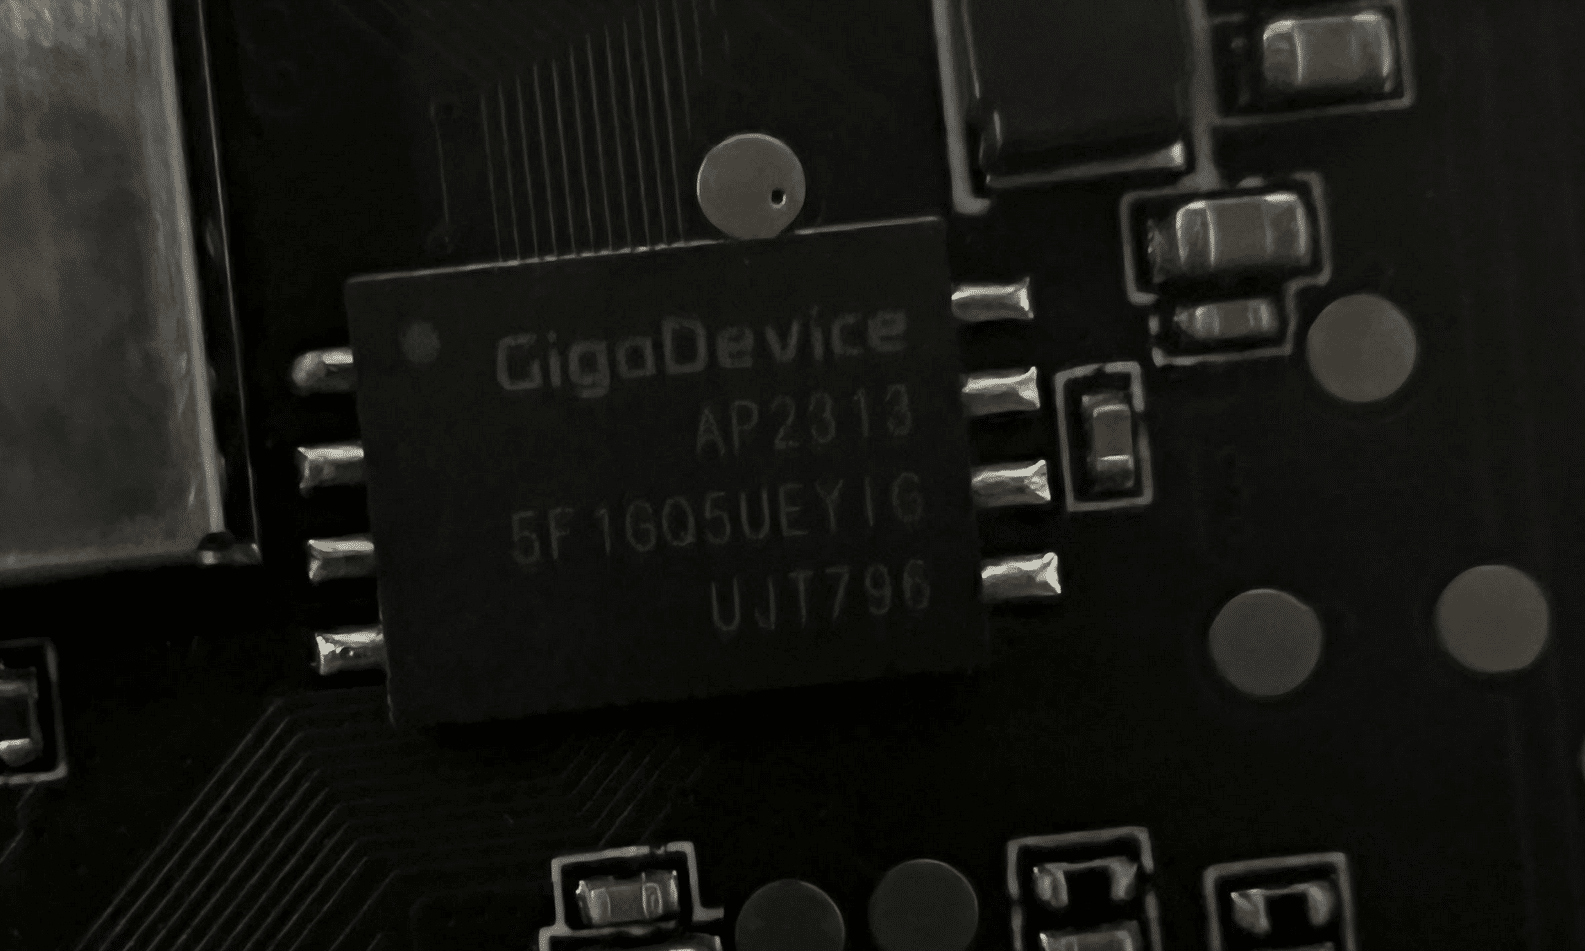
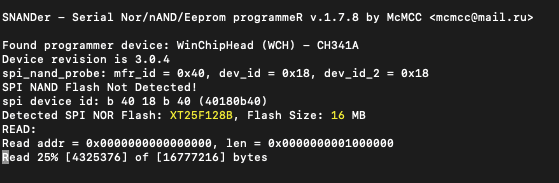
Now, all we needed was a way to read it. We searched GitHub for the chip’s part number (GD5F1GQ5UE) and found a flash memory program called SNANDer that supported it. We then used SNANDer, a CH341A programmer, to extract the firmware.
We repeated the same process with the Cam V4. Unlike the previous camera, this one used SPI NOR Flash from a company called XTX, which was not a problem as, fortunately, SNANDer worked yet again.
Wyze Cam V3 Pro – “algos”
A triage of the firmware we had previously dumped from the Wyze Cam V3 Pro’s flash memory showed that it contained an “algos” partition that wasn’t present in the firmware we downloaded from the support site.
This partition contained several model files:
- facecap_att.bin
- facecap_blur.bin
- facecap_det.bin
- passengerfs_det.bin
- personvehicle_det.bin
- Platedet.bin
However, after further investigation, we concluded that the camera wasn’t actively using these models for detection. We found no references to these models in the binaries we pulled from the camera. In a test to see if these models were necessary, we deleted them from the device, and the camera continued to function normally, confirming that they were not essential to its operation. Additionally, unlike Edge AI, sinker did not attempt to download these models again.
Upgrading the Vulnerability to V4
Now that we had firmware available for the Wyze Cam V4, we began combing through it, looking for possible vulnerabilities. To our astonishment, the “libwyzeUtilsPlatform.so” command injection vulnerability patched in the V3 Pro was reintroduced in the Wyze Cam V4.
Exploiting this vulnerability to gain root access to the V4 was almost identical to the process we used in the V3 Pro. However, the V4 uses Bluetooth instead of a QR code to configure the camera.
We reported this vulnerability to Wyze, which was later patched in firmware version 4.52.7.0367. Our security advisory on CVE-2024-37066 provides a more in-depth analysis of this vulnerability.
Attacking the Inference Process
Some Online Sleuthing
While investigating how best to load the inference libraries on the device, we came across a GitHub repository containing several SDKs for various versions of the JZDL and Venus libraries. The repository is a treasure trove of header files, libraries, models, and even conversion tools to convert models in popular formats such as PyTorch, ONNX, and TensorFlow to the proprietary Ingenic/Magik format. However, to use these libraries, we’d need a bespoke build system.
Buildroot: The Box of Horrors
The first attempt at attacking the inference process relied on trying to compile a simple program to load libvenus.so and perform inference on an image. In the Ingenic Magik toolkit repository, we found a lovely example program written in C++ that used the Venus library to perform inference and generate bounding boxes around detections. Perfect! Now, all we need is a cross-platform build chain to compile it.
Thankfully, it’s simple to configure a build system using Buildroot, an open-source tool designed for compiling custom embedded Linux systems. We opted to use Buildroot version 2022.05, and used the following configuration for compilation based on the wz_mini_hacks documentation:
| Option | Value |
|---|---|
| Target architecture | MIPS (little endian) |
| Target binary format | ELF |
| Target architecture variant | Generic MIPS32R2 |
| FP Mode | 64 |
| C library | uClibc-ng |
| Custom kernel headers series | 3.10.x |
| Binutils version | 2.36.1 |
| GCC compiler version | gcc 9.x |
| Enable C++ Support | Yes |
With Buildroot configured, we could then start compiling helpful system binaries, such as strace, gdb, tcpdump, micropython, and dropbear, which all proved to be invaluable when it came to hacking the device in general.
After compiling the various system binaries prepackaged with Buildroot, we compiled our Venus inference sources and linked them with the various Wyze libraries. We first needed to set up a new external project for Buildroot and add our own custom CMakeLists.txt makefile:
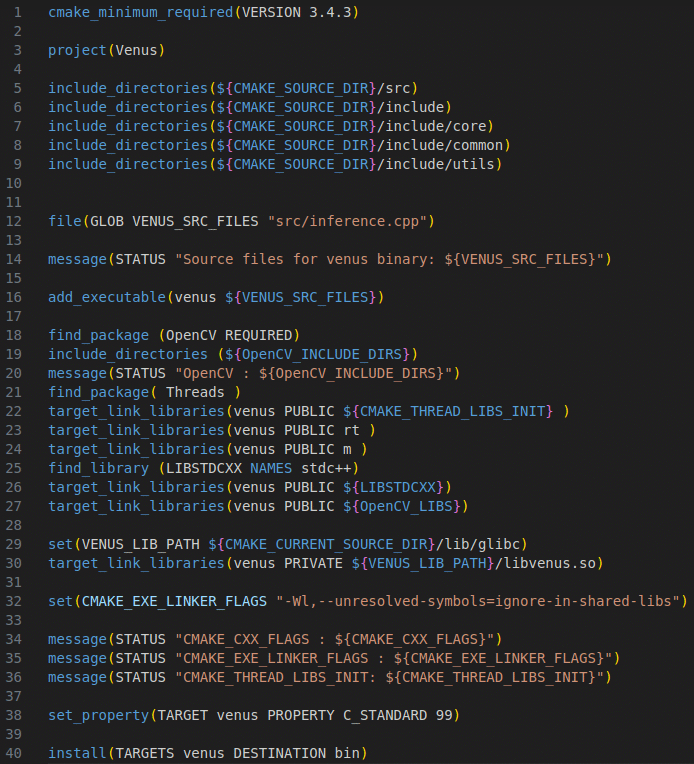
After configuring the project, specifying the include and sources directories, and defining the target link libraries, we were able to compile the program using “make venus” via Buildroot.
At this point, we were hoping to emulate the Venus inference program using QEMU, a processor and full-system emulator, which ultimately proved to be futile. As we discovered through online sleuthing, the libvenus.so library relies on a neural network accelerator chip (/dev/soc-nna), which cannot currently be emulated, so our only option was to run the binary on-device. After a bit of fiddling, we managed to configure a chroot on the camera that contained a /lib directory with symlinks for all the required libraries. We had to take this route as /lib on the camera is mounted read-only), and after supplying images to the process for inference, it became apparent that although the program was fundamentally working (i.e., it ran and gave some results), the detections were not reliable. The bounding boxes were not being drawn correctly, and so It was back to the drawing board. Despite this minor setback, we started to consider other options for performing inference on-device that may be more reliable and easier to debug.
Local Interactions
Through analysis of the iCamera and wyzeedgeai_cam_v3_pro_prod_protocol binaries, along with their associated logs, we gained insights into how iCamera interfaces with Edge AI. These two processes communicate via JSON messages over a Unix domain socket (/tmp/ai_protocol_UDS). These messages are used to initialize the Edge AI service, trigger detection events, and report results about images processed by Edge AI.
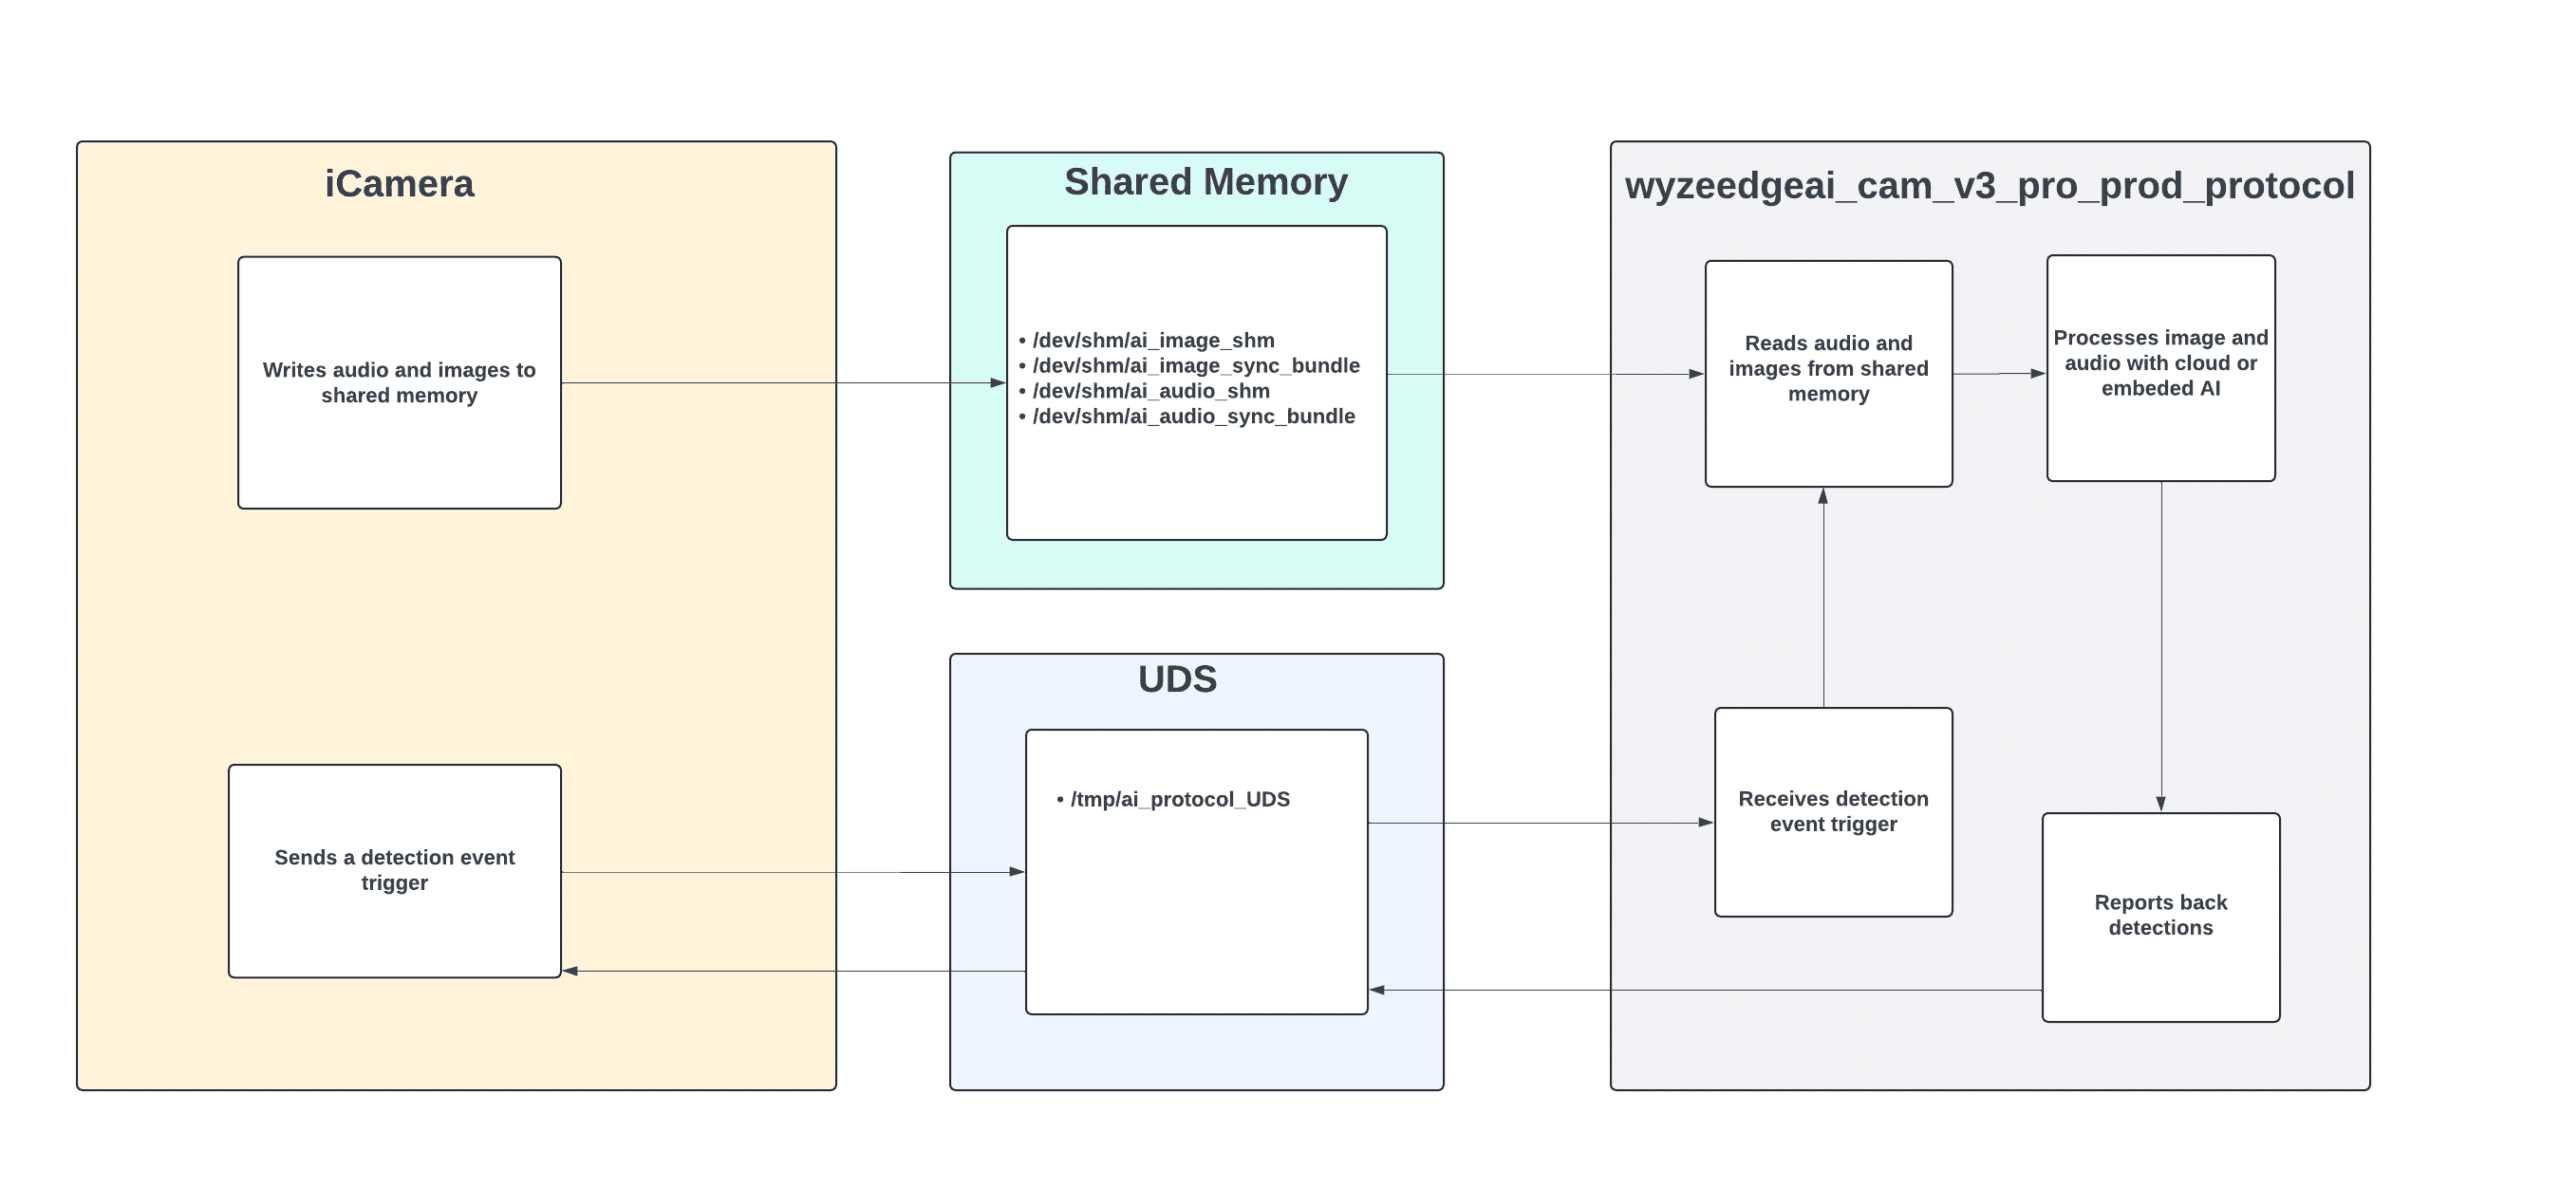
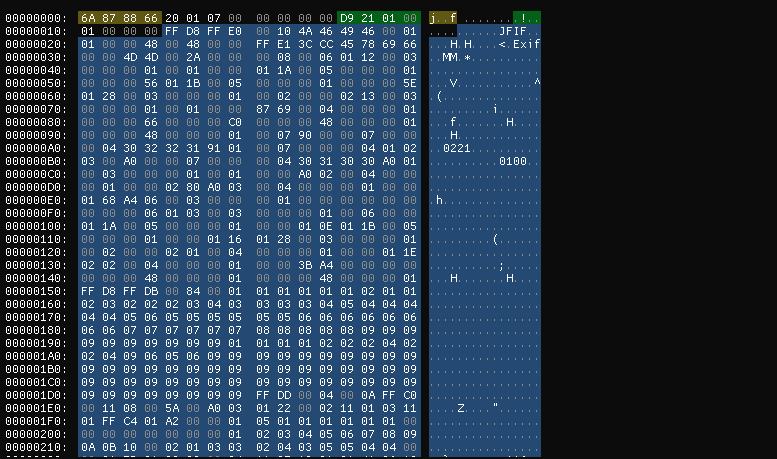
The shared memory at /dev/shm/ai_image_shm facilitates the transfer of images from the iCamera process to wyzeedgeai_cam_v3_pro_prod_protocol for processing. Each image is preceded by a 20-byte header that includes a timestamp and the image size before being copied to the shared memory.
To gain deeper insights into the communications over the Unix domain socket, we used Socat to intercept the interactions between the two processes. This involved modifying the wyzeedgeai_cam_v3_pro_prod_protocol to communicate with a new domain socket (ai_protocol_UD2). We then used Socat to bridge both sockets, enabling us to capture and analyze the exchanged messages.
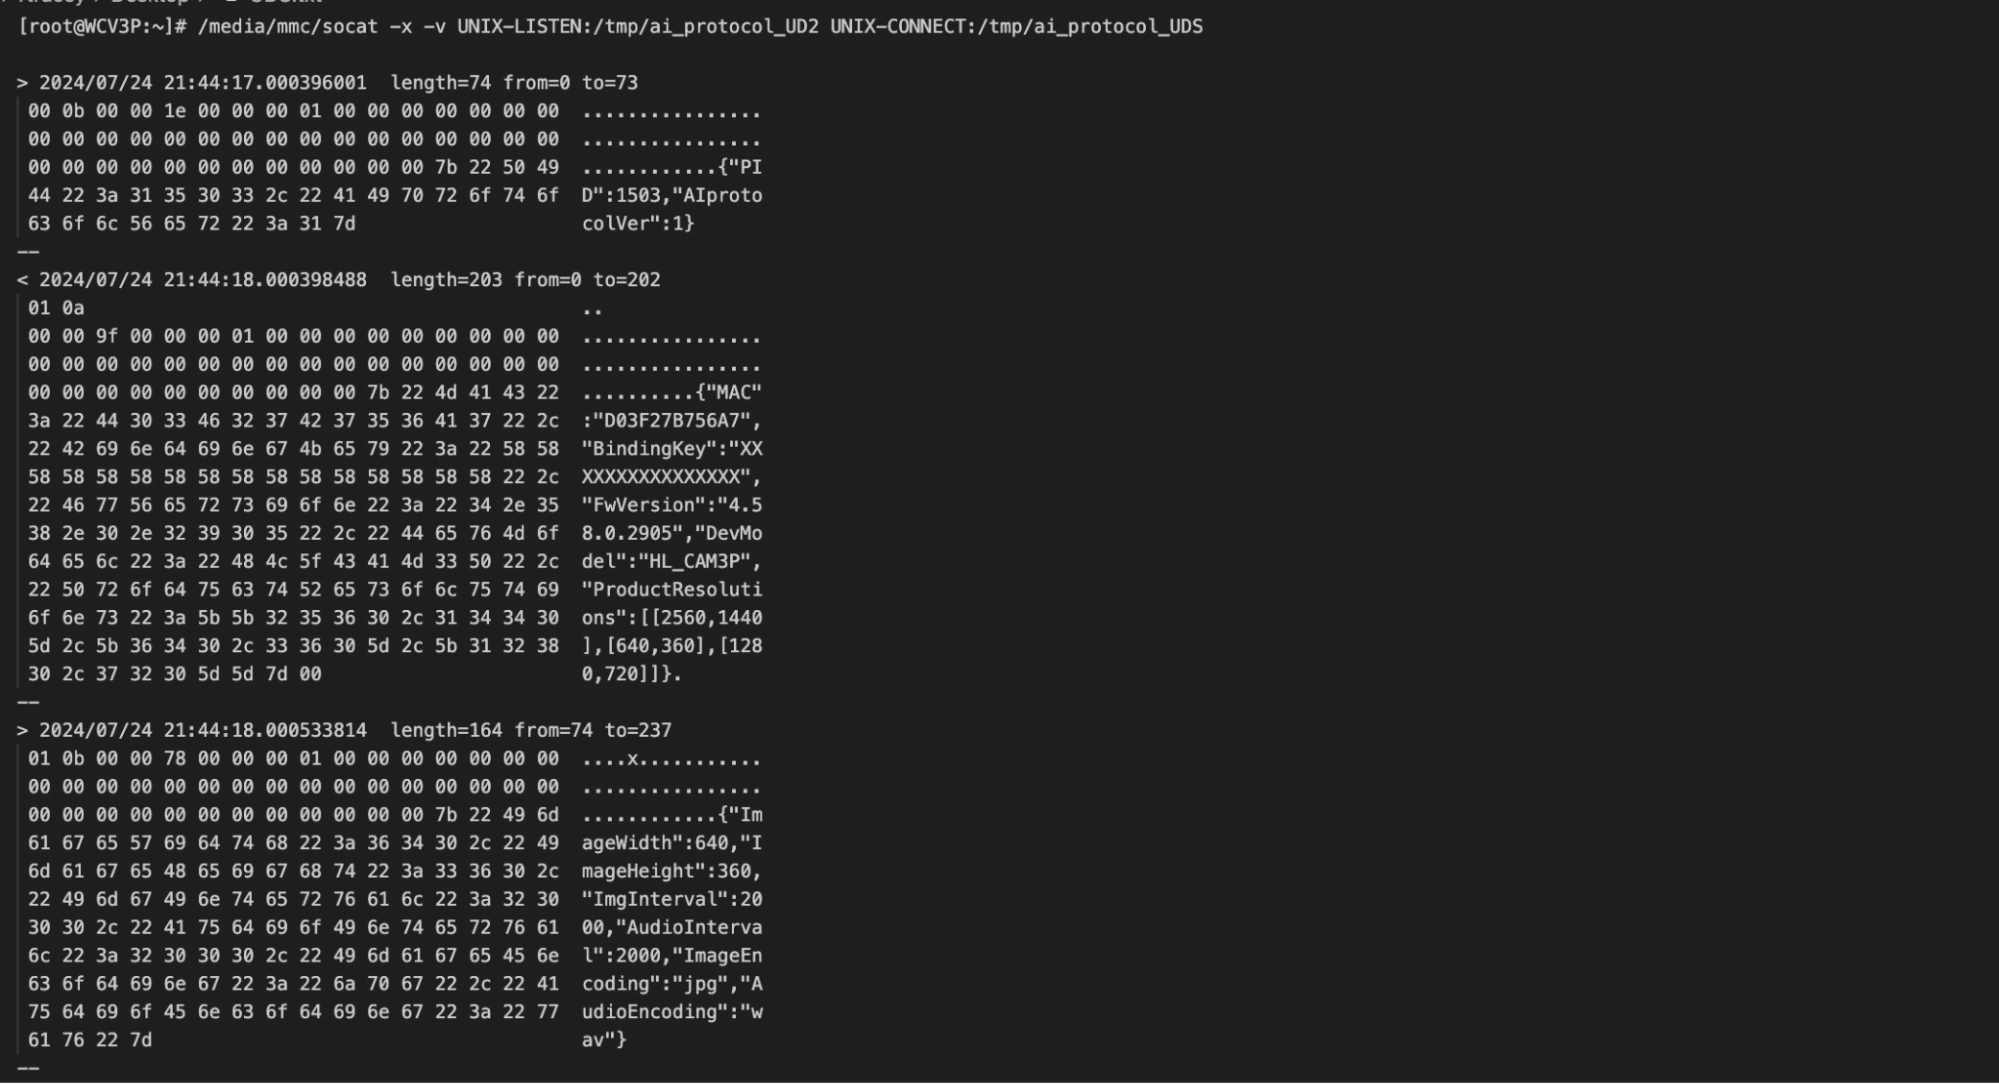
The communication over the Unix domain socket unfolds as follows:
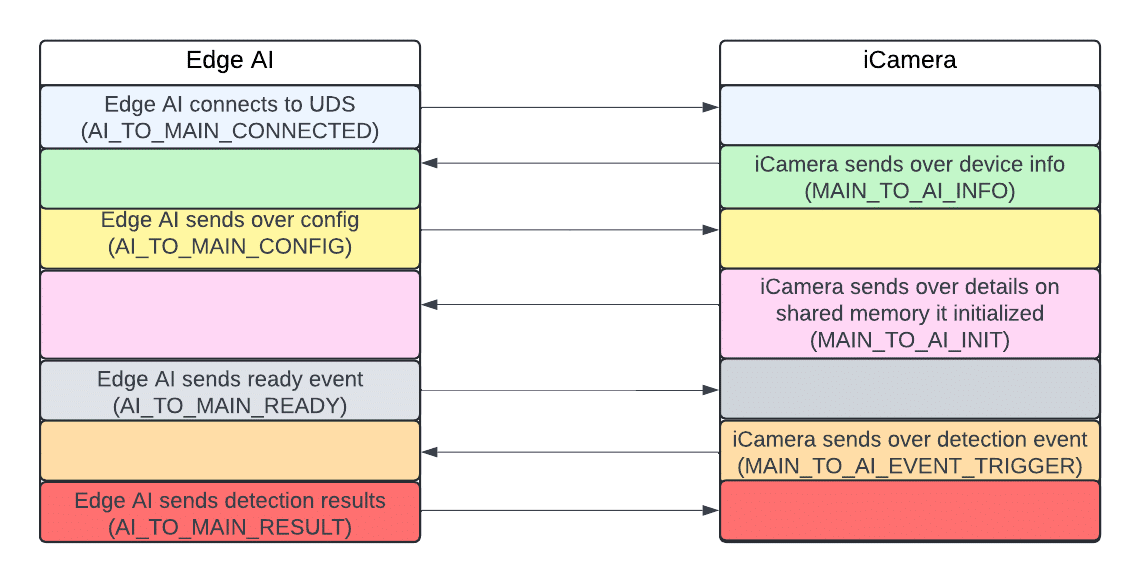
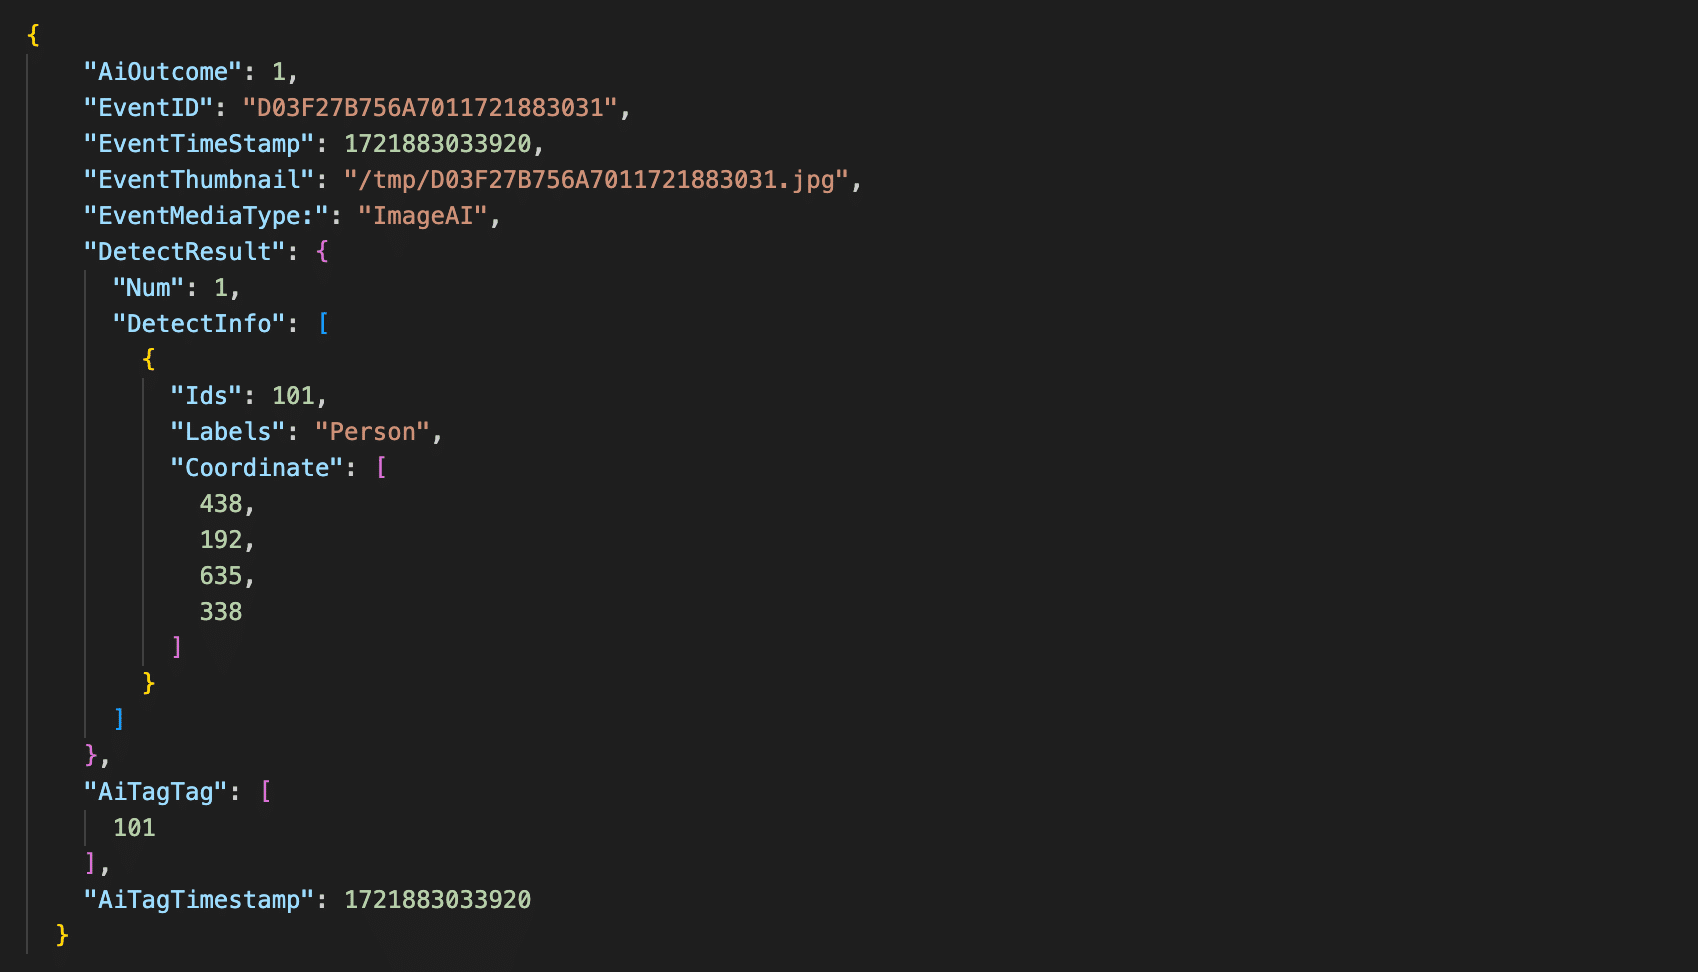
The AI_TO_MAIN_RESULT message Edge AI sends to iCamera after processing an image includes IDs, labels, and bounding box coordinates. However, a crucial piece of information was missing: it did not contain any confidence values for the detections.
Fortunately, the wyzeedgeai_cam_v3_pro_prod_protocol provides a wealth of helpful information to stdout. After modifying the binary to enable debug logging, we could now capture confidence scores and all the details we needed.
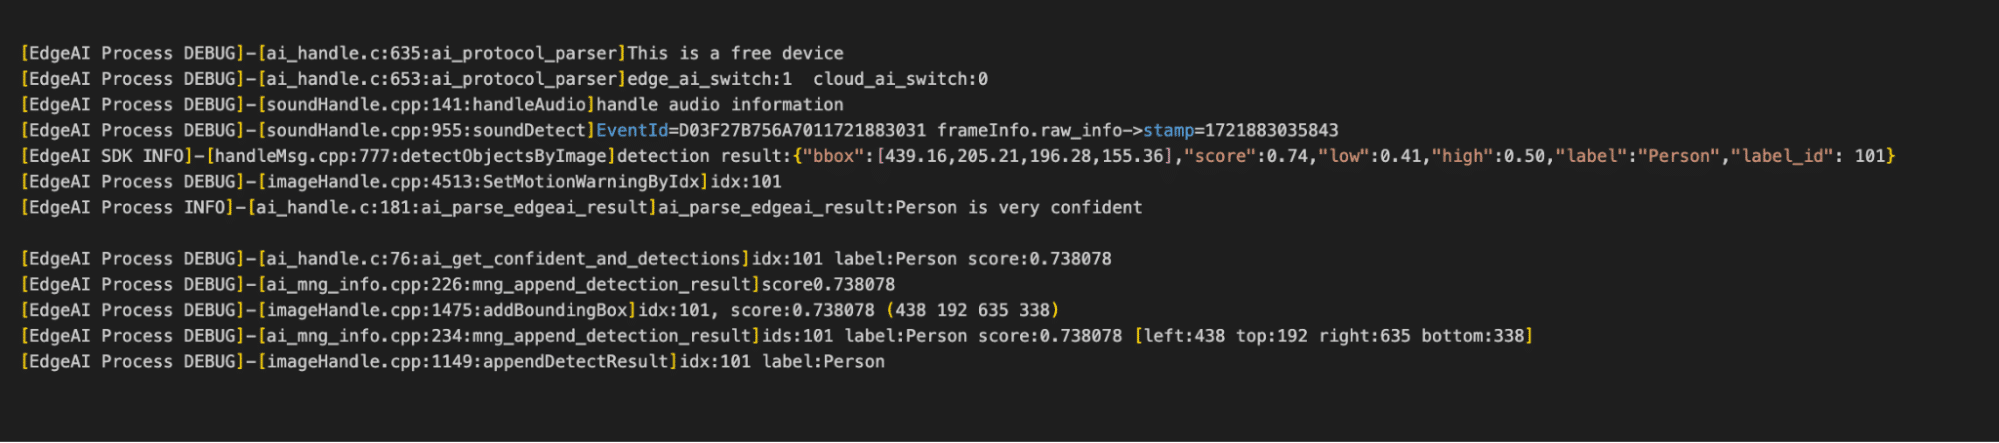
As seen in figure 21, the camera doesn’t just log the confidence scores, it also logs the bounding boxes which are in the X, Y, width, and height.
Hooking into the Process
After understanding the communications between iCamera and wyzeedgeai_cam_v3_pro_prod_protocol, our next step was to hook into this process to perform inference on arbitrary images.
We deployed a shell script on the camera to spawn several Socat listeners to facilitate this process:
- Port 4444: Exposed the Unix domain socket over TCP.
- Port 4445: Allowed us to write images to shared memory remotely.
- Port 4446: Enabled remote retrieval of Edge AI logs.
- Port 4447: Provided the ability to restart Edge AI process remotely.
Additionally, we modified the wyzeedgeai_cam_v3_pro_prod_protocol binary to communicate with the domain socket we used for memory sniffing (ai_protocol_UD2) and configured it to use shared memory with a different prefix. This ensured that iCamera couldn’t interfere with our inference process.
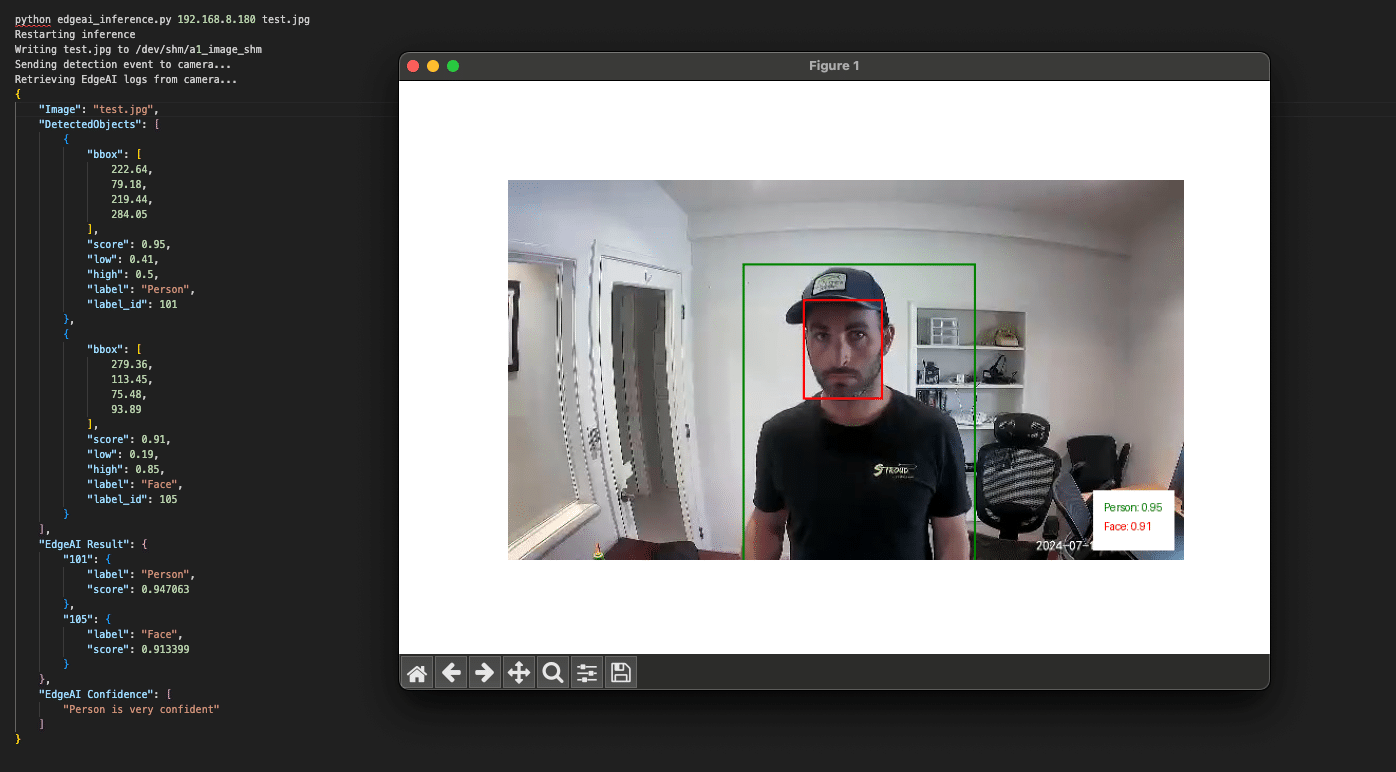
We then developed a Python script to remotely interact with our Socat listeners and perform inference on arbitrary images. The script parsed the detection results and overlaid labels, bounding boxes, and confidence scores onto the photos, allowing us to visualize what the camera detected.
We now had everything we needed to begin conducting adversarial attacks.
Exploring Edge AI detections
Detection boundaries
With the ability to run inference on arbitrary images, we began testing the camera’s detection boundaries.
The local Edge AI model has been trained to detect and classify five classes, as defined in the aiparams.ini and aiparams.ini files. These classes include:
- ID: 101 – Person
- ID: 102 – Vehicle
- ID: 103 – Pet
- ID: 104 – Package
- ID: 105 – Face
Our primary focus was on the Person class, which served as the foundation for the local person detection filter we aimed to target. We started by masking different sections of the image to determine if a face alone could trigger a person’s detection. Our tests confirmed that a face by itself was insufficient to trigger detection.
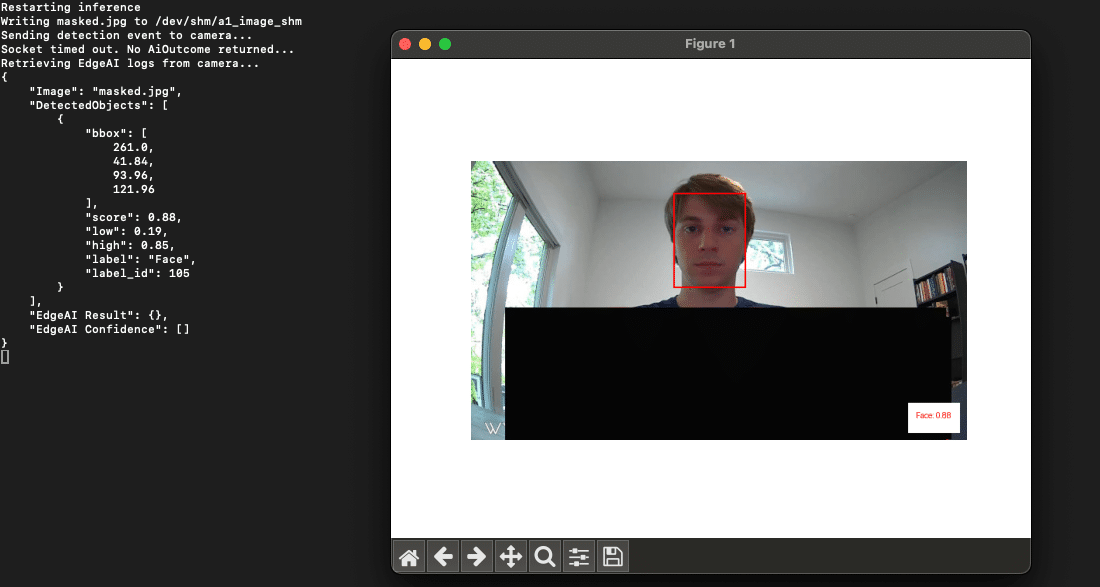
This approach also provided us with valuable insights into the detection thresholds. We found that when a camera detects a ‘Person’ it will only surface an alert to the end user if the confidence score is above 0.5.
Model parameters
The upper and lower confidence thresholds for the Person class, along with other supported classes, are configured in the two Edge AI .ini files we mentioned earlier:
- aiparams.ini
- model_params.ini.
With root access to the device, our next step was to test changes to the settings within these INI files. We successfully adjusted the confidence thresholds to suppress detections and even remapped the labels, making a person appear as a package.
Overlapping objects from different classes
Next, we wanted to explore how overlapping objects from different classes might impact detections.
We began by digitally overlapping images from other classes onto photos containing a person. We then ran these modified images through our inference script. This allowed us to identify source images and positions that had a high impact on the confidence scores of the Person class. After narrowing it down to a few effective source images, we printed and tested them again. This was done by holding them up to see if they had the same effect in the physical world.
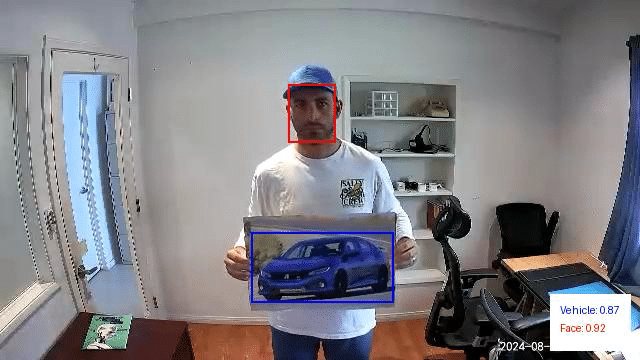
In the above example, we are holding a picture of a car taped to a poster board. This resulted in no detections for the Person class and a classification for the vehicle class with a confidence score of 0.87.
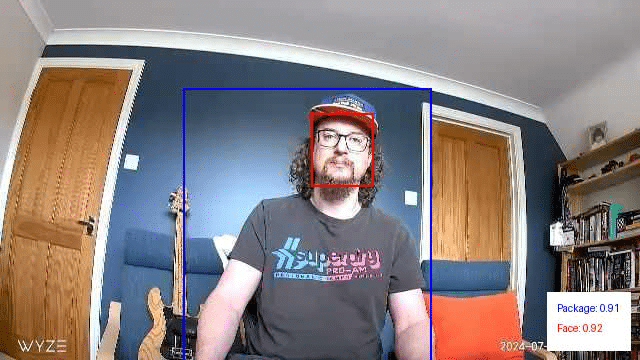
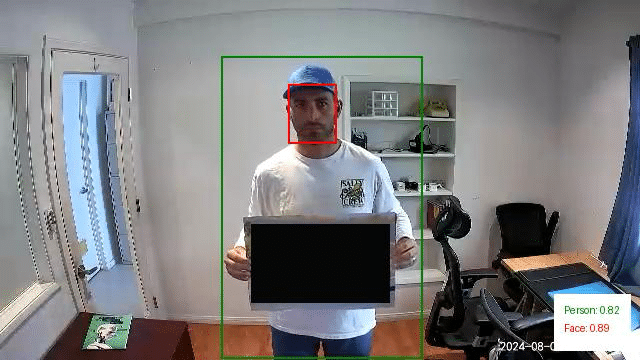
Next, we digitally modified this image to mask out the vehicle and reran it through our inference script. This resulted in a person detection with a confidence score of 0.82:
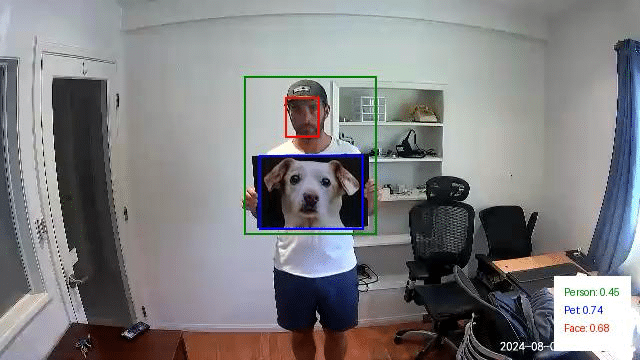
We repeated this experiment using a picture of a dog. In this instance, there was a person detection with a confidence score of 0.45. However, since this falls below the 0.50 threshold we discussed earlier, it would not have triggered an alert. Additionally, the image also yielded a detection for the Pet class with a higher confidence score of 0.74.
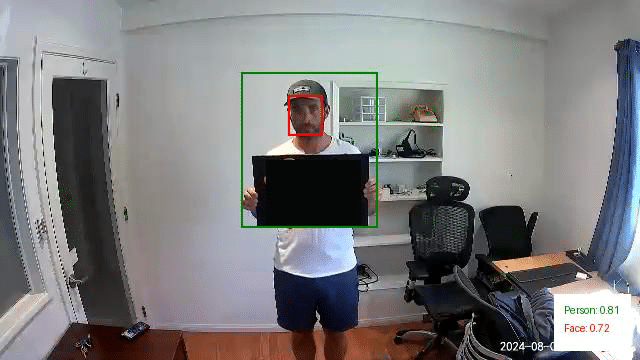
Just as we did with the first set of images, we then modified this last test image to mask out the dog photo we printed. This resulted in a Person detection with a confidence of 0.81:
Through this exercise, it became evident that overlapping objects from different classes can significantly influence the detection of people in images. Specifically, the presence of these overlapping objects often led to reduced confidence scores for Person detections or even misclassifications.
However, while these findings are intriguing, the physical patches we tested in their current state aren’t viable for realistic attack scenarios. Their effectiveness was inconsistent and highly dependent on factors like the distance from the camera and the angle at which the patch was held. Even slight variations in positioning could alter the detection outcomes, making these patches too temperamental for practical use in an attack.
Conclusions so far…
Our research into the Edge AI on the Wyze cameras gave us insight into the feasibility of different methods of evading detection when facing a smart camera. However, while we were excited to have been able to evade the watchful AI (giving us hope if Skynet ever was to take over), we found the journey to be even more rewarding than the destination. This process had yielded some unexpected results, leading to a new CVE in Wyze, an investigation of a model format that we had not previously been aware of, and getting our hands dirty with chip-off extraction.
We’ve documented this process in such detail to provide a blueprint for others to follow in attacking AI-enabled edge devices and show that the process can be quite fun and rewarding in a number of different ways, from attacking the software to the hardware and everything in between.
Edge AI is hard to do securely. The ability to balance the computational power needed to perform inference on live videos while also having a model that can consistently detect all of the objects in an image while running on an embedded device is a tough challenge. However, attacks that may work perfectly in a digital realm may not be physically realizable – which the second part of this blog will explore in more detail. As always, attackers need to innovate to bypass the ever-improving models and find ways to apply these attacks in real life.
Finally, we hope that you join us once again in the second part of this blog, which will explore different methods for taking digital attacks, such as adversarial examples, and transferring them to the physical domain so that we don’t need to approach a camera while wearing a cardboard box.


Stay Ahead of AI Security Risks
Get research-driven insights, emerging threat analysis, and practical guidance on securing AI systems—delivered to your inbox.